OPEN EXAM Activity 什么是Activity
每一个窗口/界面就是一个Activity。
Activity能为用户提供可视化界面。
程序通常由多个Activity组成。
Activity有自己的生命周期,由Android系统控制。
声明并创建一个Activity AndroidManifest.xml
主要结构
manifest-application-activity
1 2 3 4 5 6 7 8 9 10 <manifest ... > <application ... > <activity android:name =".MainActivity" ... </activity > </application > </manifest >
例如
1 2 3 4 5 6 7 8 9 10 11 12 13 14 15 16 17 18 <manifest xmlns:android ="http://schemas.android.com/apk/res/android" package ="com.example.openexampreview" > <application android:icon ="@mipmap/ic_launcher" android:label ="@string/app_name" android:theme ="@style/Theme.OpenExamPreview" > <activity android:name =".MainActivity" android:exported ="true" > <intent-filter > <action android:name ="android.intent.action.MAIN" /> <category android:name ="android.intent.category.LAUNCHER" /> </intent-filter > </activity > </application > </manifest >
MainActivity.java
1
2
3
4
5
6
7
8
9
10
11
12
package com.example.openexampreview;import androidx.appcompat.app.AppCompatActivity;import android.os.Bundle;public class MainActivity extends AppCompatActivity { @Override protected void onCreate (Bundle savedInstanceState) { super .onCreate(savedInstanceState); } }
Activity的启动 显式启动 1 2 Intent intent = new Intent (主调Activity.this , 被调Activity.class);startActivity(intent);
隐式启动 启动本程序内的Activity AndroidManifest.xml
1 2 3 4 5 6 7 8 <activity android:name =".被调Activity" android:exported ="false" > <intent-filter > <action android:name ="com.example.openexampreview.ACTION_START" /> <category android:name ="android.intent.category.DEFAULT" /> </intent-filter > </activity >
主调Activity
1 2 Intent intent = new Intent ("com.example.openexampreview.ACTION_START" );startActivity(intent);
启动其他程序的Activity 拨打电话
1 2 3 Uri uri = Uri.parse("tel:10086" );Intent intent = new Intent (Intent.ACTION_DIAL, uri);startActivity(intent);
发送短信
1 2 3 4 Uri uri = Uri.parse("smsto:10086" );Intent intent = new Intent (Intent.ACTION_SENDTO, uri);intent.putExtra("sms_body" , "CXLL" ); startActivity(intent);
打开浏览器
1 2 3 Uri uri = Uri.parse("https://xuwp.top" );Intent intent = new Intent (Intent.ACTION_VIEW, uri);startActivity(intent);
发送电子邮件
1 2 3 Uri uri = Uri.parse("mailto:xwp@cumt.edu.cn" );Intent intent = new Intent (Intent.ACTION_SENDTO, uri);startActivity(intent);
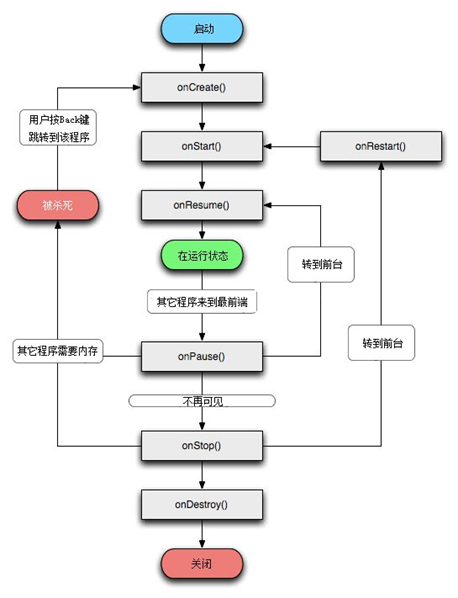
Activity的生命周期
Activity间数据传递 主调向被调传递数据 传单个键值对 主调Activity
1 2 3 4 5 6 Intent intent = new Intent (主调Activity.this , 被调Activity.class);intent.putExtra("extra_data" , "Hello, BranchActivity1!" ); startActivity(intent);
被调Activity
1 2 Intent intent = getIntent();String data = intent.getStringExtra("extra_data" );
传多个键值对 往bundle中塞入键值对,然后传递一个bundle。
主调Activity
1 2 3 4 5 6 7 8 9 Intent intent_send = new Intent (被调Activity可响应的action);Bundle bundle = new Bundle ();bundle.putInt("score" , 100 ); bundle.putString("wish" , "求考好" ); intent_send.putExtras(bundle); startActivity(intent_send);
被调Activity
1 2 3 4 Intent intent_revive = getIntent();Bundle bundle = intent_revive.getExtras();int score = bundle.getInt("score" );String wish = bundle.getString("wish" );
被调向主调传递数据 在主调Activity中使用startActivityForResult(Intent intent, int requestCode),并重写onActivityResult(int requestCode, int resultCode, Intent data)
在被调Activity中使用setResult(int resultCode, Intent data)
以传单个键值对为例
主调Activity
1 2 3 4 5 6 7 8 9 10 11 12 13 14 15 16 17 18 19 20 21 @Override protected void onCreate (Bundle savedInstanceState) {... Button button2 = findViewById(R.id.button_0_2); button2.setOnClickListener(v -> { Intent intent = new Intent (MainActivity.this , BranchActivity1.class); intent.putExtra("extra_data" , "Hello, BranchActivity1! Please reply me!" ); startActivityForResult(intent, 1 ); }); } @Override protected void onActivityResult (int requestCode, int resultCode, @Nullable Intent data) { super .onActivityResult(requestCode, resultCode, data); if (requestCode == 1 ) { if (resultCode == RESULT_OK) { String returnedData = data.getStringExtra("returned_data" ); Toast.makeText(this , returnedData, Toast.LENGTH_SHORT).show(); } } }
被调Activity
1 2 3 4 5 6 7 8 9 10 11 @Override protected void onCreate (Bundle savedInstanceState) { ... Button button2 = findViewById(R.id.button_1_2); button2.setOnClickListener(v -> { Intent intent_return = new Intent (); intent_return.putExtra("returned_data" , "Hello MainActivity!" ); setResult(RESULT_OK, intent_return); finish(); }); }
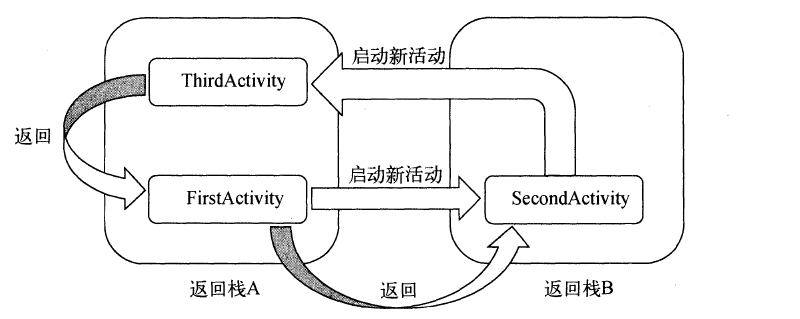
Activity的四种启动模式 启动模式共有4种,分别为standard、singleTop、singleTask、singleInstance。
在AndroidManifest.xml中给<activity>标签指定android:launchMode属性来选择启动模式。
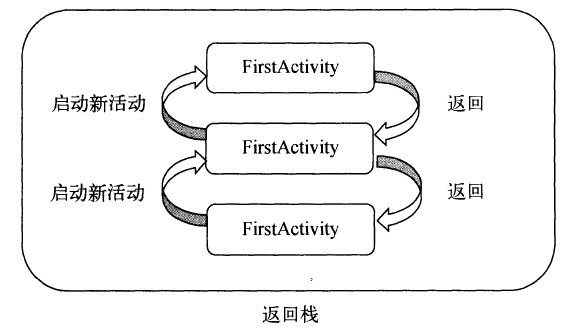
standard 启动Activity时会创建一个新的Activity实例压入返回栈,即使已经有一个该Activity类实例在栈顶。
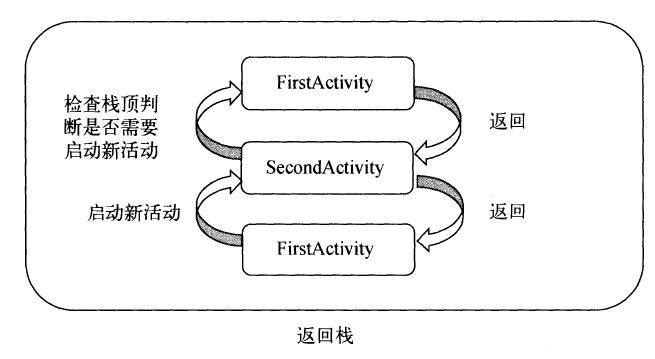
singleTop 启动Activity时若已有该Activity类的实例在栈顶,则直接复用那个实例,不再创建新的实例。
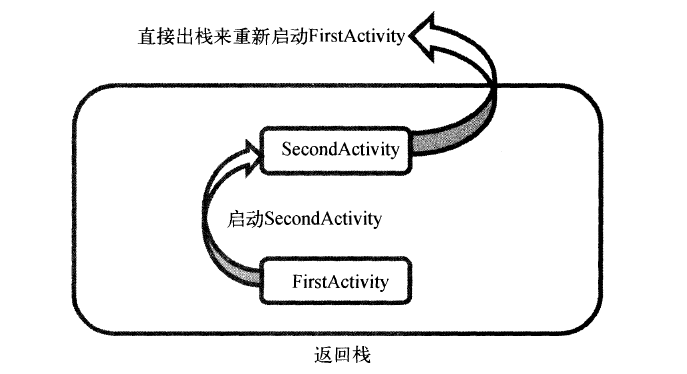
singleTask 启动Activity时
若不存在该Activity类的实例,则创建一个并将其压入返回栈;
若存在该Activity类的实例且在栈顶,则直接复用该实例;
若存在该Activity类的实例但不在栈顶,则移出该Activity实例上的所有Activity实例。
singleInstance 启动Activity时
若不存在该Activity类的实例,则新建一个返回栈,然后创建一个该类的实例,将其加入新返回栈;
若存在该Activity类的实例,不论在哪个返回栈,复用该Activity类的实例。
采用该模式的Activity类,它的实例总是位于栈顶,因为其所在栈只有它一个实例。
代码 AndroidManifest.xml
1 2 3 4 5 6 7 8 9 10 11 12 13 14 15 16 17 18 19 20 21 22 23 24 25 26 27 28 29 30 31 32 33 34 35 <?xml version="1.0" encoding="utf-8" ?> <manifest xmlns:android ="http://schemas.android.com/apk/res/android" package ="com.example.openexampreview" > <application android:icon ="@mipmap/ic_launcher" android:label ="@string/app_name" android:theme ="@style/Theme.OpenExamPreview" > <activity android:name =".MainActivity" android:exported ="true" > <intent-filter > <action android:name ="android.intent.action.MAIN" /> <category android:name ="android.intent.category.LAUNCHER" /> </intent-filter > </activity > <activity android:name =".BranchActivity1" android:exported ="false" > </activity > <activity android:name =".BranchActivity2" android:exported ="false" > <intent-filter > <action android:name ="com.example.openexampreview.ACTION_START" /> <category android:name ="android.intent.category.DEFAULT" /> </intent-filter > </activity > </application > </manifest >
MainActivity
1 2 3 4 5 6 7 8 9 10 11 12 13 14 15 16 17 18 19 20 21 22 23 24 25 26 27 28 29 30 31 32 33 34 35 36 37 38 39 40 41 42 43 44 45 46 package com.example.openexampreview; import androidx.annotation.Nullable; import androidx.appcompat.app.AppCompatActivity; import android.content.Intent; import android.os.Bundle; import android.widget.Button; import android.widget.Toast; public class MainActivity extends AppCompatActivity { @Override protected void onCreate (Bundle savedInstanceState) { super .onCreate(savedInstanceState); setContentView(R.layout.main_layout); Button button1 = findViewById(R.id.button_0_1); button1.setOnClickListener(v -> { Intent intent = new Intent (MainActivity.this , BranchActivity1.class); intent.putExtra("extra_data" , "Hello, BranchActivity1!" ); startActivity(intent); }); Button button2 = findViewById(R.id.button_0_2); button2.setOnClickListener(v -> { Intent intent = new Intent (MainActivity.this , BranchActivity1.class); intent.putExtra("extra_data" , "Hello, BranchActivity1! Please reply me!" ); startActivityForResult(intent, 1 ); }); } @Override protected void onActivityResult (int requestCode, int resultCode, @Nullable Intent data) { super .onActivityResult(requestCode, resultCode, data); if (requestCode == 1 ) { if (resultCode == RESULT_OK) { String returnedData = data.getStringExtra("returned_data" ); Toast.makeText(this , returnedData, Toast.LENGTH_SHORT).show(); } } } }
BranchActivity1.java
1 2 3 4 5 6 7 8 9 10 11 12 13 14 15 16 17 18 19 20 21 22 23 24 25 26 27 28 29 30 31 32 33 34 35 36 37 38 39 40 41 42 package com.example.openexampreview;import androidx.appcompat.app.AppCompatActivity;import android.content.Intent;import android.os.Bundle;import android.widget.Button;import android.widget.Toast;public class BranchActivity1 extends AppCompatActivity { @Override protected void onCreate (Bundle savedInstanceState) { super .onCreate(savedInstanceState); setContentView(R.layout.branch1_layout); Intent intent = getIntent(); String data = intent.getStringExtra("extra_data" ); Toast.makeText(this , data, Toast.LENGTH_SHORT).show(); Button button1 = findViewById(R.id.button_1_1); button1.setOnClickListener(v -> { Intent intent_send = new Intent ("com.example.openexampreview.ACTION_START" ); Bundle bundle = new Bundle (); bundle.putInt("score" , 100 ); bundle.putString("wish" , "求考好" ); intent_send.putExtras(bundle); startActivity(intent_send); }); Button button2 = findViewById(R.id.button_1_2); button2.setOnClickListener(v -> { Intent intent_return = new Intent (); intent_return.putExtra("returned_data" , "Hello MainActivity!" ); setResult(RESULT_OK, intent_return); finish(); }); } }
BranchActivity2.java
1 2 3 4 5 6 7 8 9 10 11 12 13 14 15 16 17 18 19 20 21 22 23 24 25 26 27 28 29 30 31 32 33 34 35 36 37 38 39 40 41 42 43 44 45 46 package com.example.openexampreview;import androidx.appcompat.app.AppCompatActivity;import android.content.Intent;import android.net.Uri;import android.os.Bundle;import android.widget.Button;import android.widget.Toast;public class BranchActivity2 extends AppCompatActivity { @Override protected void onCreate (Bundle savedInstanceState) { super .onCreate(savedInstanceState); setContentView(R.layout.branch2_layout); Intent intent_revive = getIntent(); Bundle bundle = intent_revive.getExtras(); int score = bundle.getInt("score" ); String wish = bundle.getString("wish" ); Toast.makeText(this , wish, Toast.LENGTH_SHORT).show(); Toast.makeText(this , String.valueOf(score), Toast.LENGTH_SHORT).show(); Button button3 = findViewById(R.id.button_2_1); button3.setOnClickListener(v -> { Uri uri = Uri.parse("mailto:xwp@cumt.edu.cn" ); Intent intent = new Intent (Intent.ACTION_SENDTO, uri); startActivity(intent); }); } }
Service 什么是Service Service 是一种可在后台执行长时间运行操作而不提供界面的应用组件。
声明并创建一个Service manifest-application-service
AndroidManifest.xml
1 2 3 4 5 6 7 8 9 10 11 <manifest ... > <application ... > <service android:name =".TestService" android:enabled ="true" android:exported ="true" > </service > </application > </manifest >
TestService.java
1 2 3 4 5 6 7 8 9 10 11 12 13 14 15 16 package com.example.servicepreview;import android.app.Service;import android.content.Intent;import android.os.IBinder;public class TestService extends Service { public TestService () { } @Override public IBinder onBind (Intent intent) { throw new UnsupportedOperationException ("Not yet implemented" ); } }
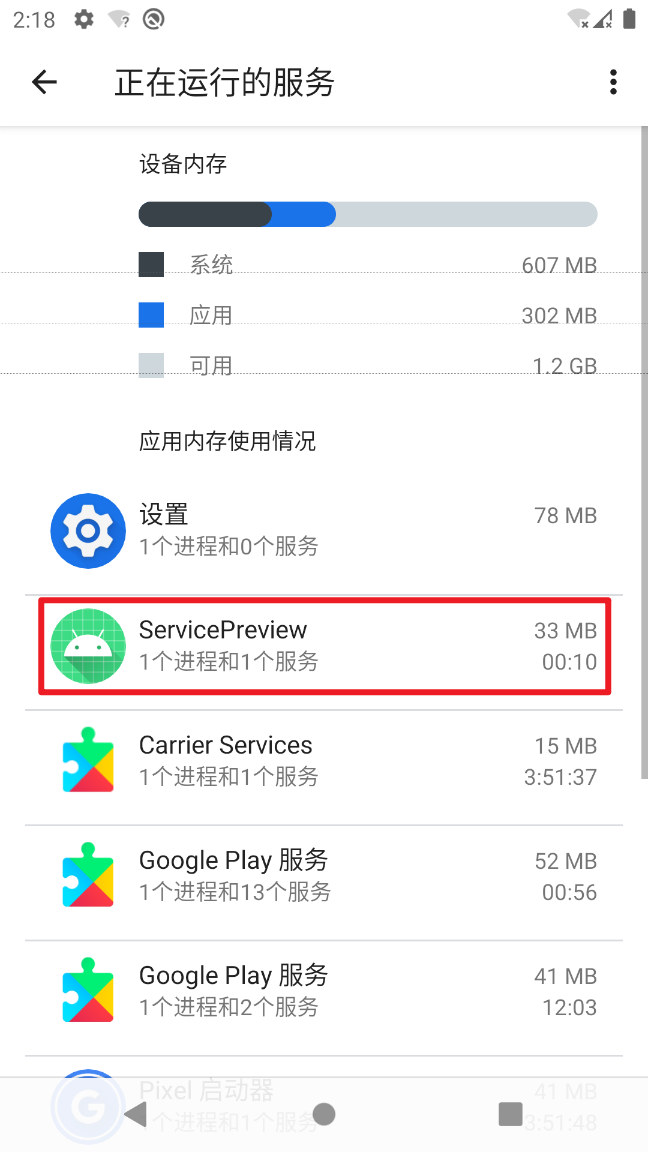
系统可以显示正在运行的Service及其运行时间。
Service的启动和停止 使用startService启动Service
使用stopService停止Service
MainActivity.java
1 2 3 4 5 6 7 8 9 10 11 12 13 14 15 16 17 18 19 20 21 22 23 24 25 26 27 28 @Override protected void onCreate (Bundle savedInstanceState) { ... Button startServiceButton = (Button) findViewById(R.id.start_service); Button stopServiceButton = (Button) findViewById(R.id.stop_service); startServiceButton.setOnClickListener(this ); stopServiceButton.setOnClickListener(this ); ... } @Override public void onClick (View v) { switch (v.getId()) { case R.id.start_service: Intent startIntent = new Intent (this , TestService.class); startService(startIntent); break ; case R.id.stop_service: Intent stopIntent = new Intent (this , TestService.class); stopService(stopIntent); break ; ... default : break ; } }
Service只会onCreate一次、onDestory一次,但可以onStartCommand多次。
Service的绑定和解绑——与进程通信 使用bindService绑定Activity和Service
使用unbindService解绑Activity和Service
二者通过Binder交互。
MainActivity.java
1 2 3 4 5 6 7 8 9 10 11 12 13 14 15 16 17 18 19 20 21 22 23 24 25 26 @Override protected void onCreate (Bundle savedInstanceState) { ... Button bindServiceButton = (Button) findViewById(R.id.bind_service); Button unbindServiceButton = (Button) findViewById(R.id.unbind_service); bindServiceButton.setOnClickListener(this ); unbindServiceButton.setOnClickListener(this ); } @Override public void onClick (View v) { switch (v.getId()) { ... case R.id.bind_service: Intent bindIntent = new Intent ("com.example.servicepreview.SERVICE_START" ); bindIntent.setPackage("com.example.servicepreview" ); bindService(bindIntent, connection, BIND_AUTO_CREATE); break ; case R.id.unbind_service: unbindService(connection); break ; default : break ; } }
Service只能onCreate一次、onBind一次、onUnbind一次、onDestory一次,但可以onStartCommand多次。
startService启动
bindService启动
Service的生命周期 Service的生命周期分两种,通过startService启动和通过bindService启动。
注意,onStrartCommand可多次执行,其他都只能一次。
若使用startService启动Service,则主调Activity finish时Service不会结束。
若使用bindService启动Service,则主调Activity finish时Service会一起结束。若Service绑定了多个Activity,则全部绑定的Activity都unBindService或finish时,Service结束。
当整个Application结束时,所有Service都结束。
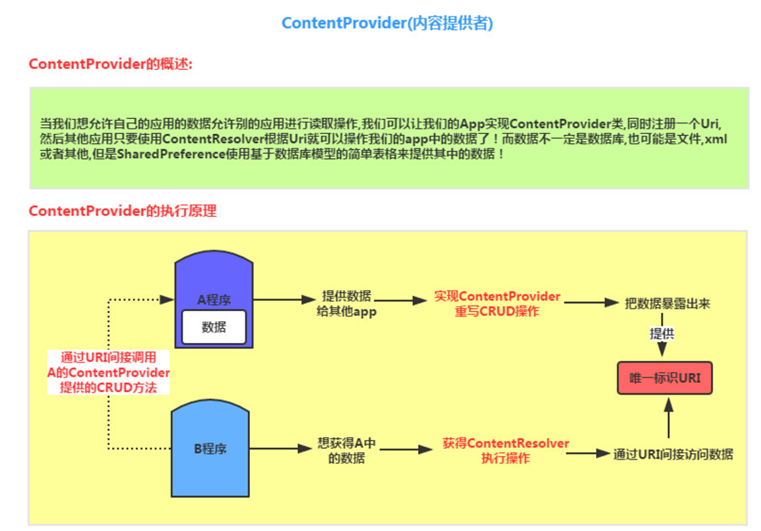
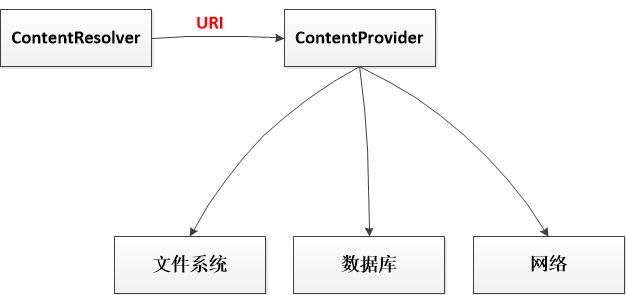
Content Provider 什么是Content Provider Content Provider是一种通过请求从一个应用程序向其他的应用程序提供数据的应用组件。
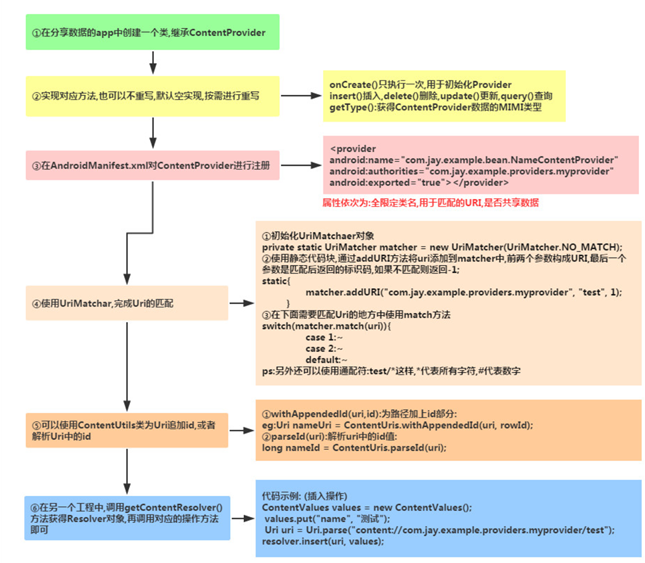
声明并创建一个Content Provider
1 继承ContentProvider,并重载六个函数
新建立的类继承ContentProvider后,共有六个函数需要重载,分别是
delete():删除数据集
insert():添加数据集
qurey():查询数据集
update():更新数据集
onCreate():初始化底层数据集和建立数据连接等工作
getType():返回指定URI的MIME数据类型
如果URI是单条数据,则返回的MIME数据类型应以vnd.android.cursor.item开头
如果URI是多条数据,则返回的MIME数据类型应以vnd.android.cursor.dir/开头
2 声明CONTENT_URI,实现UriMatcher
在新构造的ContentProvider类中,经常需要判断URI是单条数据还是多条数据,最简单的方法是构造一个UriMatcher
为了便于判断和使用URI,一般将URI的授权者名称和数据路径等内容声明为静态常量,并声明CONTENT_URI
3 注册ContentProvider
AndroidManifest.xml
1 2 3 4 5 <application ... > <provider android:authorities ="com.example.peopleprovider" android:name =".PeopleProvider" /> </application >
使用Content Provider 通过ContentResolver组件使用Content Provider
ContentResolver resolver = getContentResolver();
ContentProvider使用的URI语法结构如下
content://<authority>/<data_path>/<id>
content://:代表schema,是通用前缀,表示该URI用于ContentProvider定位资源,无需修改。
<authority>:代表Database,是授权者名称,用来确定具体由哪一个ContentProvider提供资源,一般都由类的小写全称组成,以保证唯一性。
<data_path>:代表Table,是数据路径,用来确定请求的是哪个数据集。
<id>:代表row、行号,是数据标识。
People.java中
1 2 3 4 String KEY_ID = "_id" ;String KEY_NAME = "name" ;String KEY_AGE = "age" ;String KEY_HEIGHT = "height" ;
添加 使用insert()
1 2 3 4 5 ContentValues values = new ContentValues ();values.put(KEY_NAME, "Tom" ); values.put(KEY_AGE, 21 ); values.put(KEY_HEIGHT, 1.81f ); Uri newUri = resolver.insert(CONTENT_URI, values);
使用bulkInsert()
1 2 3 ContentValues[] arrayValues = new ContentValues [10 ]; int count = resolver.bulkInsert(CONTENT_URI, arrayValues);
删除 删一条
1 2 Uri uri = Uri.parse(CONTENT_URI_STRING + "/" +"2" );int result = resolver.delete(uri, null , null );
删多条
1 2 String selection = KEY_ID + ">4" ;int result = resolver.delete(CONTENT_URI, selection, null );
更新 1 2 3 4 5 6 ContentValues values = new ContentValues ();values.put(KEY_NAME, "Tom" ); values.put(KEY_AGE, 21 ); values.put(KEY_HEIGHT, 1.81f ); Uri rui = Uri.parse(CONTENT_URI_STRING + "/" + "7" );int result = resolver.update(uri, values, null , null );
查询 1 2 3 Uri uri = Uri.parse(CONTENT_URI_STRING + "/" + "2" ;Cursor cursor = resolver.query(uri, new String [] {KEY_ID, KEY_NAME, KEY_AGE, KEY_HEIGHT}, null , null , null );
代码 PPT的原版代码,出自Android ContentProvider 完全解析及简单DEMO
原文没给layout,老师直接copy的,也就只能拿来应试用。
ContentProviderDemo AndroidManifest.xml
1 2 3 4 5 6 7 8 9 10 11 12 13 14 15 16 <?xml version="1.0" encoding="utf-8" ?> <manifest xmlns:android ="http://schemas.android.com/apk/res/android" package ="com.example.contentproviderdemo" > <application android:allowBackup ="true" android:icon ="@mipmap/ic_launcher" android:label ="@string/app_name" android:supportsRtl ="true" android:theme ="@style/Theme.ContentProviderDemo" > <provider android:authorities ="com.example.peopleprovider" android:name =".PeopleProvider" /> </application > </manifest >
PeopleProvider.java
1 2 3 4 5 6 7 8 9 10 11 12 13 14 15 16 17 18 19 20 21 22 23 24 25 26 27 28 29 30 31 32 33 34 35 36 37 38 39 40 41 42 43 44 45 46 47 48 49 50 51 52 53 54 55 56 57 58 59 60 61 62 63 64 65 66 67 68 69 70 71 72 73 74 75 76 77 78 79 80 81 82 83 84 85 86 87 88 89 90 91 92 93 94 95 96 97 98 99 100 101 102 103 104 105 106 107 108 109 110 111 112 113 114 115 116 117 118 119 120 121 122 123 124 125 126 127 128 129 130 131 132 133 134 135 136 137 138 139 140 141 142 143 144 145 146 147 148 149 150 151 152 153 154 155 156 157 158 159 160 161 162 package com.example.contentproviderdemo;import android.content.ContentProvider;import android.content.ContentUris;import android.content.ContentValues;import android.content.Context;import android.content.UriMatcher;import android.database.Cursor;import android.database.SQLException;import android.database.sqlite.SQLiteDatabase;import android.database.sqlite.SQLiteOpenHelper;import android.database.sqlite.SQLiteQueryBuilder;import android.net.Uri;import androidx.annotation.Nullable;public class PeopleProvider extends ContentProvider { private static final String DB_NAME = "people.db" ; private static final String DB_TABLE = "peopleinfo" ; private static final int DB_VERSION = 1 ; private SQLiteDatabase db; private DBOpenHelper dbOpenHelper; private static final int MULTIPLE_PEOPLE = 1 ; private static final int SINGLE_PEOPLE = 2 ; private static final UriMatcher uriMatcher; static { uriMatcher = new UriMatcher (UriMatcher.NO_MATCH); uriMatcher.addURI(People.AUTHORITY, People.PATH_MULTIPLE, MULTIPLE_PEOPLE); uriMatcher.addURI(People.AUTHORITY, People.PATH_SINGLE, SINGLE_PEOPLE); } @Override public boolean onCreate () { Context context = getContext(); dbOpenHelper = new DBOpenHelper (context, DB_NAME, null , DB_VERSION); db = dbOpenHelper.getWritableDatabase(); if (db == null ) { return false ; } else { return true ; } } @Nullable @Override public Cursor query (Uri uri, String[] projection, String selection, String[] selectionArgs, String sortOrder) { SQLiteQueryBuilder qb = new SQLiteQueryBuilder (); qb.setTables(DB_TABLE); switch (uriMatcher.match(uri)) { case SINGLE_PEOPLE: qb.appendWhere(People.KEY_ID + "=" + uri.getPathSegments().get(1 )); break ; default : break ; } Cursor cursor = qb.query(db, projection, selection, selectionArgs, null , null , sortOrder); cursor.setNotificationUri(getContext().getContentResolver(), uri); return cursor; } @Nullable @Override public String getType (Uri uri) { switch (uriMatcher.match(uri)) { case MULTIPLE_PEOPLE: return People.MIME_TYPE_MULTIPLE; case SINGLE_PEOPLE: return People.MIME_TYPE_SINGLE; default : throw new IllegalArgumentException ("Unkown uro:" + uri); } } @Nullable @Override public Uri insert (Uri uri, ContentValues values) { long id = db.insert(DB_TABLE, null , values); if (id > 0 ) { Uri newUri = ContentUris.withAppendedId(People.CONTENT_URI, id); getContext().getContentResolver().notifyChange(newUri, null ); return newUri; } throw new SQLException ("failed to insert row into " + uri); } @Override public int delete (Uri uri, String selection, String[] selectionArgs) { int count = 0 ; switch (uriMatcher.match(uri)) { case MULTIPLE_PEOPLE: count = db.delete(DB_TABLE, selection, selectionArgs); break ; case SINGLE_PEOPLE: String segment = uri.getPathSegments().get(1 ); count = db.delete(DB_TABLE, People.KEY_ID + "=" + segment, selectionArgs); break ; default : throw new IllegalArgumentException ("Unsupported URI:" + uri); } getContext().getContentResolver().notifyChange(uri, null ); return count; } @Override public int update (Uri uri, ContentValues values, String selection, String[] selectionArgs) { int count; switch (uriMatcher.match(uri)) { case MULTIPLE_PEOPLE: count = db.update(DB_TABLE, values, selection, selectionArgs); break ; case SINGLE_PEOPLE: String segment = uri.getPathSegments().get(1 ); count = db.update(DB_TABLE, values, People.KEY_ID + "=" + segment, selectionArgs); break ; default : throw new IllegalArgumentException ("Unknow URI: " + uri); } getContext().getContentResolver().notifyChange(uri, null ); return count; } private static class DBOpenHelper extends SQLiteOpenHelper { private static final String DB_CREATE = "create table " + DB_TABLE + "(" + People.KEY_ID + " integer primary key autoincrement, " + People.KEY_NAME + " text not null, " + People.KEY_AGE + " integer, " + People.KEY_HEIGHT + " float);" ; public DBOpenHelper (Context context, String name, SQLiteDatabase.CursorFactory factory, int version) { super (context, name, factory, version); } @Override public void onCreate (SQLiteDatabase db) { db.execSQL(DB_CREATE); } @Override public void onUpgrade (SQLiteDatabase db, int oldVersion, int newVersion) { db.execSQL("DROP TABLE IF EXISTS " + DB_TABLE); onCreate(db); } } }
People.java
1 2 3 4 5 6 7 8 9 10 11 12 13 14 15 16 17 18 19 20 21 22 23 24 package com.example.contentproviderdemo;import android.net.Uri;public class People { public static final String MIME_DIR_PREFIX = "vnd.android.cursor.dir" ; public static final String MIME_ITEM_PREFIX = "vnd.android.cursor.item" ; public static final String MIME_ITEM = "vnd.example.people" ; public static final String MIME_TYPE_SINGLE = MIME_ITEM_PREFIX + "/" + MIME_ITEM ; public static final String MIME_TYPE_MULTIPLE = MIME_DIR_PREFIX + "/" + MIME_ITEM ; public static final String AUTHORITY = "com.example.peopleprovider" ; public static final String PATH_SINGLE = "people/#" ; public static final String PATH_MULTIPLE = "people" ; public static final String CONTENT_URI_STRING = "content://" + AUTHORITY + "/" + PATH_MULTIPLE; public static final Uri CONTENT_URI = Uri.parse(CONTENT_URI_STRING); public static final String KEY_ID = "_id" ; public static final String KEY_NAME = "name" ; public static final String KEY_AGE = "age" ; public static final String KEY_HEIGHT = "height" ; }
ContentResolverDemo AndroidManifest.xml
1 2 3 4 5 6 7 8 9 10 11 12 13 14 15 16 17 18 19 20 21 <?xml version="1.0" encoding="utf-8" ?> <manifest xmlns:android ="http://schemas.android.com/apk/res/android" package ="com.example.contentresolverdemo" > <application android:allowBackup ="true" android:icon ="@mipmap/ic_launcher" android:label ="@string/app_name" android:supportsRtl ="true" android:theme ="@style/Theme.ContentResolverDemo" > <activity android:name =".MainActivity" android:exported ="true" > <intent-filter > <action android:name ="android.intent.action.MAIN" /> <category android:name ="android.intent.category.LAUNCHER" /> </intent-filter > </activity > </application > </manifest >
MainActivity.java
1 2 3 4 5 6 7 8 9 10 11 12 13 14 15 16 17 18 19 20 21 22 23 24 25 26 27 28 29 30 31 32 33 34 35 36 37 38 39 40 41 42 43 44 45 46 47 48 49 50 51 52 53 54 55 56 57 58 59 60 61 62 63 64 65 66 67 68 69 70 71 72 73 74 75 76 77 78 79 80 81 82 83 84 85 86 87 88 89 90 91 92 93 94 95 96 97 98 99 100 101 102 103 104 105 106 107 package com.example.contentresolverdemo;import android.annotation.SuppressLint;import android.content.ContentResolver;import android.content.ContentValues;import android.database.Cursor;import android.net.Uri;import android.os.Bundle;import android.view.View;import android.widget.Button;import android.widget.EditText;import android.widget.TextView;import androidx.appcompat.app.AppCompatActivity;public class MainActivity extends AppCompatActivity { private EditText nameText; private EditText ageText; private EditText heightText; private EditText idEntry; private TextView labelView; private TextView displayView; private Button add; private Button queryAll; private Button clear; private Button del; private Button query; private Button deleteAll; private Button update; private ContentResolver resolver; @Override protected void onCreate (Bundle savedInstanceState) { super .onCreate(savedInstanceState); setContentView(R.layout.activity_main); resolver = this .getContentResolver(); initView(); initEvent(); } private void initEvent () { add.setOnClickListener(new View .OnClickListener() { @Override public void onClick (View v) { ContentValues values = new ContentValues (); values.put(People.KEY_NAME, nameText.getText().toString()); values.put(People.KEY_AGE, Integer.parseInt(ageText.getText().toString())); values.put(People.KEY_HEIGHT, Float.parseFloat(heightText.getText().toString())); Uri newUri = resolver.insert(People.CONTENT_URI, values); labelView.setText("添加成功,URI:" + newUri); } }); queryAll.setOnClickListener(new View .OnClickListener() { @SuppressLint("Range") @Override public void onClick (View v) { Cursor cursor = resolver.query(People.CONTENT_URI, new String []{People.KEY_ID, People.KEY_NAME, People.KEY_AGE, People.KEY_HEIGHT}, null , null , null ); if (cursor == null ) { labelView.setText("数据库中没有数据" ); return ; } labelView.setText("数据库:" + String.valueOf(cursor.getCount()) + "条记录" ); String msg= "" ; if (cursor.moveToFirst()) { do { msg += "ID: " + cursor.getString(cursor.getColumnIndex(People.KEY_ID)) + "," ; msg += "姓名: " + cursor.getString(cursor.getColumnIndex(People.KEY_NAME)) + "," ; msg += "年龄: " + cursor.getInt(cursor.getColumnIndex(People.KEY_AGE)) + "," ; msg += "身高: " + cursor.getFloat(cursor.getColumnIndex(People.KEY_HEIGHT)) + "," ; } while (cursor.moveToNext()); } displayView.setText(msg); } }); deleteAll.setOnClickListener(new View .OnClickListener() { @Override public void onClick (View v) { resolver.delete(People.CONTENT_URI, null , null ); String msg = "数据全部删除" ; labelView.setText(msg); } }); update.setOnClickListener(new View .OnClickListener() { @Override public void onClick (View v) { ContentValues values = new ContentValues (); values.put(People.KEY_NAME, nameText.getText().toString()); values.put(People.KEY_AGE, Integer.parseInt(ageText.getText().toString())); values.put(People.KEY_HEIGHT, Float.parseFloat(heightText.getText().toString())); Uri uri = Uri.parse(People.CONTENT_URI_STRING + "/" + idEntry.getText().toString()); int result = resolver.update(uri, values, null , null ); String msg = "更新ID为" + idEntry.getText().toString() + "的数据" + (result > 0 ? "成功" : "失败" ); labelView.setText(msg); } }); } private void initView () { } }
People.java
1 2 3 4 5 6 7 8 9 10 11 12 13 14 15 16 17 18 19 20 21 22 23 24 package com.example.contentresolverdemo;import android.net.Uri;public class People { public static final String MIME_DIR_PREFIX = "vnd.android.cursor.dir" ; public static final String MIME_ITEM_PREFIX = "vnd.android.cursor.item" ; public static final String MIME_ITEM = "vnd.example.people" ; public static final String MIME_TYPE_SINGLE = MIME_ITEM_PREFIX + "/" + MIME_ITEM ; public static final String MIME_TYPE_MULTIPLE = MIME_DIR_PREFIX + "/" + MIME_ITEM ; public static final String AUTHORITY = "com.example.peopleprovider" ; public static final String PATH_SINGLE = "people/#" ; public static final String PATH_MULTIPLE = "people" ; public static final String CONTENT_URI_STRING = "content://" + AUTHORITY + "/" + PATH_MULTIPLE; public static final Uri CONTENT_URI = Uri.parse(CONTENT_URI_STRING); public static final String KEY_ID = "_id" ; public static final String KEY_NAME = "name" ; public static final String KEY_AGE = "age" ; public static final String KEY_HEIGHT = "height" ; }
Broadcast receiver 什么是Broadcast Receiver Broadcast Receiver是一种用于接受系统和应用中Broadcast(广播)的应用组件。
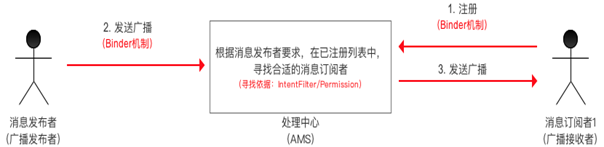
Android中的Broadcast使用基于消息的发布/订阅事件模型。
模型中有3个角色:
消息订阅者(广播接收者)
消息发布者(广播发布者)
消息中心(AMS,即Activity Manager Service)
广播接收者 通过 Binder机制在 AMS 注册
广播发送者 通过 Binder 机制向 AMS 发送广播
AMS 根据 广播发送者 要求,在已注册列表中,寻找合适的广播接收者寻找依据:IntentFilter / Permission
AMS将广播发送到合适的广播接收者相应的消息循环队列中
广播接收者通过消息循环拿到此广播,并回调 onReceive()
声明并创建一个Broadcast Receiver 注册BroadcastReceiver的方法有动态注册和静态注册两种。
静态注册是指在AndroidManifest.xml中注册,不管该应用程序是否处于活动状态,都会进行监听。
动态注册是指在.java中注册。
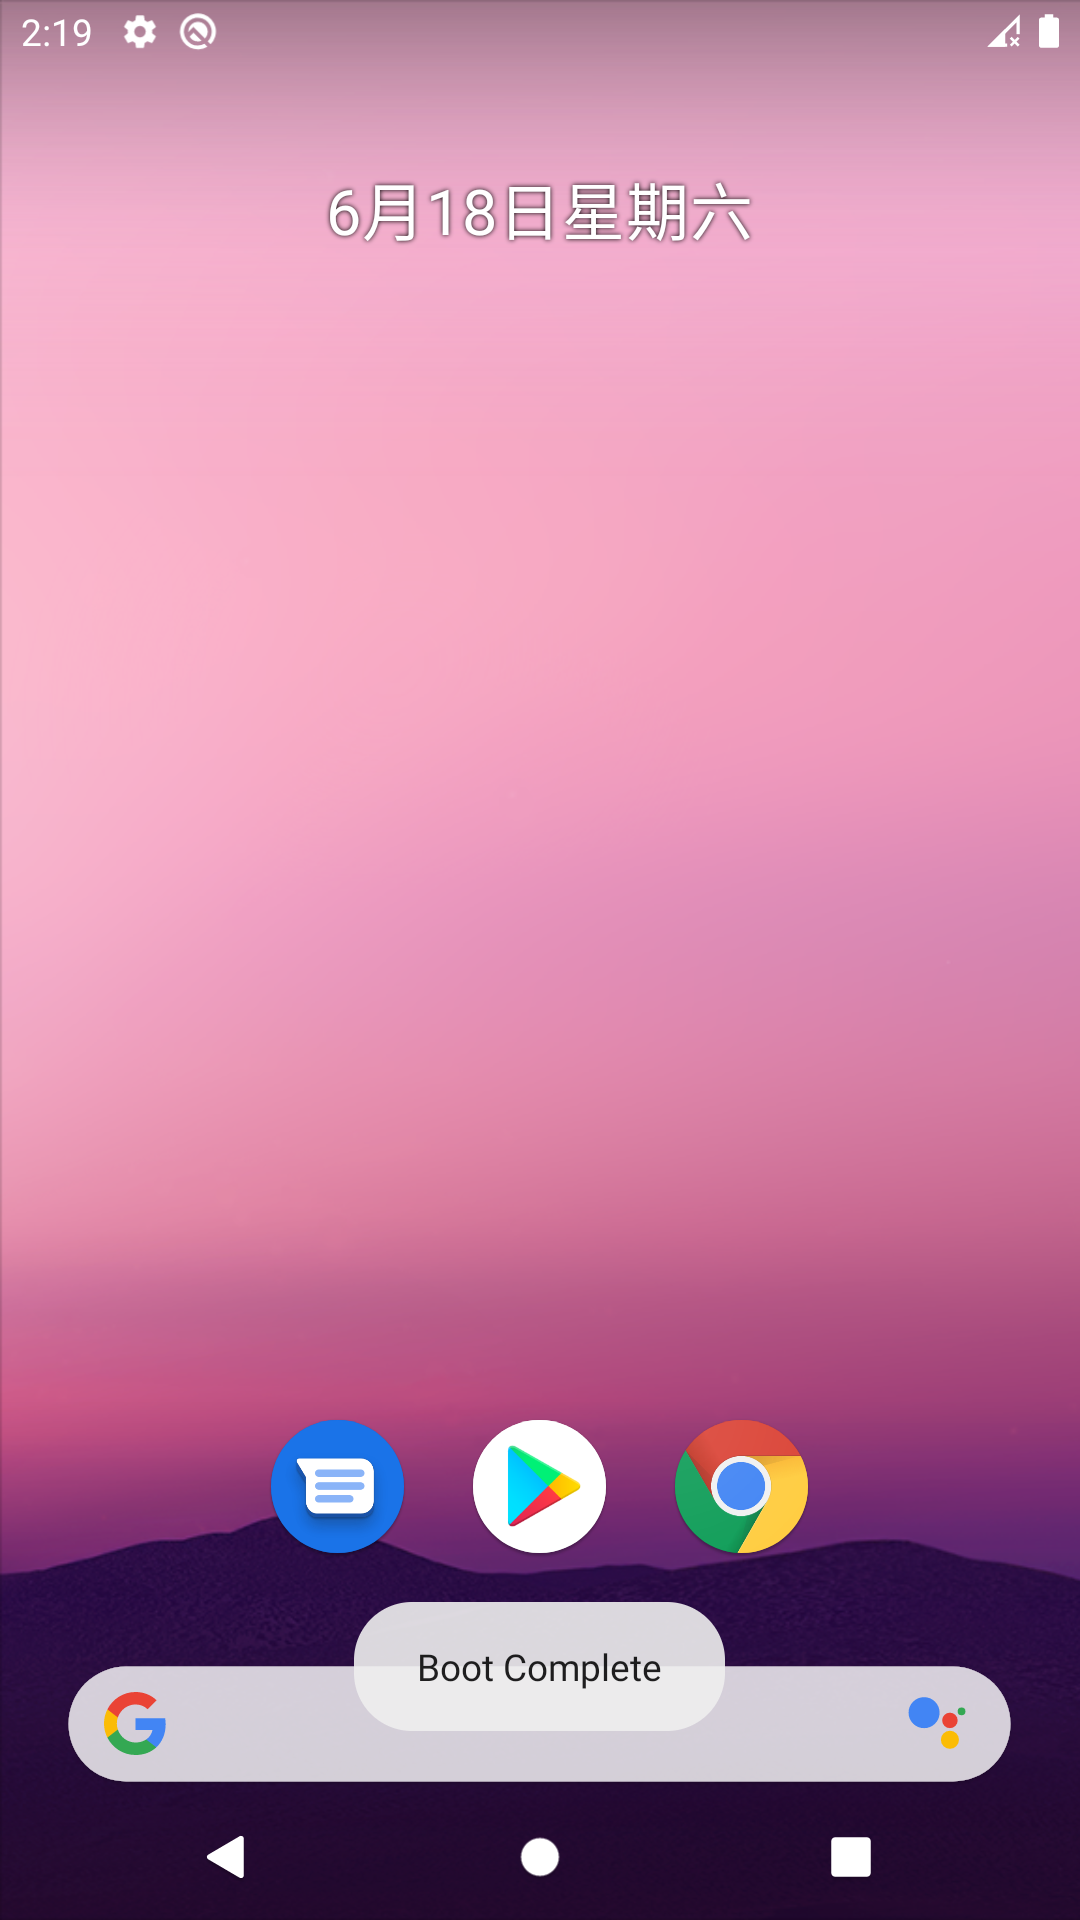
静态注册 一个用于接收开机广播的Receiver
AndroidManifest.xml
1 2 3 4 5 6 7 8 9 10 11 12 13 14 15 16 <application ... > <activity ... </activity > <receiver android:name =".MyBroadcastReceiver" android:enabled ="true" android:exported ="true" > <intent-filter > <action android:name ="android.intent.action.BOOT_COMPLETED" /> </intent-filter > </receiver > </application >
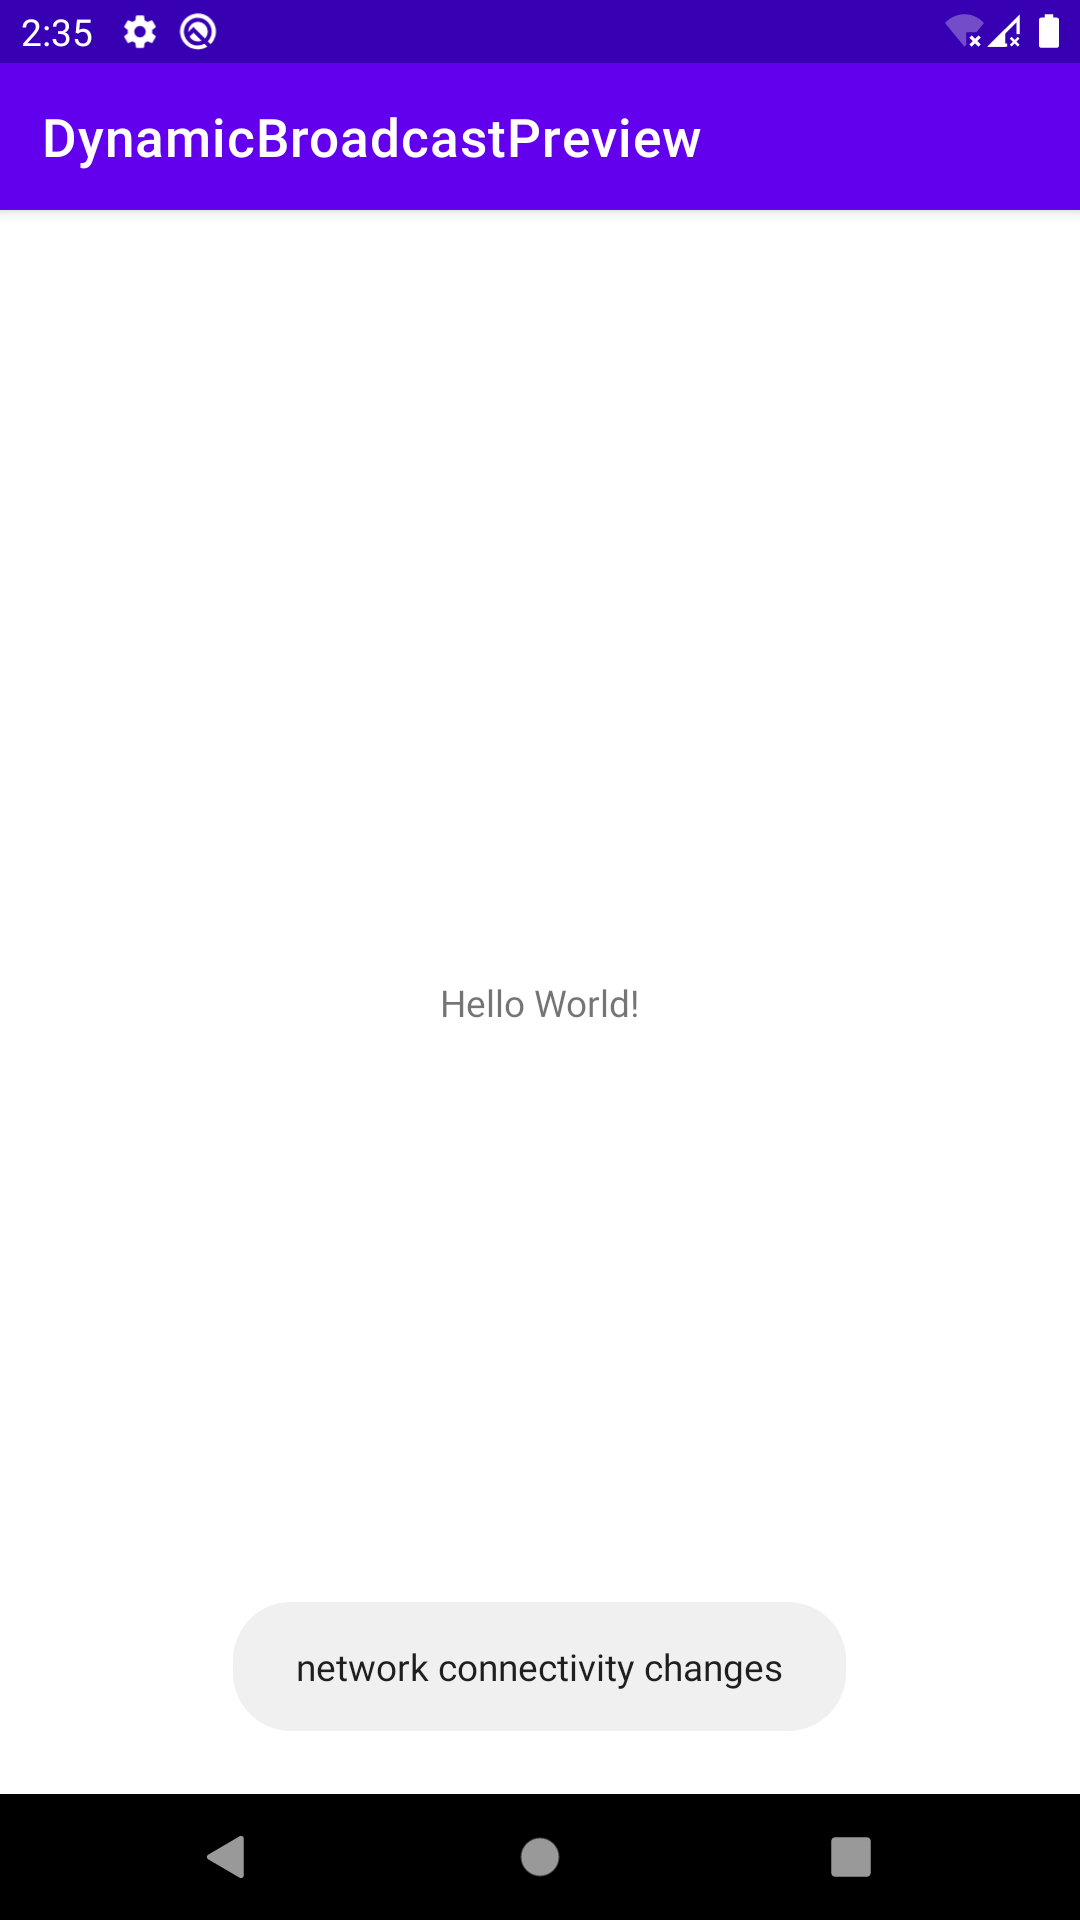
动态注册 一个用于接收网络状态改变的Receiver,接收系统广播
接收自定义广播可以使用intent.addAction指定Action。
注:new IntentFilter时的参数是一个Action。
MainActivity.java
1 2 3 4 5 6 7 8 9 10 11 12 13 14 15 16 17 18 19 20 21 22 23 24 25 26 27 28 29 30 31 32 33 34 35 36 37 38 39 40 41 42 43 44 45 46 47 48 package com.example.dynamicbroadcastpreview;import androidx.appcompat.app.AppCompatActivity;import android.content.BroadcastReceiver;import android.content.Context;import android.content.Intent;import android.content.IntentFilter;import android.os.Bundle;import android.widget.Toast;public class MainActivity extends AppCompatActivity { private IntentFilter intentFilter; private MyBroadcastReceiver myBroadcastReceiver; @Override protected void onCreate (Bundle savedInstanceState) { super .onCreate(savedInstanceState); setContentView(R.layout.activity_main); intentFilter = new IntentFilter ("android.net.conn.CONNECTIVITY_CHANGE" ); myBroadcastReceiver = new MyBroadcastReceiver (); registerReceiver(myBroadcastReceiver, intentFilter); } @Override protected void onDestroy () { super .onDestroy(); unregisterReceiver(myBroadcastReceiver); } public class MyBroadcastReceiver extends BroadcastReceiver { @Override public void onReceive (Context context, Intent intent) { Toast.makeText(context, "network connectivity changes" , Toast.LENGTH_SHORT).show(); } } }
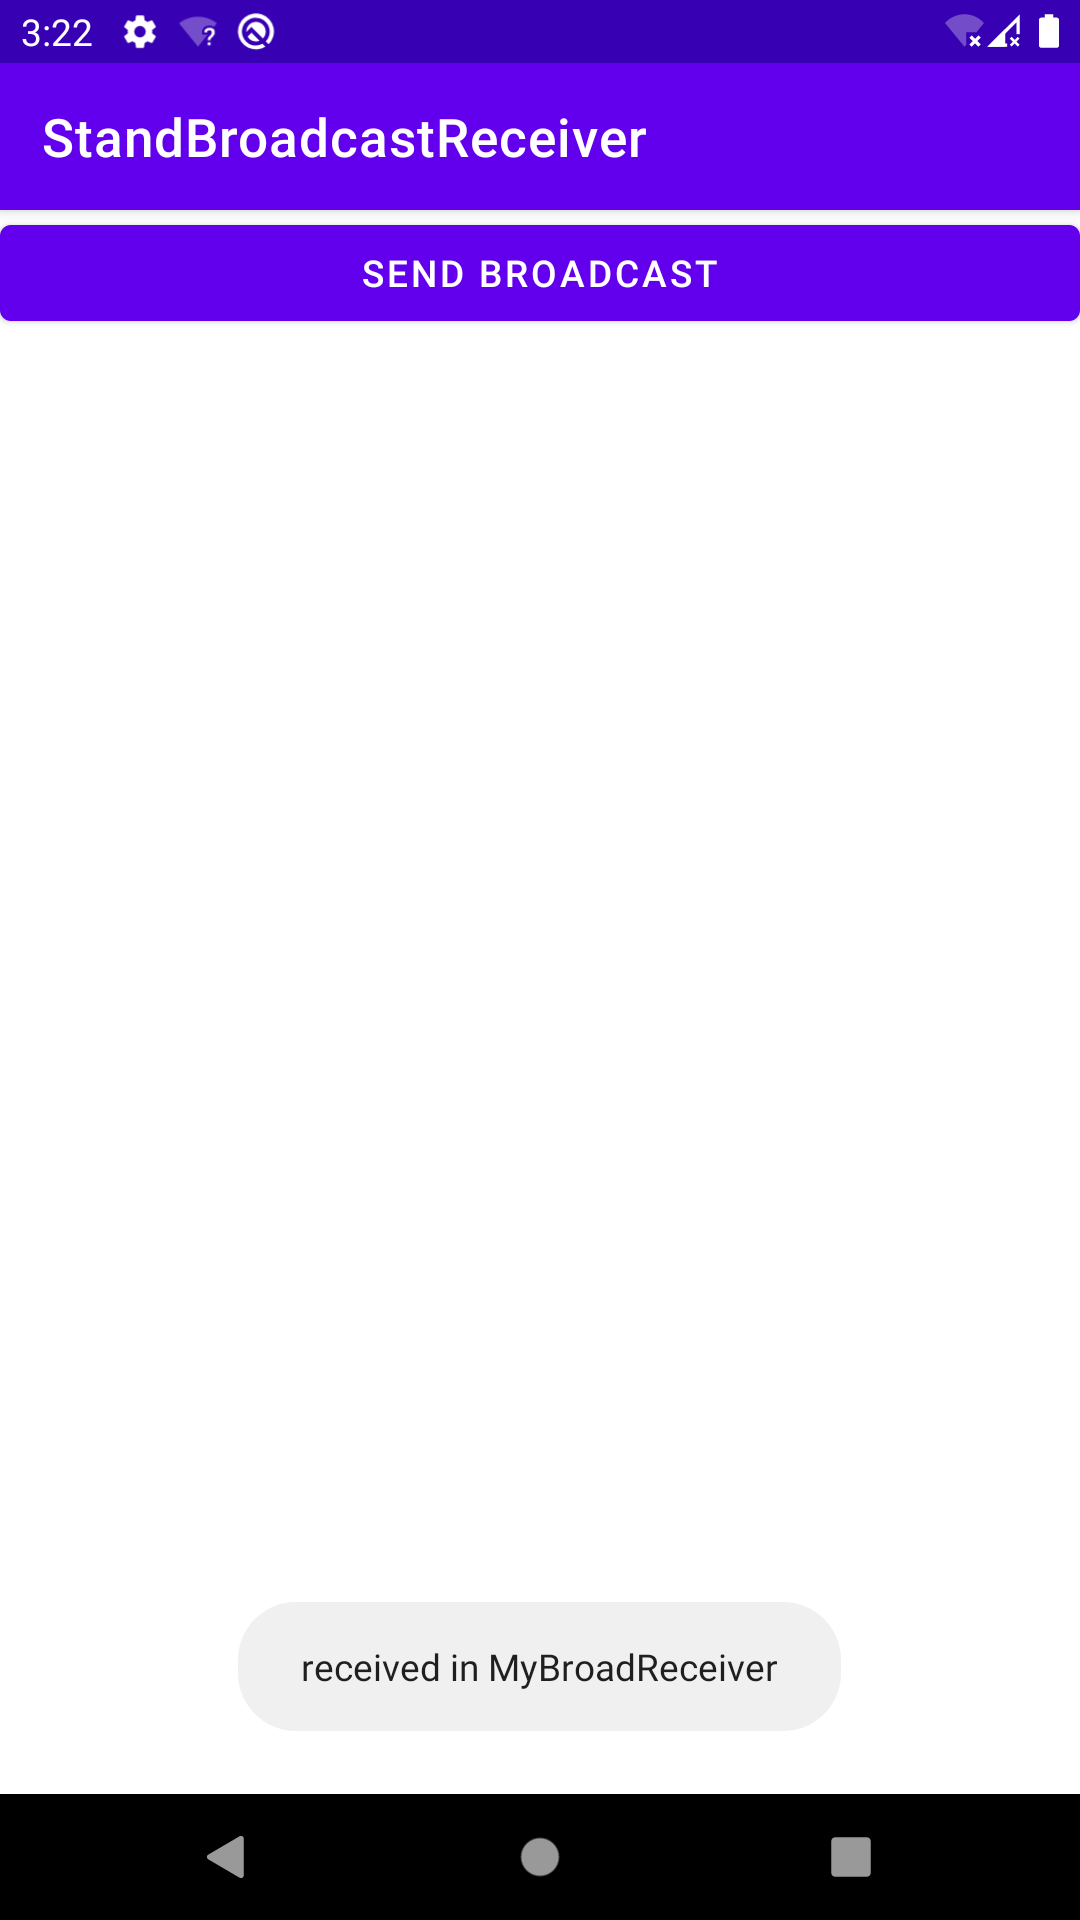
发送标准Broadcast 向指定action发送广播
AndroidManifest.xml
1 2 3 4 5 6 7 8 9 10 11 12 13 14 15 16 17 18 19 20 21 22 23 24 25 26 27 28 29 30 31 32 33 34 35 36 <?xml version="1.0" encoding="utf-8" ?> <manifest xmlns:android ="http://schemas.android.com/apk/res/android" xmlns:tools ="http://schemas.android.com/tools" package ="com.example.standbroadcastreceiver" > <application android:allowBackup ="true" android:dataExtractionRules ="@xml/data_extraction_rules" android:fullBackupContent ="@xml/backup_rules" android:icon ="@mipmap/ic_launcher" android:label ="@string/app_name" android:roundIcon ="@mipmap/ic_launcher_round" android:supportsRtl ="true" android:theme ="@style/Theme.StandBroadcastReceiver" tools:targetApi ="31" > <receiver android:name =".MyBroadcastReceiver" android:enabled ="true" android:exported ="true" > <intent-filter > <action android:name ="com.example.standbroadcastreceiver.MY_BROADCAST" /> </intent-filter > </receiver > <activity android:name =".MainActivity" android:exported ="true" > <intent-filter > <action android:name ="android.intent.action.MAIN" /> <category android:name ="android.intent.category.LAUNCHER" /> </intent-filter > </activity > </application > </manifest >
MyBroadcastReceiver.java
1 2 3 4 5 6 7 8 9 10 11 12 13 14 package com.example.standbroadcastreceiver;import android.content.BroadcastReceiver;import android.content.Context;import android.content.Intent;import android.widget.Toast;public class MyBroadcastReceiver extends BroadcastReceiver { @Override public void onReceive (Context context, Intent intent) { Toast.makeText(context, "received in MyBroadReceiver" , Toast.LENGTH_SHORT).show(); } }
MainActivity.java
1 2 3 4 5 6 7 8 9 10 11 12 13 14 15 16 17 18 19 20 21 22 23 24 25 26 package com.example.standbroadcastreceiver;import androidx.appcompat.app.AppCompatActivity;import android.content.BroadcastReceiver;import android.content.Context;import android.content.Intent;import android.os.Bundle;import android.widget.Button;import android.widget.Toast;public class MainActivity extends AppCompatActivity { @Override protected void onCreate (Bundle savedInstanceState) { super .onCreate(savedInstanceState); setContentView(R.layout.activity_main); Button button = (Button) findViewById(R.id.button); button.setOnClickListener(v -> { Intent intent = new Intent ("com.example.standbroadcastreceiver.MY_BROADCAST" ); intent.setPackage("com.example.standbroadcastreceiver" ); sendBroadcast(intent); }); } }
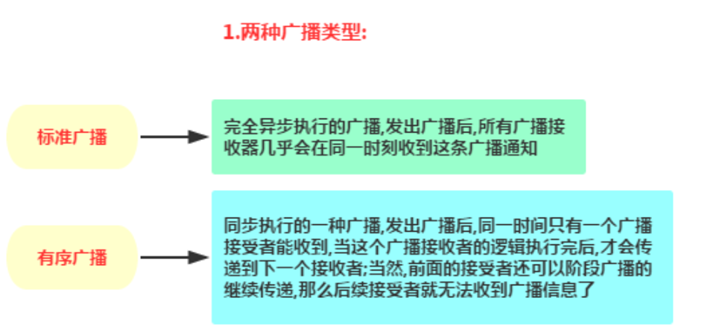
发送有序Broadcast 把sendBroadcast(intent)改成sendOrderedBroadcast(intent, null)
然后在intent-filter标签内加入 android:priority=”优先级(数值)”
接收到的Receiver可以使用abortBroadcast()将广播截断,让优先级比它低的无法接收。
代码 都在上面,有序Broadcast没实现
总结 使用BroadCastReciver的一般步骤:
首先定义一个自定义的Broadcast Receiver类,定义广播接收器类需要继承BroadcastReceiver基类来实现,并且必须重写其中的onReceive()方法,此方法用于响应相应的广播事件处理。
然后注册Broadcast Receiver类。可以选择静态注册也可以选择动态注册。
最后使用Broadcast Receiver类进行广播事件的响应。广播事件的响应同样也有两种方式,一种是主动广播,另外一种是使用系统标准广播。主动广播使用sendBroadcast()方法发送广播,使用注册过的Broadcast Receiver类接收广播并处理相应事件。
使用sendBroadcast()发送的标准广播,所有满足条件的BroadcastReceiver都会执行其onReceive()方法来处理响应
使用sendOrderedBroadcast()发送的有序广播。会根据BroadcastReceiver注册时IntentFilter的优先级顺序来执行onReceive()方法。优先级在<intent-filter>的android:priority中声明(静态注册),也可以在代码中通过IntentFilter.setPriority()方法设置(动态注册)。数越大优先级别越高。
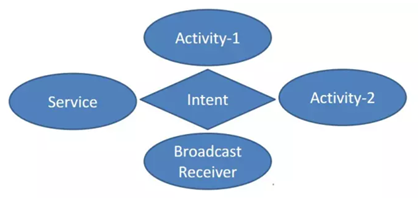
Intent 什么是Intent Intent是对要执行的操作的抽象描述,作为消息传递参数,协调各个组件(如Activity)来完成一项任务。
Intent的作用 启动Activity startActivity(Intent)
startActivityForResult(Intent)
启动Service startService(Intent)
bindService(Intent)
发送Broadcast sendBroadcast(Intent)
sendOrderedBroadcast(Intent)
Intent的种类 显式Intent 通过指定组件名启动目标组件,原型如下:
public Intent(Context packageContext, Class<?> cls)
如:Intent startIntent = new Intent(this, TestService.class);
隐式Intent 通过指定Action、Category启动匹配的组件,原型如下:
public Intent(String action)
调用该构造函数时应用会匹配AndroidManifest.xml相关组件的Intent-filter标签中的Action和Category,逐一过滤(匹配)出满足属性的组件。
当不止一个满足时,会弹出一个让我们选择启动哪个的对话框。(原来如此!)
Intent的组成 Intent的组成如下表
组成 属性 设置属性方法 获取属性方法
动作
Action
setAction() getAction()
数据
Data
setData() getData()
分类
Category
addCategory() getCategories()
类型
Type
setType()
getType()
组件
Component
setComponent() setClass() setClassName()
getComponent()
扩展信息
Extra
putExtra() getXXXExtra()获取不同数据类型的数据,如int类型则使用getIntExtra(),字符串则使用getStringExtra() getExtras()获取Bundle包
Action属性 Intent类定义了一系列Action属性常量,但一般使用自定义的Action。
Category属性 Category属性为Action属性提供附加的信息。
CATEGORY_DEFAULT是最常用的Category属性。
Category属性
说明
CATEGORY_DEFAULT 默认的执行方式,按照普通Activity的执行方式执行
CATEGORY_HOME
该组件为Home Activity
CATEGORY_LAUNCHER
优先级最高的Activity,通常为入口ACTION_MAIN配合使用
CATEGORY_BROWSABLE
可以使用浏览器启动
CATEGORY_GADGET
可以内嵌到另外的Activity中
Data属性 Data属性是执行动作的URI和MIME类型,配合Action常量使用。
如Data属性tel://配合Action属性常量ACTION_DIAL。
1 2 3 Uri uri = Uri.parse("tel:10086" );Intent intent = new Intent (Intent.ACTION_DIAL, uri);startActivity(intent);
Data属性
说明 示例
tel://
号码数据格式,后跟电话号码
tel://123
mailto://
邮件数据格式,后跟邮件收件人地址
mailto://dh@163.com
smsto://
短息数据格式,后跟短信接收号码
smsto://123
content://
内容数据格式,后跟需要读取的内容
content://contacts/people/1
file://
文件数据格式,后跟文件路径
file://sdcard/mymusic.mp3
geo://latitude,longitude
经纬数据格式,在地图上显示经纬度所指定的位置
geo://180,65
Extras属性用于添加附加信息,是最常用的属性,详见“Activity间数据传递”。
Flags属性 Flags属性用于标记来源的启动方式,如FLAG_ACTIVITY_SINGLE_TOP代表SingleTop启动模式。
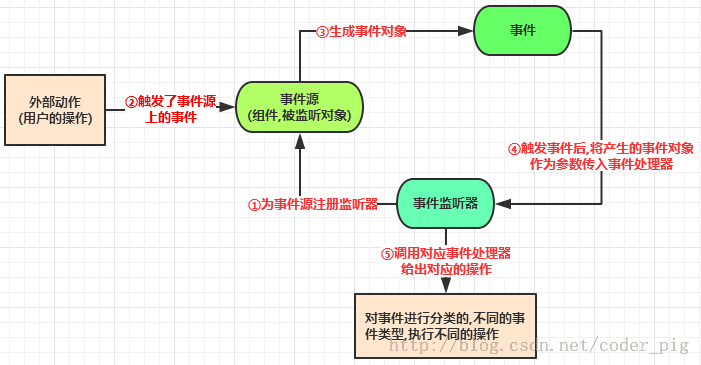
事件监听 什么是事件监听 事件监听全称为基于监听的事件处理,另外还有基于回调的事件处理。
Step 1:为某个事件源(组件)设置一个监听器,用于监听用户操作
Step 2:用户的操作,触发了事件源的监听器
Step 3:生成了对应的事件对象
Step 4:将这个事件源对象作为参数传给事件监听器
Step 5:事件监听器对事件对象进行判断,执行对应的事件处理器(对应事件的处理方法)
首先和Java一样,事件监听有匿名内部类、内部类、lambda、外部类、本类这些方式,Android另外还有一种绑定到layout xml布局文件的方法。
设置监听器 Java学过的就直接上代码了
匿名内部类 1 2 3 4 5 6 7 8 9 10 11 12 13 14 15 16 17 public class MainActivity extends AppCompatActivity { @Override protected void onCreate (Bundle savedInstanceState) { ... Button button1 = findViewById(R.id.button_0_1); button1.setOnClickListener(new View .OnClickListener() { @Override public void onClick (View v) { } }); ... } }
lambda 因为传入的类中只有一个可Override的函数,所以解释器可以推导出要实现的接口和要Override的函数。
1 2 3 4 5 6 7 8 9 10 11 12 13 public class MainActivity extends AppCompatActivity { @Override protected void onCreate (Bundle savedInstanceState) { ... Button button1 = findViewById(R.id.button_0_1); button1.setOnClickListener(v -> { }); } }
内部类 与匿名内部类不同的是,可以重复使用,可以访问外部类的控件。
1 2 3 4 5 6 7 8 9 10 11 12 13 14 15 16 17 18 19 public class MainActivity extends AppCompatActivity { @Override protected void onCreate (Bundle savedInstanceState) { ... Button button1 = findViewById(R.id.button_0_1); button1.setOnClickListener(new ButtonOnClickListener ()); ... } class ButtonOnClickListener implements View .OnClickListener { @Override public void onClick (View v) { } } }
外部类 就是把内部类加个public放到新的java文件里,不能访问控件。
ButtonOnClickListener.java
1 2 3 4 5 6 7 8 9 10 11 12 13 package com.example.openexampreview;import android.view.View;public class ButtonOnClickListener implements View .OnClickListener { @Override public void onClick (View v) { } }
MainActivity.java
1 2 3 4 5 6 7 8 9 10 public class MainActivity extends AppCompatActivity { @Override protected void onCreate (Bundle savedInstanceState) { ... Button button1 = findViewById(R.id.button_0_1); button1.setOnClickListener(new ButtonOnClickListener ()); ... } }
本类 这种方法可以把各事件的处理代码放到一起,比较聚合。
要对本类实现事件处理接口!然后在同一事件中使用switch(view.getId())区分不同事件源的处理代码。
1 2 3 4 5 6 7 8 9 10 11 12 13 14 15 16 17 18 19 20 21 22 23 24 25 26 27 28 29 30 31 32 33 34 35 36 37 38 39 40 41 42 public class MainActivity extends AppCompatActivity implements View .OnClickListener { ... @Override protected void onCreate (Bundle savedInstanceState) { ... Button startServiceButton = (Button) findViewById(R.id.start_service); Button stopServiceButton = (Button) findViewById(R.id.stop_service); ... Button bindServiceButton = (Button) findViewById(R.id.bind_service); Button unbindServiceButton = (Button) findViewById(R.id.unbind_service); ... } @Override public void onClick (View v) { switch (v.getId()) { case R.id.start_service: break ; case R.id.stop_service: break ; case R.id.bind_service: break ; case R.id.unbind_service: break ; default : break ; } } }
绑定layout 这个方法挺有意思,在Activity中添加一个事件处理函数,然后在Activity对应的Layout的事件源 中增加一行属性绑定事件处理函数 即可进行事件监听。
MainActivity.java
1 2 3 4 5 6 7 8 9 10 11 12 13 public class MainActivity extends AppCompatActivity { @Override protected void onCreate (Bundle savedInstanceState) { super .onCreate(savedInstanceState); setContentView(R.layout.main_layout); public void button_0_1_Click (View source) { } }
activity_main.xml
1 2 3 4 5 6 7 8 9 10 11 12 <?xml version="1.0" encoding="utf-8" ?> <LinearLayout ... > <Button android:id ="@+id/button_0_1" android:layout_width ="match_parent" android:layout_height ="wrap_content" android:text ="Button 0 1" android:onClick ="button_0_1_Click" > </Button > </LinearLayout >
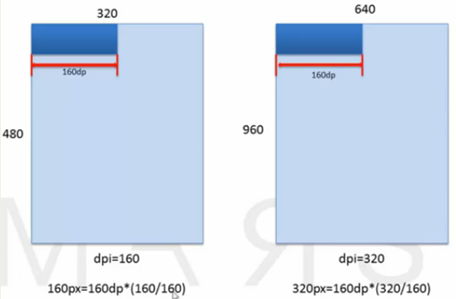
界面布局管理器 长度单位 px:像素(pixels),即屏幕上的像素点,1px代表占据一个像素点。
dp:独立像素(device independent pixels),这是我们使用最多的一种单位,一般来说我们在布局文件中定义件的宽高等属性时都会使用它。它是一种能够自动适应不同屏幕密度 的单位,定义:在160dpi的屏幕上1dp = 1px,因此有转换公式:。由于Android碎片化严重,使用它作为长度单位可以适配不同的屏幕密度。
sp:比例像素(scaled pixels),我们定义字体大小的时候,一般都会使用sp作单位。sp除了能够像dp一样可以适应屏幕密度的变化,还可以随着系统字体的大小设置改变作出变化 。如果产品经理不想文字随着手机设置中字体的大小发生改变(例如标题),可以使用dp代替。
in:英寸(inch),屏幕的物理尺寸,1 inch = 2.54cm。
pt:点(point),也是屏幕的物理尺寸,1 pt = 1/72 inch。
mm:毫米(millimeter),后面三种都是物理尺寸,在Android开发中不常用。
dpi:对角线每英寸像素点数(dots per inch),,其中$\sqrt{height^2 + width^2}$为对角线像素个数,$size$为对角线长度(英寸)。
px和dp直观感受
颜色 Android中的颜色值通常遵循RGB/ARGB标准。
A:透明度(Alpha)
R:红色(Red)
G:绿色(Green)
B:蓝色(Blue)
取值范围均为0 ~ 255(即16进制的0x00 ~ 0xFF)
A 从0x00到0xFF表示从透明到不透明
RGB 从0x00到0xFF表示颜色从浅到深。
当RGB全取最小值(0或0x000000)时颜色为黑色,全取最大值(255或0xFFFFFF)时颜色为白色。
eg. 颜色值#FF99CC00,其中FF是透明度,99是红色值,CC是绿色值,00是蓝色值。
颜色值#FF99CC,其中FF是红色值,99是绿色值,CC是蓝色值。
XML XML是指可扩展标记语言(eXtensible Markup Language),被设计用来结构化、存储以及传输信息。
术语:父、子以及同胞,用于描述元素之间的关系。父元素拥有子元素。相同层级上的子元素成为同胞。
例如这是一本书的结构。
那么可以这样表示某个书店。
1 2 3 4 5 6 7 8 9 10 11 12 13 14 15 16 17 18 19 20 21 <?xml version="1.0" encoding="UTF-8" ?> <bookstore > <book category ="COOKING" > <title lang ="en" > Everyday Italian</title > <author > Giada De Laurentiis</author > <year > 2005</year > <price > 30.00</price > </book > <book category ="CHILDREN" > <title lang ="en" > Harry Potter</title > <author > J K. Rowling</author > <year > 2005</year > <price > 29.99</price > </book > <book category ="WEB" > <title lang ="en" > Learning XML</title > <author > Erik T. Ray</author > <year > 2003</year > <price > 39.95</price > </book > </bookstore >
以此为例说明一下语法。
声明(declaration)
1 <?xml version="1.0" encoding="UTF-8" ?>
标签(Tag)
属性(Attribute):标签内部的键值对。
1 <book category ="COOKING" >
元素(Element):起始标签和结束标签间的内容。
1 2 3 <title lang ="en" > Everyday Italian </title >
1 2 3 <author > Giada De Laurentiis </author >
Android中xml的特点就是属性比较多,。
如:
1 2 3 4 5 6 7 8 9 10 11 12 13 14 15 16 <?xml version="1.0" encoding="utf-8" ?> <LinearLayout xmlns:android ="http://schemas.android.com/apk/res/android" xmlns:tools ="http://schemas.android.com/tools" android:orientation ="vertical" android:layout_width ="match_parent" android:layout_height ="match_parent" tools:context =".LinearLayoutActivity" > <Button android:id ="@+id/button0" android:layout_width ="match_parent" android:layout_height ="wrap_content" android:text ="Button" > </Button > </LinearLayout >
TextView 注意:xml不能使用//注释!(这里只是为了更好地说明)xml只能使用<!-- -->进行注释,且不能在元素处注释。
1 2 3 4 5 6 7 8 9 10 11 12 13 14 15 16 17 18 19 20 21 22 23 24 25 26 27 28 29 30 31 32 33 34 35 36 37 38 39 40 41 42 43 44 45 46 47 48 49 <TextView android:id = "@+id/xxx" android:layout_width="wrap_content" android:layout_height="wrap_content" android:text="@string/hello_world" android:textSize="24sp" android:textColor="#0000FF" android:textStyle="normal" android:gravity="center" android:singleLine="true" android:background="" android:layout_margin="10dp" android:padding="30dp" android:gravity="bottom|right" android:orientation="horizontal" > </TextView>
例:
1 2 3 4 5 6 7 8 9 10 11 12 13 14 15 16 17 18 19 20 21 22 23 <?xml version="1.0" encoding="utf-8" ?> <LinearLayout xmlns:android ="http://schemas.android.com/apk/res/android" xmlns:tools ="http://schemas.android.com/tools" android:orientation ="vertical" android:layout_width ="match_parent" android:layout_height ="match_parent" android:gravity ="center" android:background ="#8fffad" tools:context =".WidgetsPreview" > <TextView android:id ="@+id/text1" android:layout_width ="200dp" android:layout_height ="200dp" android:gravity ="center" android:text ="This is a TextView" android:textColor ="#EA5264" android:textStyle ="bold|italic" android:background ="#000000" android:textSize ="18sp" > </TextView > </LinearLayout >
和Text的属性差不多
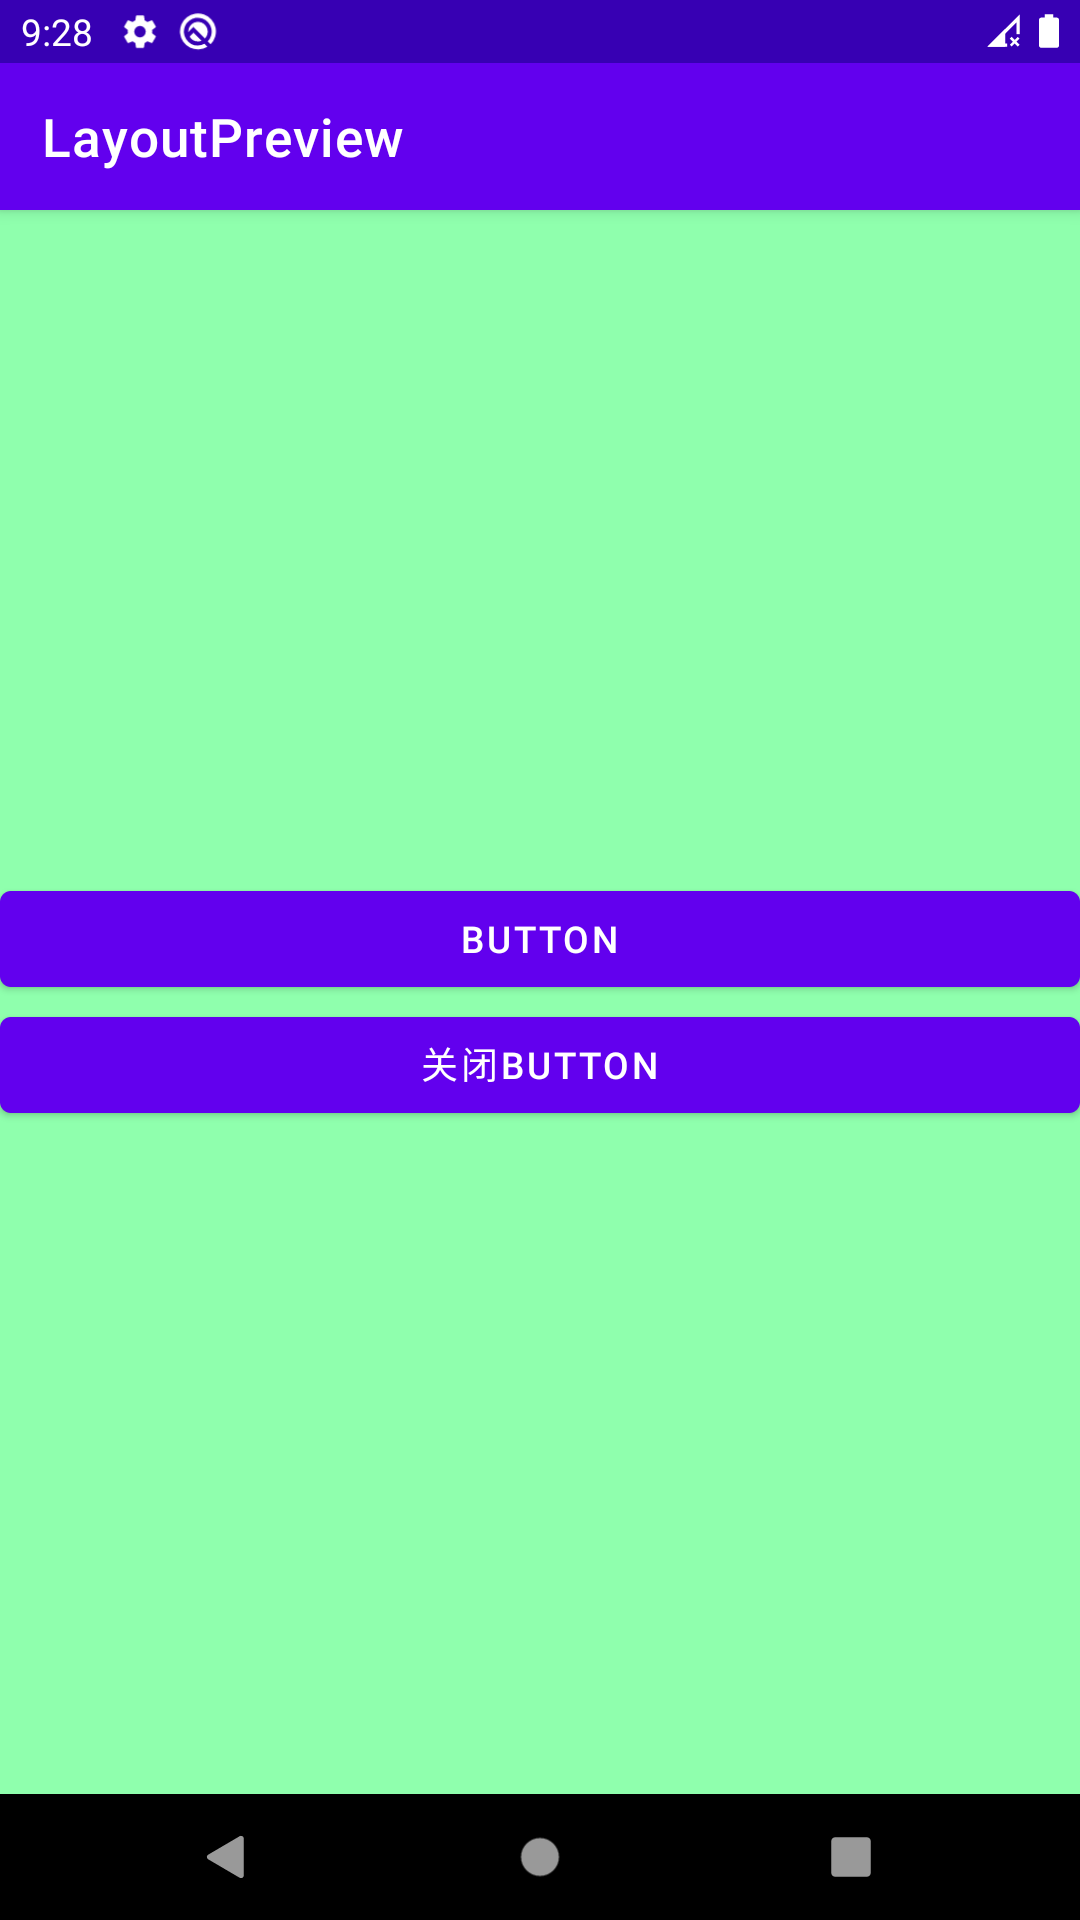
例:
xml
1 2 3 4 5 6 7 8 9 10 11 12 13 14 15 16 17 18 19 20 21 22 23 24 25 26 <?xml version="1.0" encoding="utf-8" ?> <LinearLayout xmlns:android ="http://schemas.android.com/apk/res/android" xmlns:tools ="http://schemas.android.com/tools" android:orientation ="vertical" android:layout_width ="match_parent" android:layout_height ="match_parent" android:gravity ="center" android:background ="#8fffad" tools:context =".WidgetsPreview" > <Button android:id ="@+id/button1" android:layout_width ="match_parent" android:layout_height ="wrap_content" android:text ="Button" > </Button > <Button android:id ="@+id/button2" android:layout_width ="match_parent" android:layout_height ="wrap_content" android:text ="关闭Button" android:onClick ="buttonOnClick" > </Button > </LinearLayout >
java
1 2 3 4 5 6 7 8 9 10 11 12 13 14 15 16 17 18 19 20 21 22 23 24 25 26 27 28 29 30 31 32 33 package com.example.layoutpreview;import androidx.appcompat.app.AppCompatActivity;import android.os.Bundle;import android.view.View;import android.widget.Button;public class WidgetsPreview extends AppCompatActivity { private Button button1; private Button button2; @Override protected void onCreate (Bundle savedInstanceState) { super .onCreate(savedInstanceState); setContentView(R.layout.activity_widgets_preview); button1 = findViewById(R.id.button1); button2 = findViewById(R.id.button2); } public void buttonOnClick (View v) { if (button2.getText().toString().equals("关闭Button" )) { button1.setEnabled(false ); button2.setText("启用Button" ); } else if (button2.getText().toString().equals("启用Button" )) { button1.setEnabled(true ); button2.setText("关闭Button" ); } } }
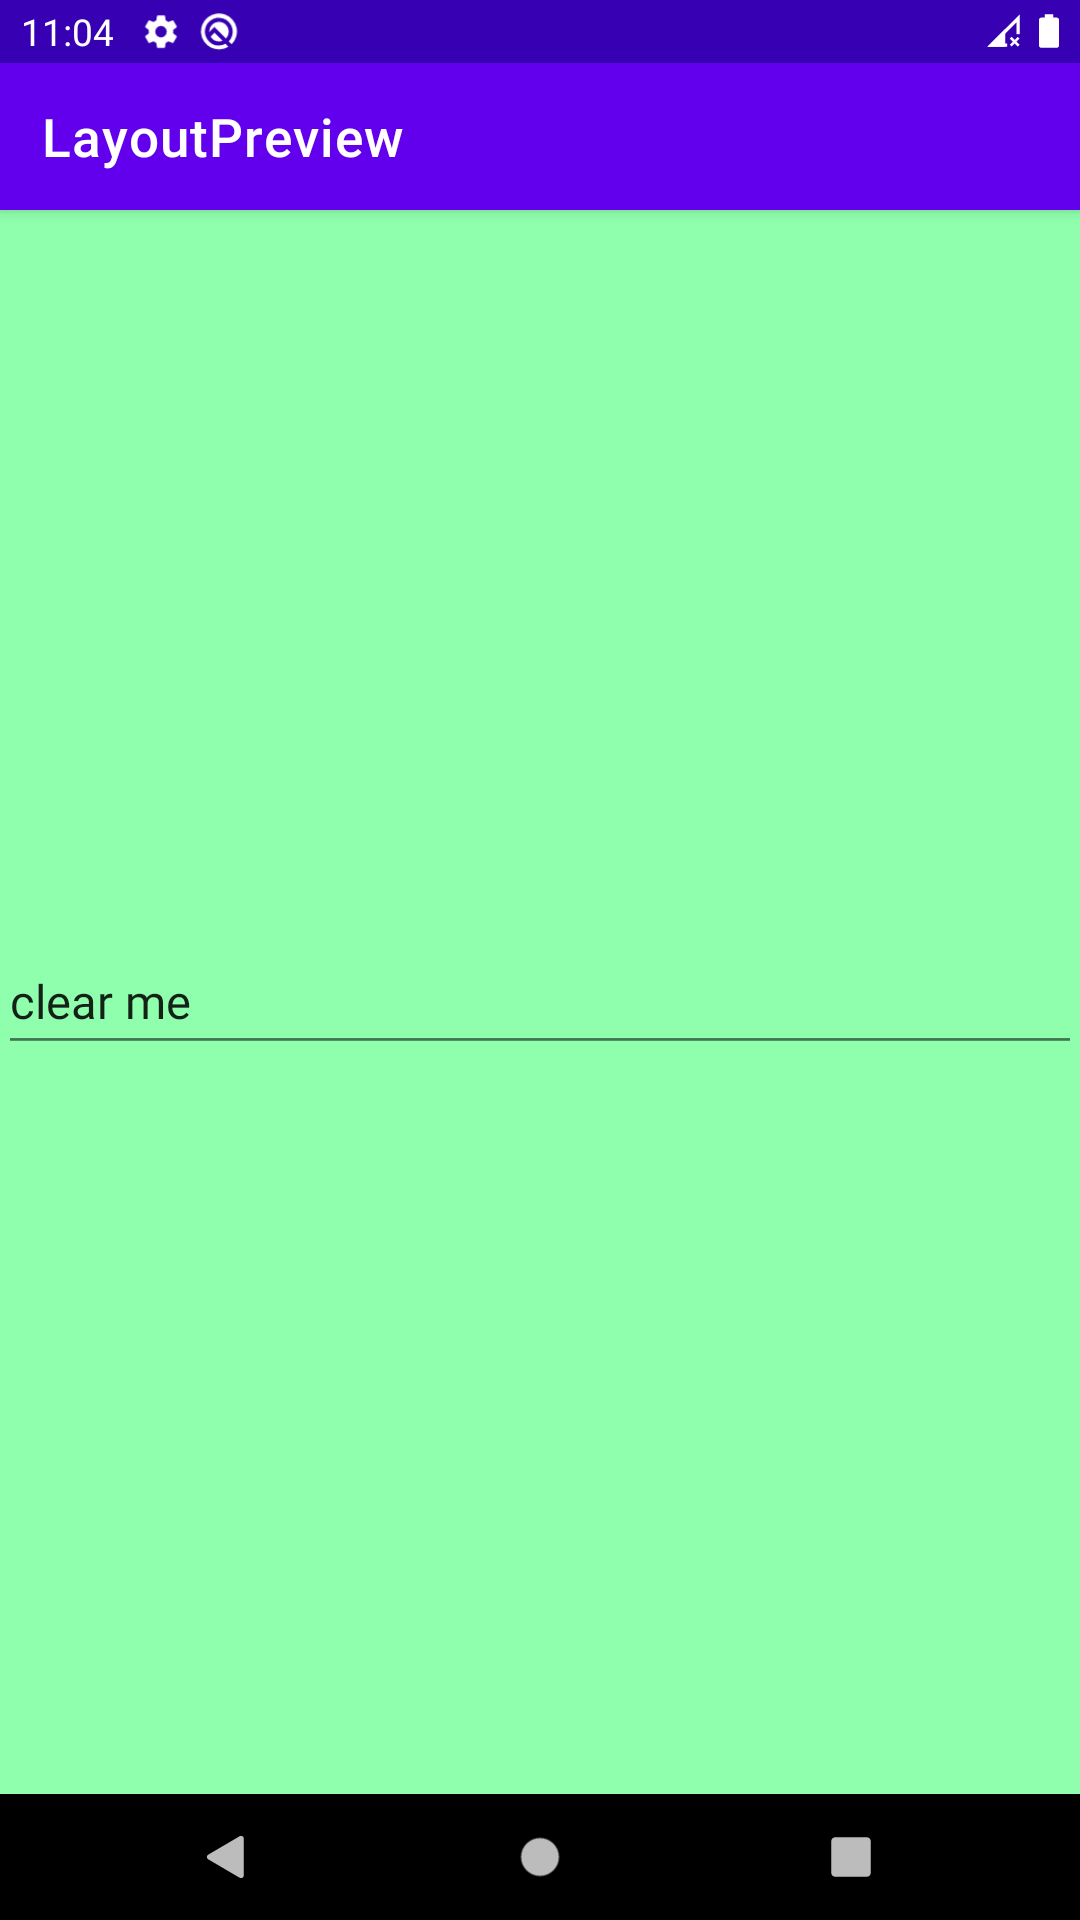
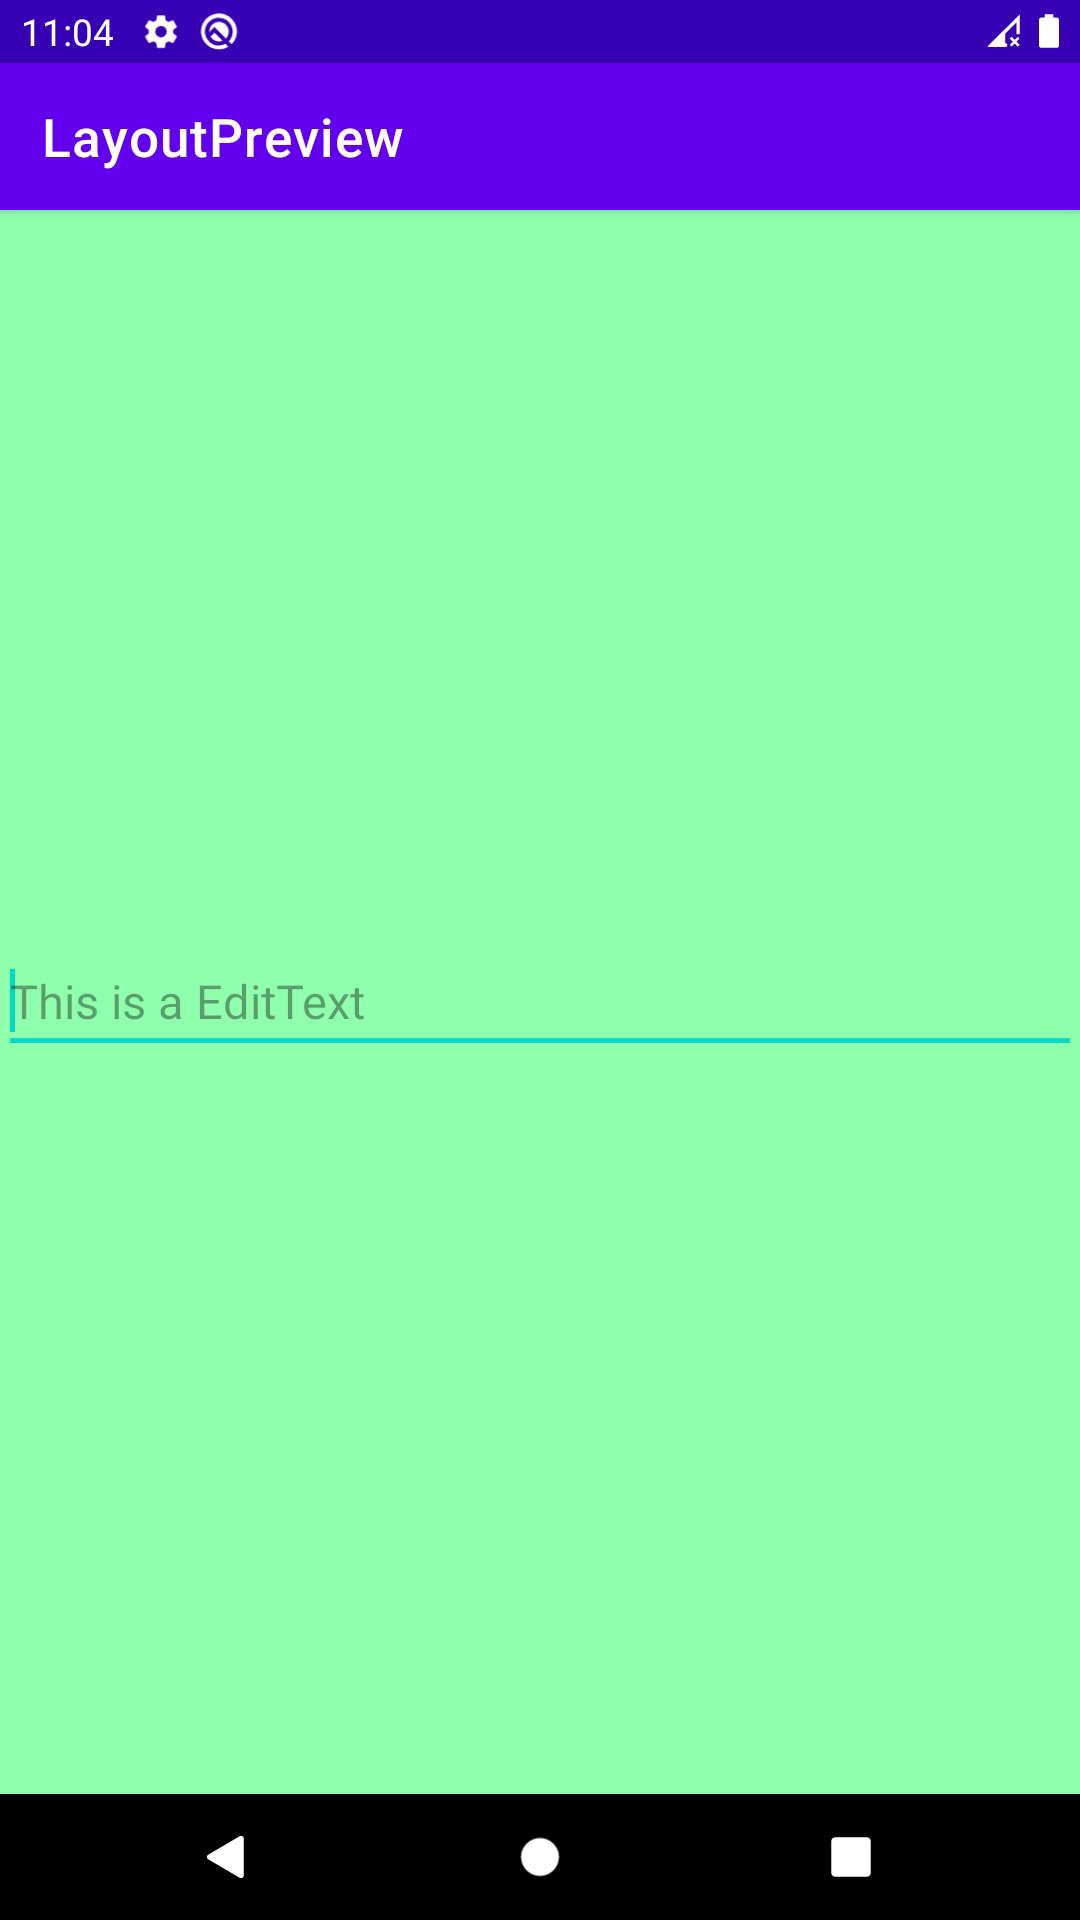
EditText
xml
1 2 3 4 5 6 7 8 9 10 11 12 13 14 15 16 17 18 19 20 <?xml version="1.0" encoding="utf-8" ?> <LinearLayout xmlns:android ="http://schemas.android.com/apk/res/android" xmlns:tools ="http://schemas.android.com/tools" android:orientation ="vertical" android:layout_width ="match_parent" android:layout_height ="match_parent" android:gravity ="center" android:background ="#8fffad" tools:context =".WidgetsPreview" > <EditText android:id ="@+id/edit1" android:layout_width ="match_parent" android:layout_height ="wrap_content" android:hint ="This is a EditText" android:minLines ="1" android:maxLines ="1" > </EditText > </LinearLayout >
java
1 2 3 4 5 6 7 8 9 10 11 12 13 14 15 16 17 18 19 20 21 package com.example.layoutpreview;import androidx.appcompat.app.AppCompatActivity;import android.os.Bundle;import android.view.View;import android.widget.EditText;public class WidgetsPreview extends AppCompatActivity { private EditText editText; @Override protected void onCreate (Bundle savedInstanceState) { super .onCreate(savedInstanceState); setContentView(R.layout.activity_widgets_preview); editText = findViewById(R.id.edit1); editText.setText("clear me" ); } }
ImageView 应该不会考,详见下面新闻程序
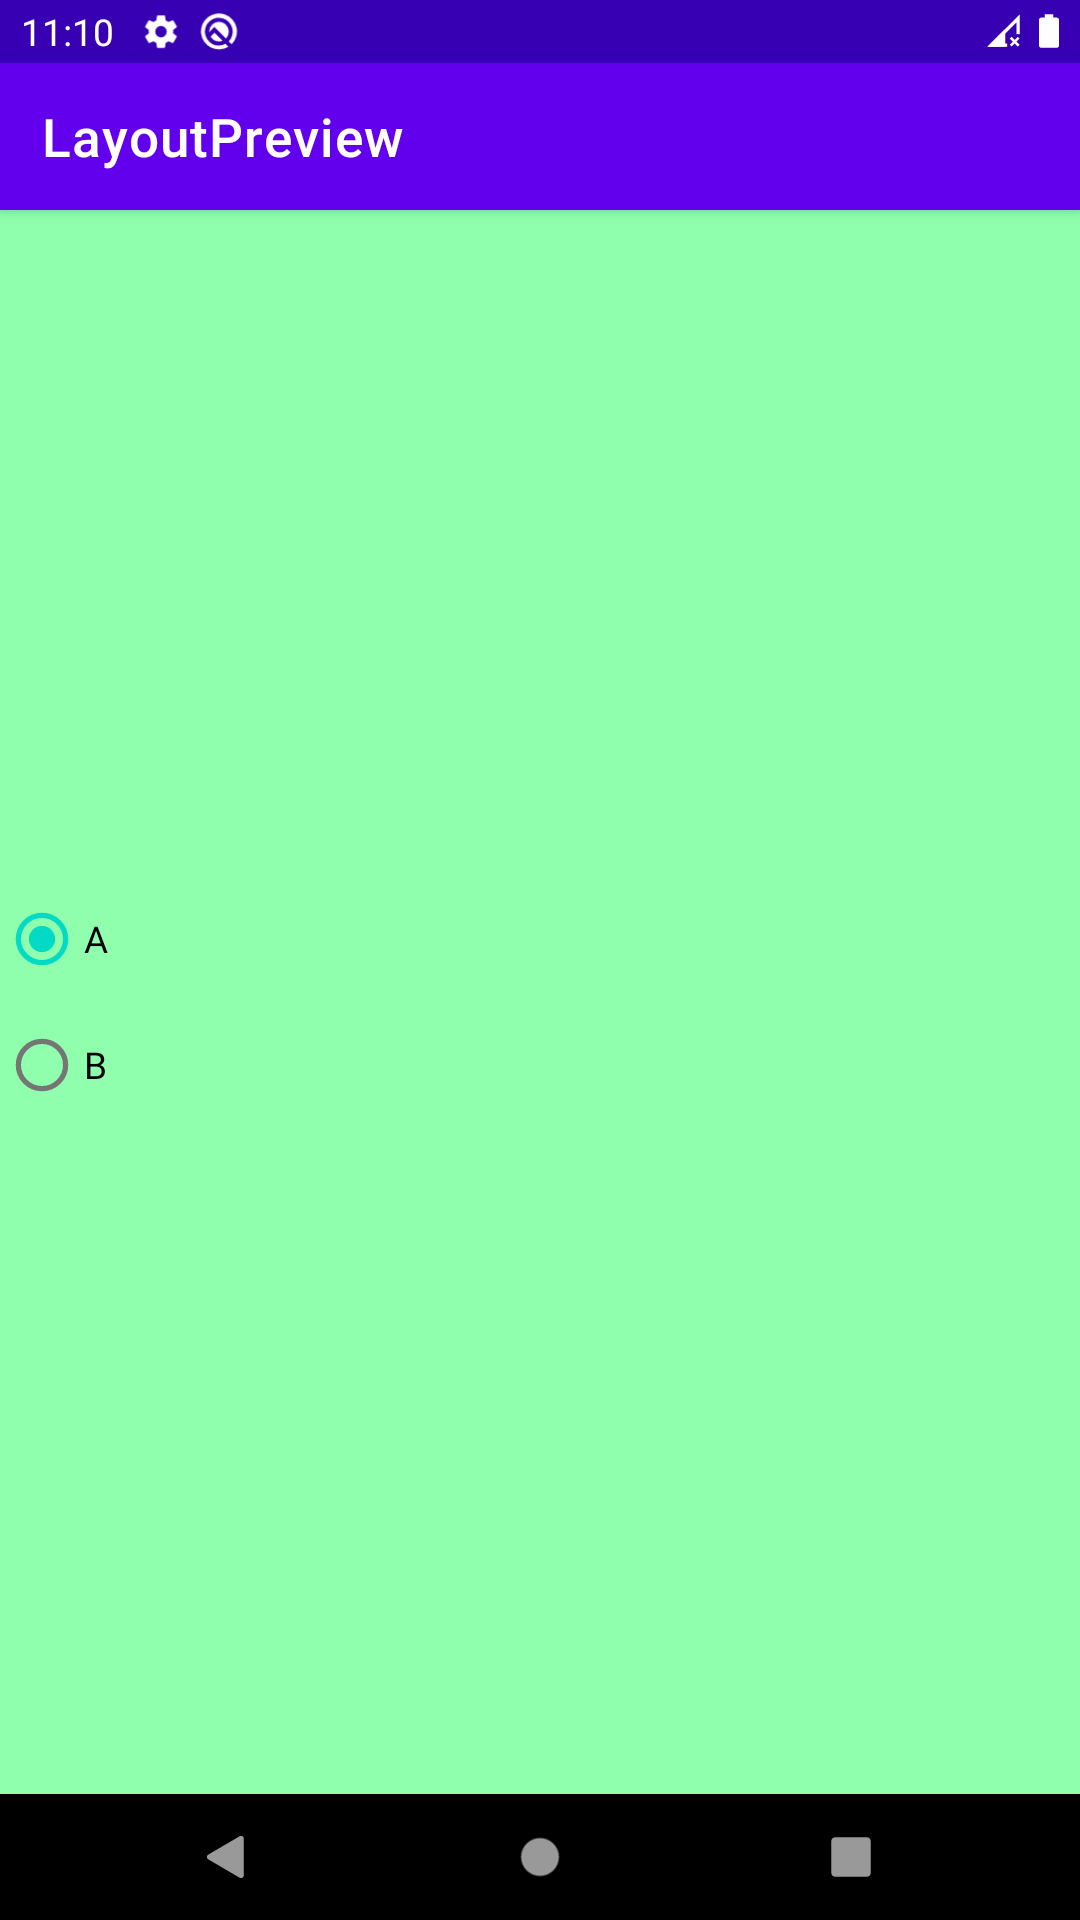
RadioGroup
xml
1 2 3 4 5 6 7 8 9 10 11 12 13 14 15 16 17 18 19 20 21 22 23 24 25 26 27 28 29 30 31 32 33 34 <?xml version="1.0" encoding="utf-8" ?> <LinearLayout xmlns:android ="http://schemas.android.com/apk/res/android" xmlns:tools ="http://schemas.android.com/tools" android:orientation ="vertical" android:layout_width ="match_parent" android:layout_height ="match_parent" android:gravity ="center" android:background ="#8fffad" tools:context =".WidgetsPreview" > <RadioGroup android:id ="@+id/radioGroup" android:layout_width ="match_parent" android:layout_height ="wrap_content" android:orientation ="vertical" > <RadioButton android:id ="@+id/radioButtonA" android:layout_width ="match_parent" android:layout_height ="wrap_content" android:text ="A" android:checked ="true" > </RadioButton > <RadioButton android:id ="@+id/radioButtonB" android:layout_width ="match_parent" android:layout_height ="wrap_content" android:text ="B" > </RadioButton > </RadioGroup > </LinearLayout >
CheckBox 应该不会考,不想写了
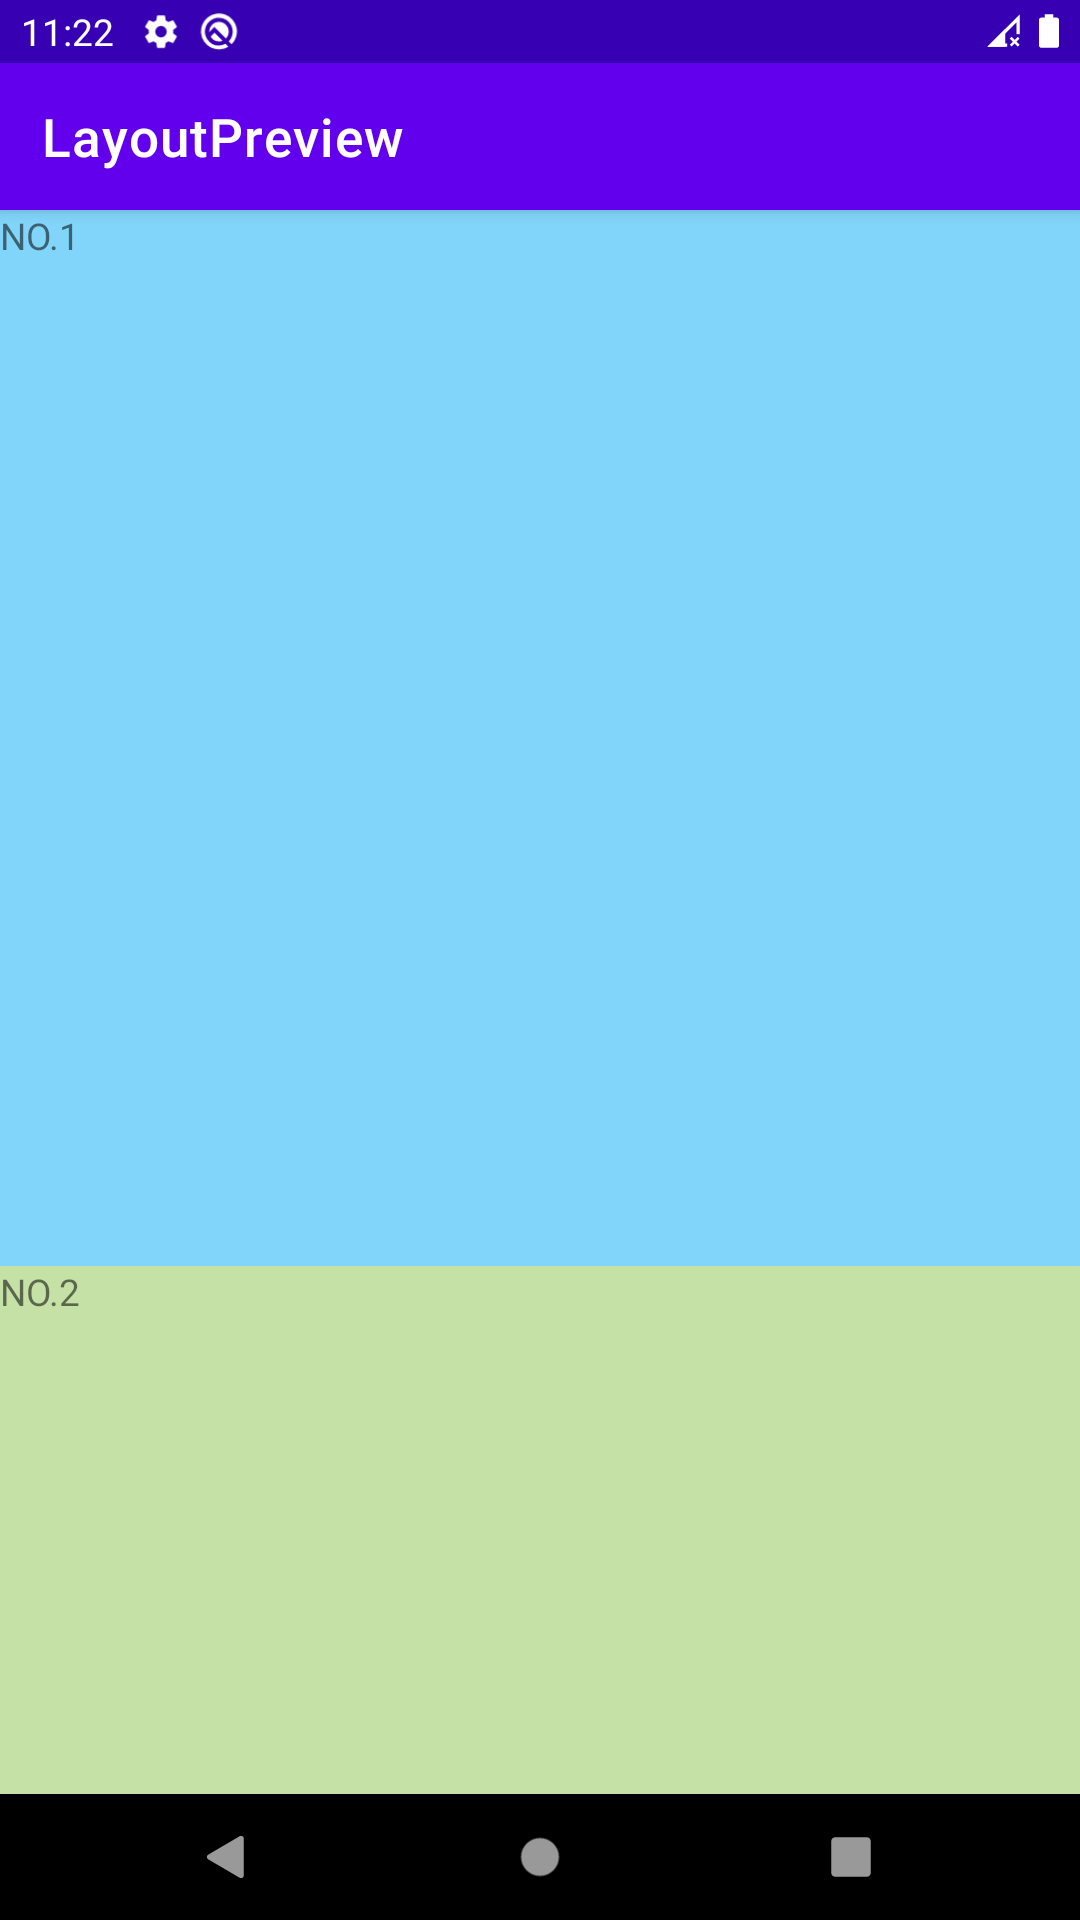
LinearLayout 注意一个问题,fill_parent和weight共同使用时的分配问题。
layout
1 2 3 4 5 6 7 8 9 10 11 12 13 14 15 16 17 18 19 20 21 22 23 24 25 26 27 28 29 30 31 32 33 34 35 36 37 <?xml version="1.0" encoding="utf-8" ?> <LinearLayout xmlns:android ="http://schemas.android.com/apk/res/android" xmlns:tools ="http://schemas.android.com/tools" android:orientation ="vertical" android:layout_width ="match_parent" android:layout_height ="match_parent" tools:context =".LinearLayoutActivity" > <TextView android:id ="@+id/text_view1" android:layout_width ="fill_parent" android:layout_height ="fill_parent" android:layout_weight ="1" android:text ="NO.1" android:background ="#81D4FA" > </TextView > <TextView android:id ="@+id/text_view2" android:layout_width ="fill_parent" android:layout_height ="fill_parent" android:layout_weight ="2" android:text ="NO.2" android:background ="#C5E1A5" > </TextView > <TextView android:id ="@+id/text_view3" android:layout_width ="fill_parent" android:layout_height ="fill_parent" android:layout_weight ="3" android:text ="NO.3" android:background ="#FFF59D" > </TextView > </LinearLayout >
渲染后如下
问题出现:纵向上本应该是(height使用0dp的情况)
但现在变成了
原因在于计算方法:
$1 - 3 = -2(fill_parent)$,缺少两个fill_parent,然后缺少的部分按weight分担
所以
所以最后形成了的结果。
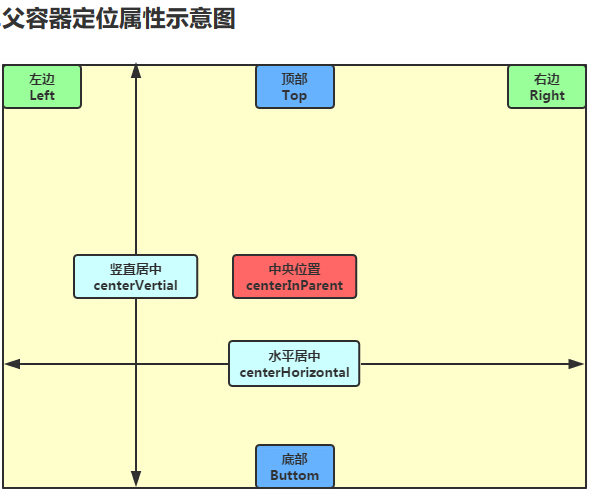
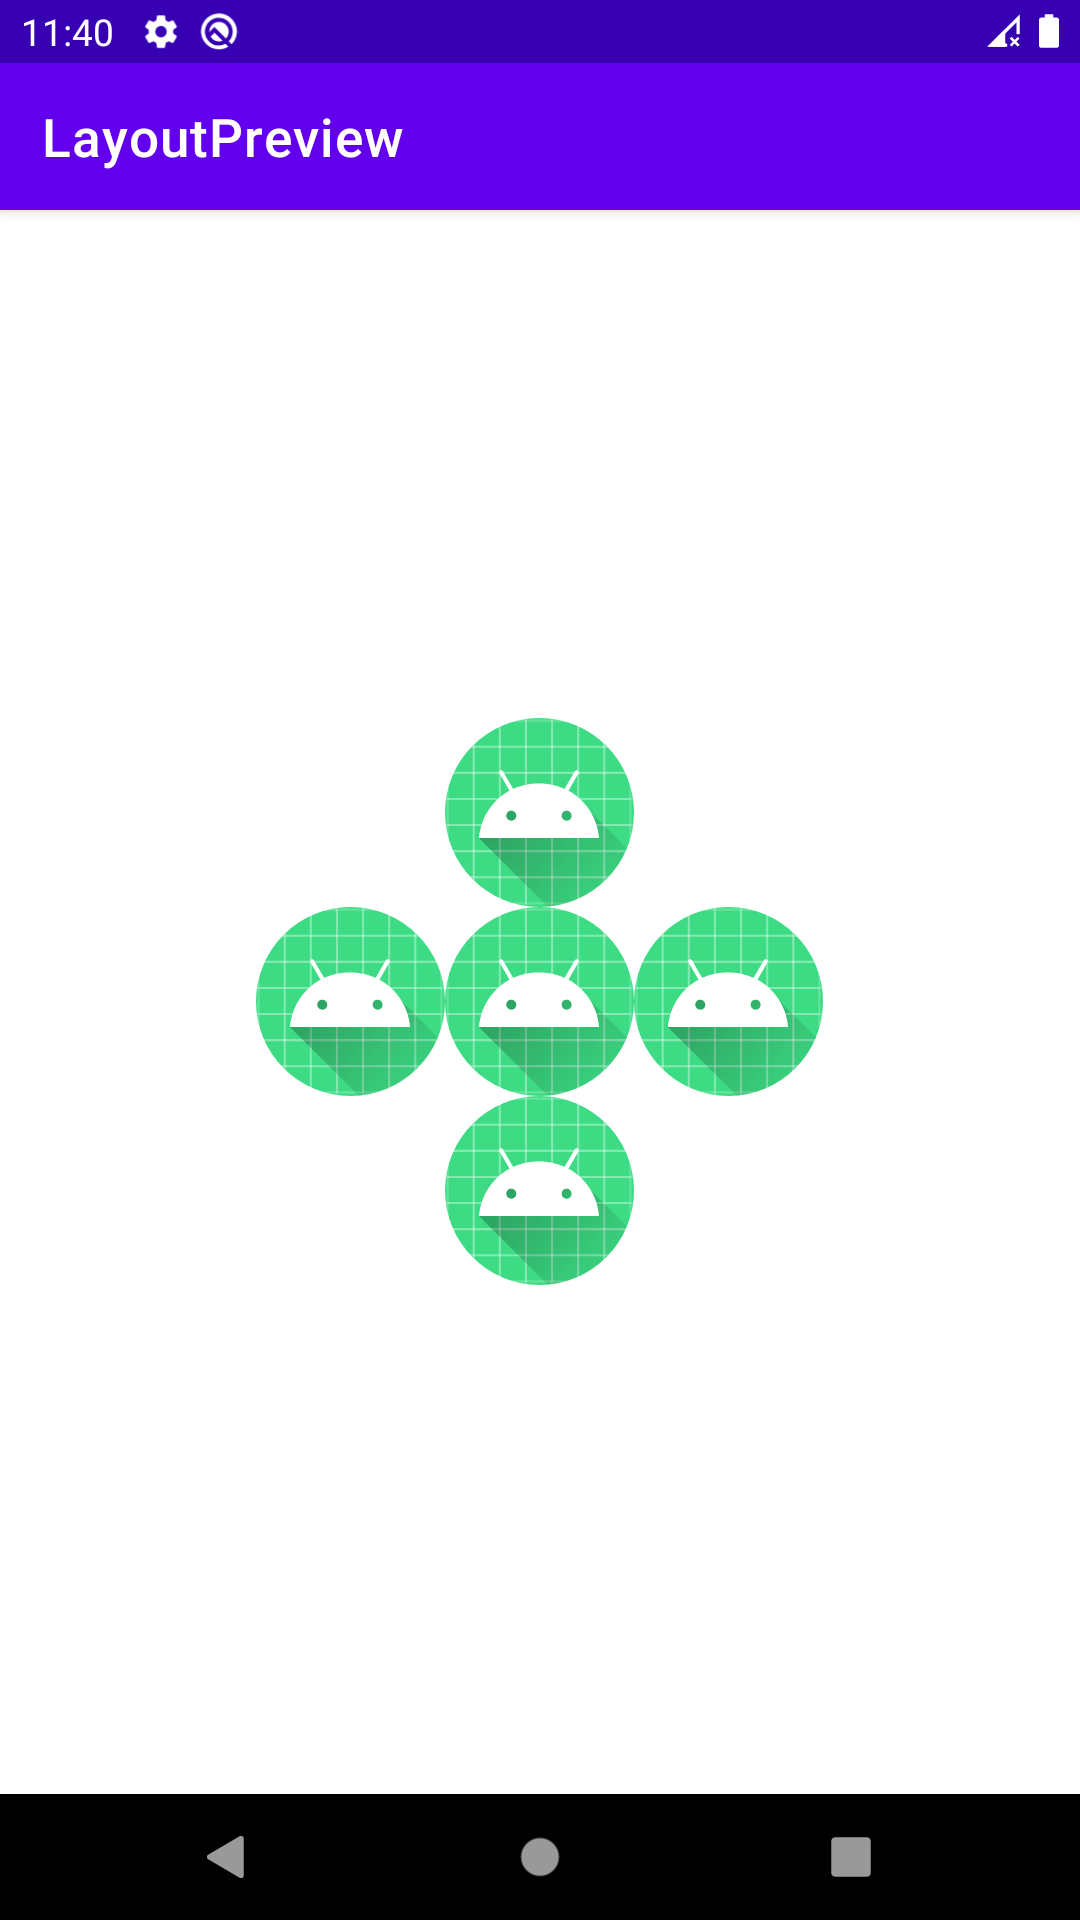
RelativeLayout
layout
1 2 3 4 5 6 7 8 9 10 11 12 13 14 15 16 17 18 19 20 21 22 23 24 25 26 27 28 29 30 31 32 33 34 35 36 37 38 39 40 41 42 43 44 45 46 47 48 49 50 51 52 <?xml version="1.0" encoding="utf-8" ?> <RelativeLayout xmlns:android ="http://schemas.android.com/apk/res/android" xmlns:tools ="http://schemas.android.com/tools" android:layout_width ="match_parent" android:layout_height ="match_parent" tools:context =".RelativeLayoutPreview" > <ImageView android:id ="@+id/img_center" android:layout_width ="wrap_content" android:layout_height ="wrap_content" android:layout_centerInParent ="true" android:src ="@mipmap/ic_launcher" > </ImageView > <ImageView android:id ="@+id/img_left" android:layout_width ="wrap_content" android:layout_height ="wrap_content" android:layout_centerVertical ="true" android:layout_toLeftOf ="@id/img_center" android:src ="@mipmap/ic_launcher" > </ImageView > <ImageView android:id ="@+id/img_right" android:layout_width ="wrap_content" android:layout_height ="wrap_content" android:layout_centerVertical ="true" android:layout_toRightOf ="@id/img_center" android:src ="@mipmap/ic_launcher" > </ImageView > <ImageView android:id ="@+id/img_above" android:layout_width ="wrap_content" android:layout_height ="wrap_content" android:layout_centerHorizontal ="true" android:layout_above ="@id/img_center" android:src ="@mipmap/ic_launcher" > </ImageView > <ImageView android:id ="@+id/img_below" android:layout_width ="wrap_content" android:layout_height ="wrap_content" android:layout_centerHorizontal ="true" android:layout_below ="@id/img_center" android:src ="@mipmap/ic_launcher" > </ImageView > </RelativeLayout >
注意一些属性
layout_toLeftof意为to left of … :放到…的左侧
layout_toRightof意为to right of … :放到…的右侧
layout_above意为above…:在…上方
layout_below意为below…:在…下方
layout_centerInParent:在父元素的中心,中央位置
layout_centerVertical:在竖直方向的中心,竖直居中
layout_centerHorizontal:在水平方向的中心,水平居中
FrameLayout 估计不考
TableLayout 估计不考
GridLayout 估计不考
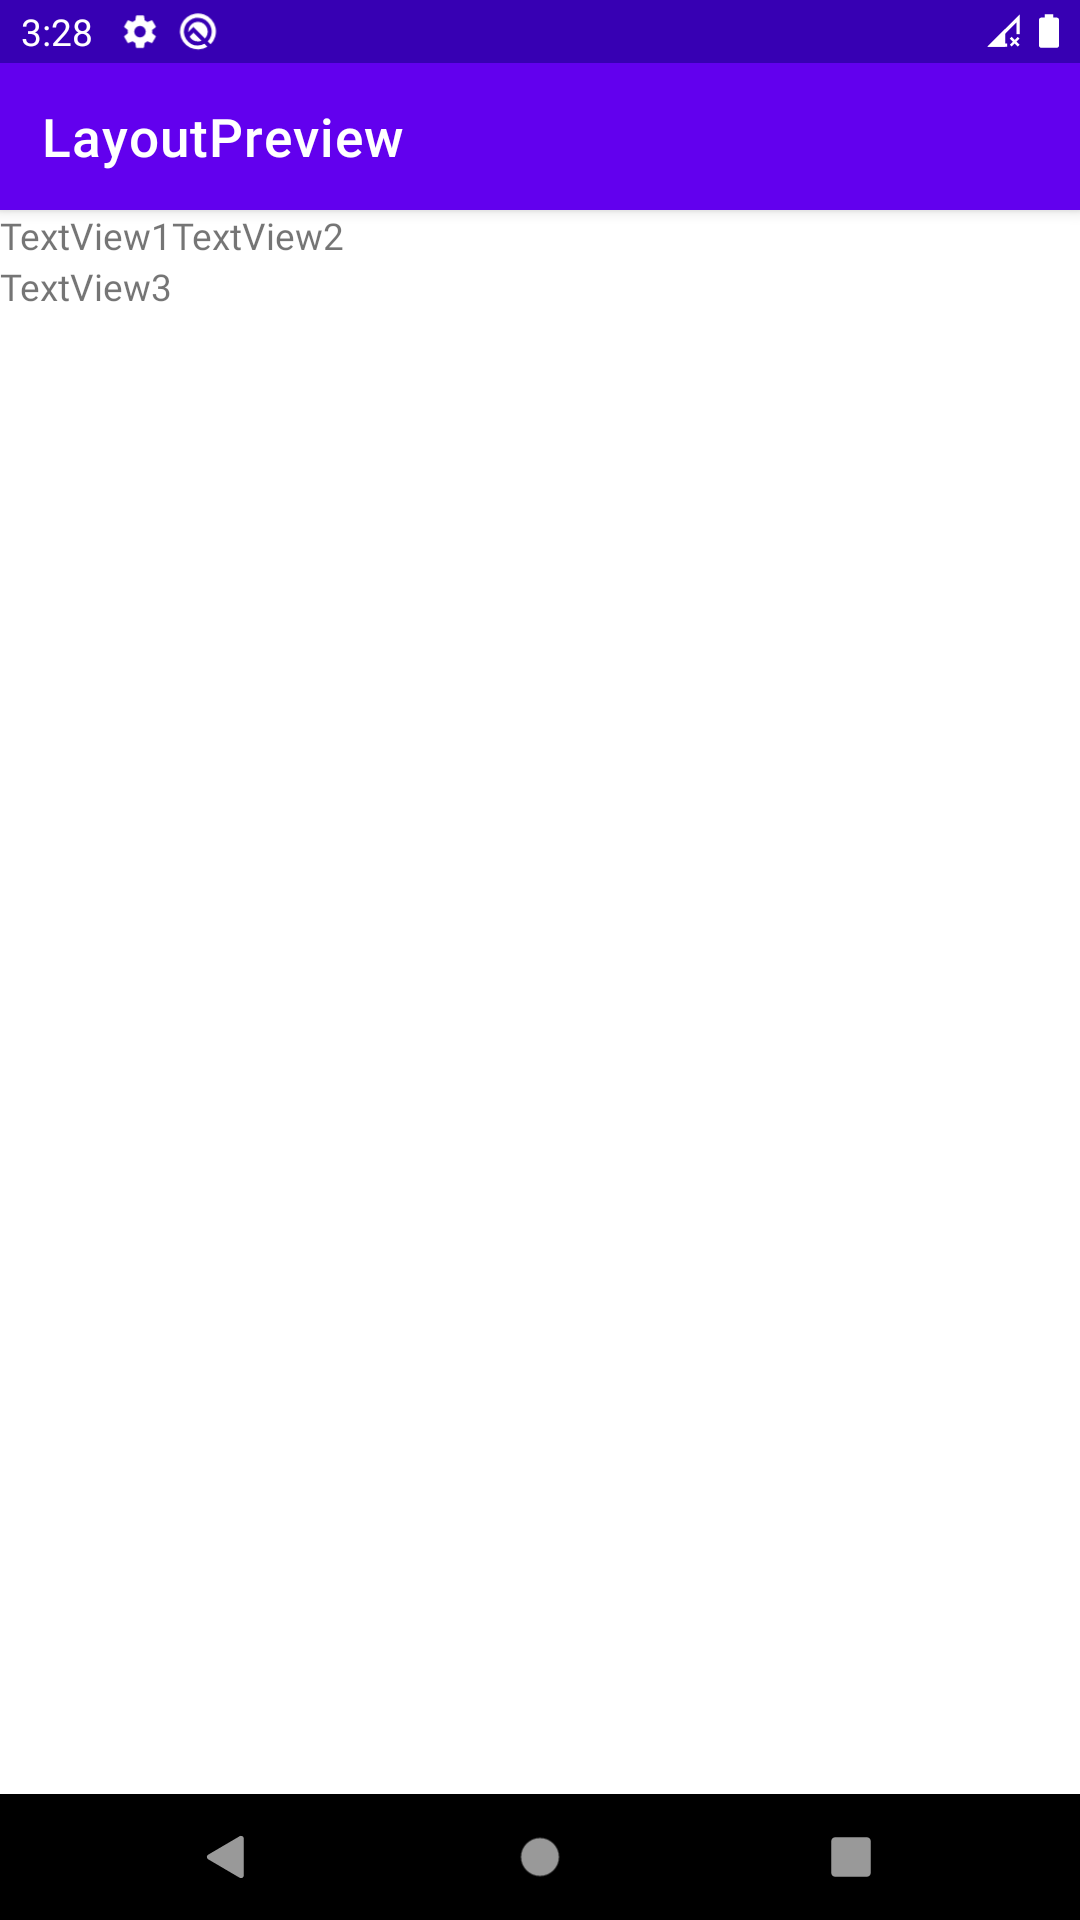
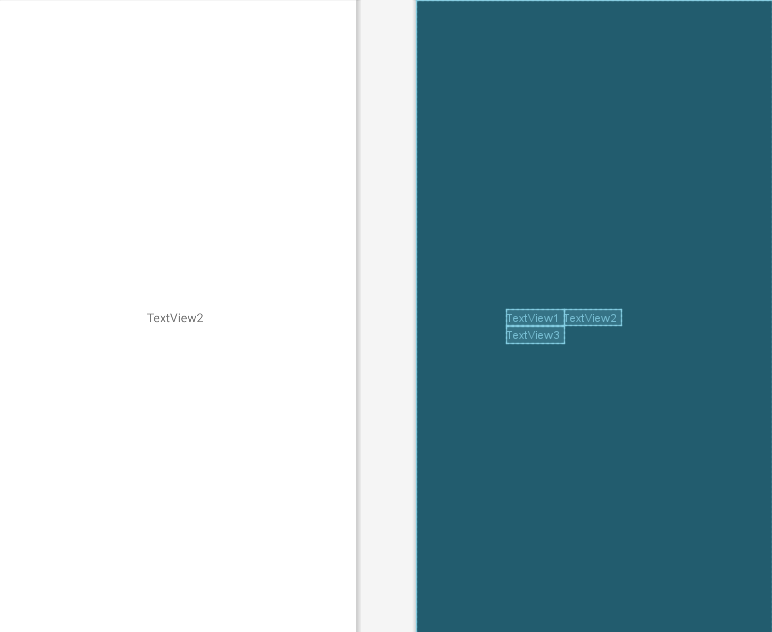
ConstraintLayout 相对定位
1 2 3 4 5 6 7 8 9 10 11 12 13 14 15 16 17 18 19 20 21 22 23 24 25 26 27 28 29 30 31 32 33 34 35 <?xml version="1.0" encoding="utf-8" ?> <androidx.constraintlayout.widget.ConstraintLayout xmlns:android ="http://schemas.android.com/apk/res/android" xmlns:app ="http://schemas.android.com/apk/res-auto" xmlns:tools ="http://schemas.android.com/tools" android:layout_width ="match_parent" android:layout_height ="match_parent" tools:context =".ConstraintLayoutActivity" > <TextView android:id ="@+id/constraint_text_view_1" android:layout_width ="wrap_content" android:layout_height ="wrap_content" android:text ="TextView1" tools:ignore ="MissingConstraints" > </TextView > <TextView android:id ="@+id/constraint_text_view_2" android:layout_width ="wrap_content" android:layout_height ="wrap_content" android:text ="TextView2" app:layout_constraintLeft_toRightOf ="@id/constraint_text_view_1" tools:ignore ="MissingConstraints" > </TextView > <TextView android:id ="@+id/constraint_text_view_3" android:layout_width ="wrap_content" android:layout_height ="wrap_content" android:text ="TextView3" app:layout_constraintTop_toBottomOf ="@id/constraint_text_view_1" tools:ignore ="MissingConstraints" > </TextView > </androidx.constraintlayout.widget.ConstraintLayout >
注意constraint的属性在app命名空间
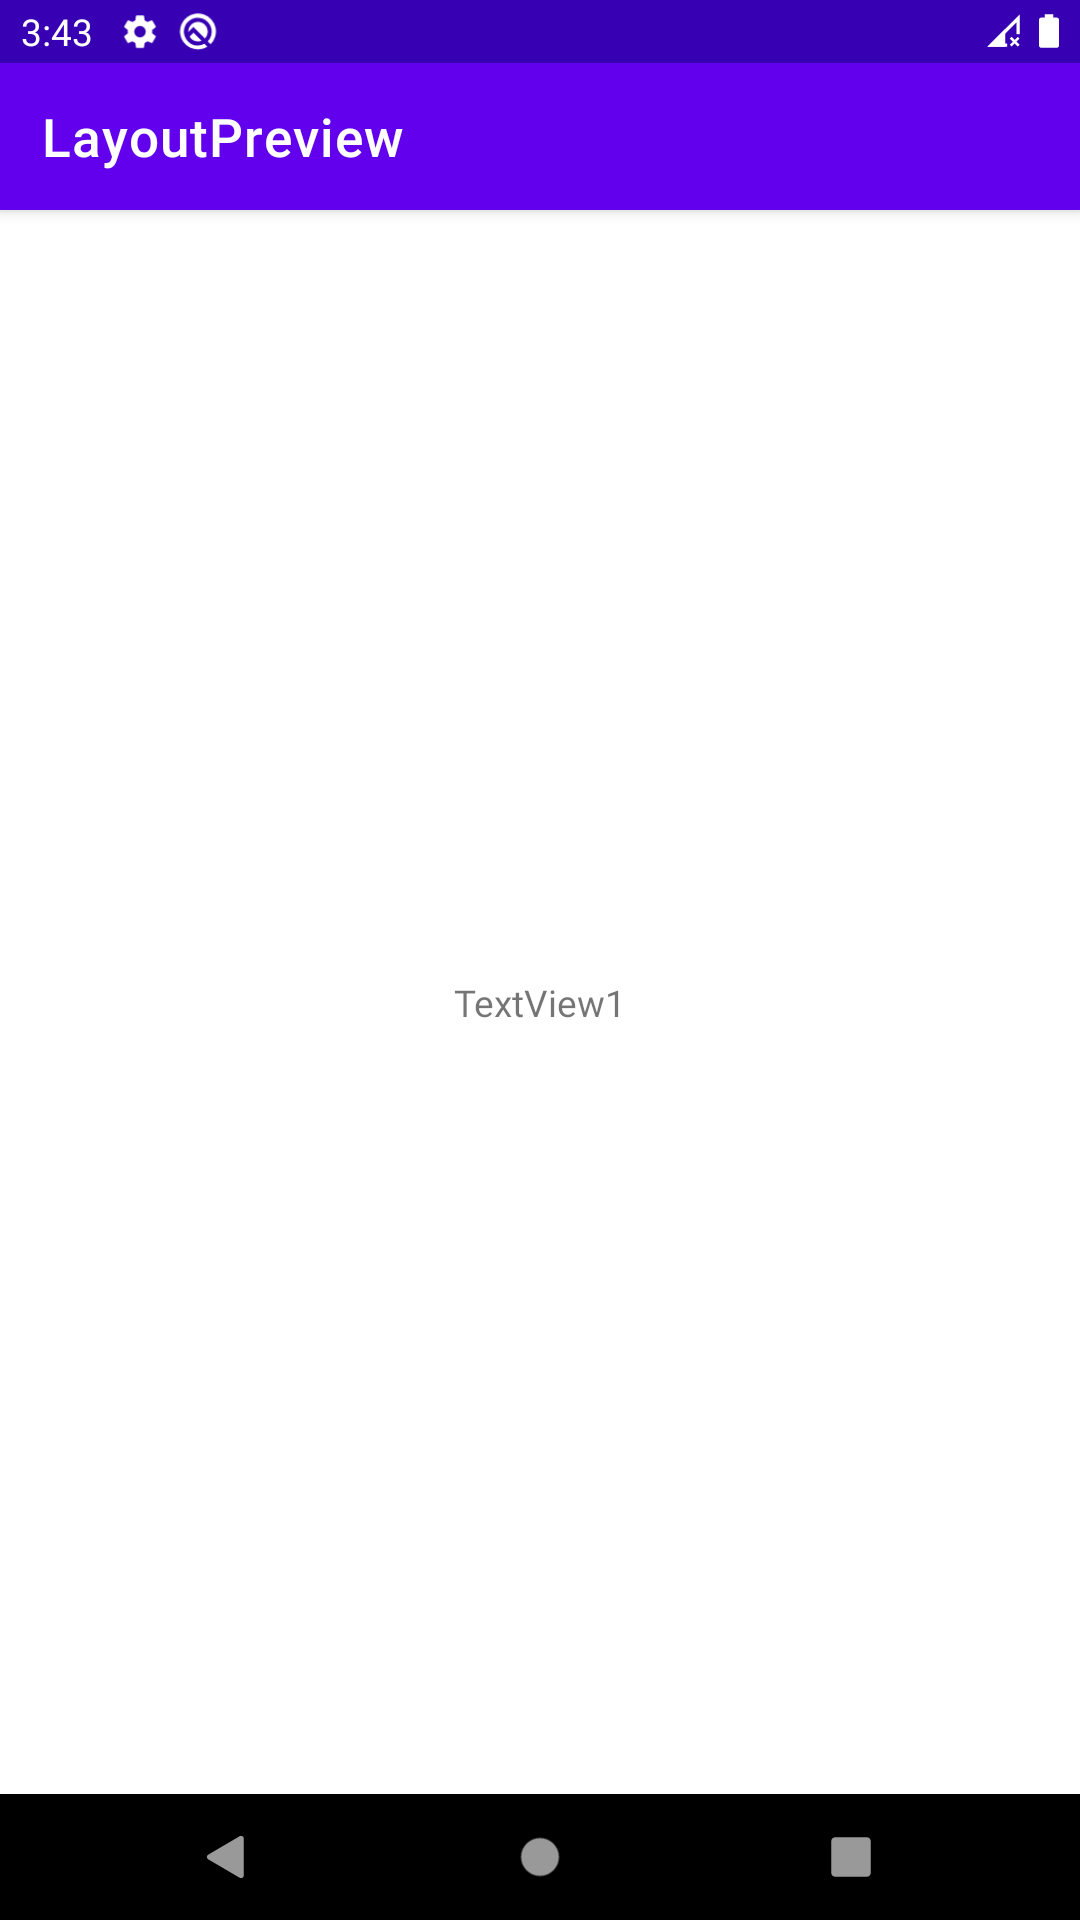
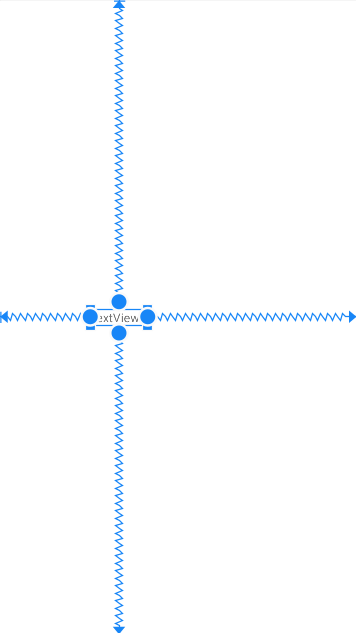
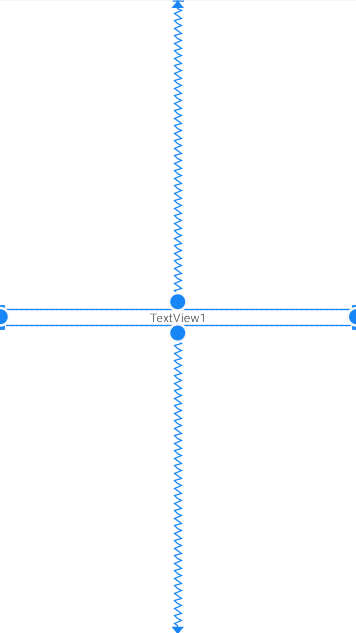
居中和偏移 layout_constraintX _toY Of… :把该控件的X贴到…的Y上(或者说在X上放一根连接Y方向的弹簧?)
居中:
1 2 3 4 5 6 7 8 9 10 <TextView android:id ="@+id/constraint_text_view_1" android:layout_width ="wrap_content" android:layout_height ="wrap_content" android:text ="TextView1" app:layout_constraintTop_toTopOf ="parent" app:layout_constraintBottom_toBottomOf ="parent" app:layout_constraintLeft_toLeftOf ="parent" app:layout_constraintRight_toRightOf ="parent" > </TextView >
该元素
上面贴父元素的上面
下面贴父元素的下面
左边贴父元素的左边
右边贴父元素的右边
那么
该元素居中(四根弹簧相互“制衡”)
偏移
1 2 3 4 5 6 7 8 9 10 11 <TextView android:id ="@+id/constraint_text_view_1" android:layout_width ="wrap_content" android:layout_height ="wrap_content" android:text ="TextView1" app:layout_constraintHorizontal_bias ="0.3" app:layout_constraintBottom_toBottomOf ="parent" app:layout_constraintTop_toTopOf ="parent" app:layout_constraintLeft_toLeftOf ="parent" app:layout_constraintRight_toRightOf ="parent" > </TextView >
app:layout_constraintHorizontal_bias="0.3"意为控件左边距左边框的比例为0.3
当然用android:layout_marginLeft也可以有类似的效果。
尺寸约束 注意:0dp
1 2 3 4 5 6 7 8 9 10 11 12 <TextView android:id ="@+id/constraint_text_view_1" android:layout_width ="0dp" android:layout_height ="wrap_content" android:gravity ="center" android:text ="TextView1" app:layout_constraintHorizontal_bias ="0.3" app:layout_constraintBottom_toBottomOf ="parent" app:layout_constraintTop_toTopOf ="parent" app:layout_constraintLeft_toLeftOf ="parent" app:layout_constraintRight_toRightOf ="parent" > </TextView >
此时app:layout_constraintHorizontal_bias属性无效
Group 1 2 3 4 5 6 7 <androidx.constraintlayout.widget.Group android:id ="@+id/group" android:layout_width ="wrap_content" android:layout_height ="wrap_content" android:visibility ="invisible" app:constraint_referenced_ids ="constraint_text_view_1,constraint_text_view_3" > </androidx.constraintlayout.widget.Group >
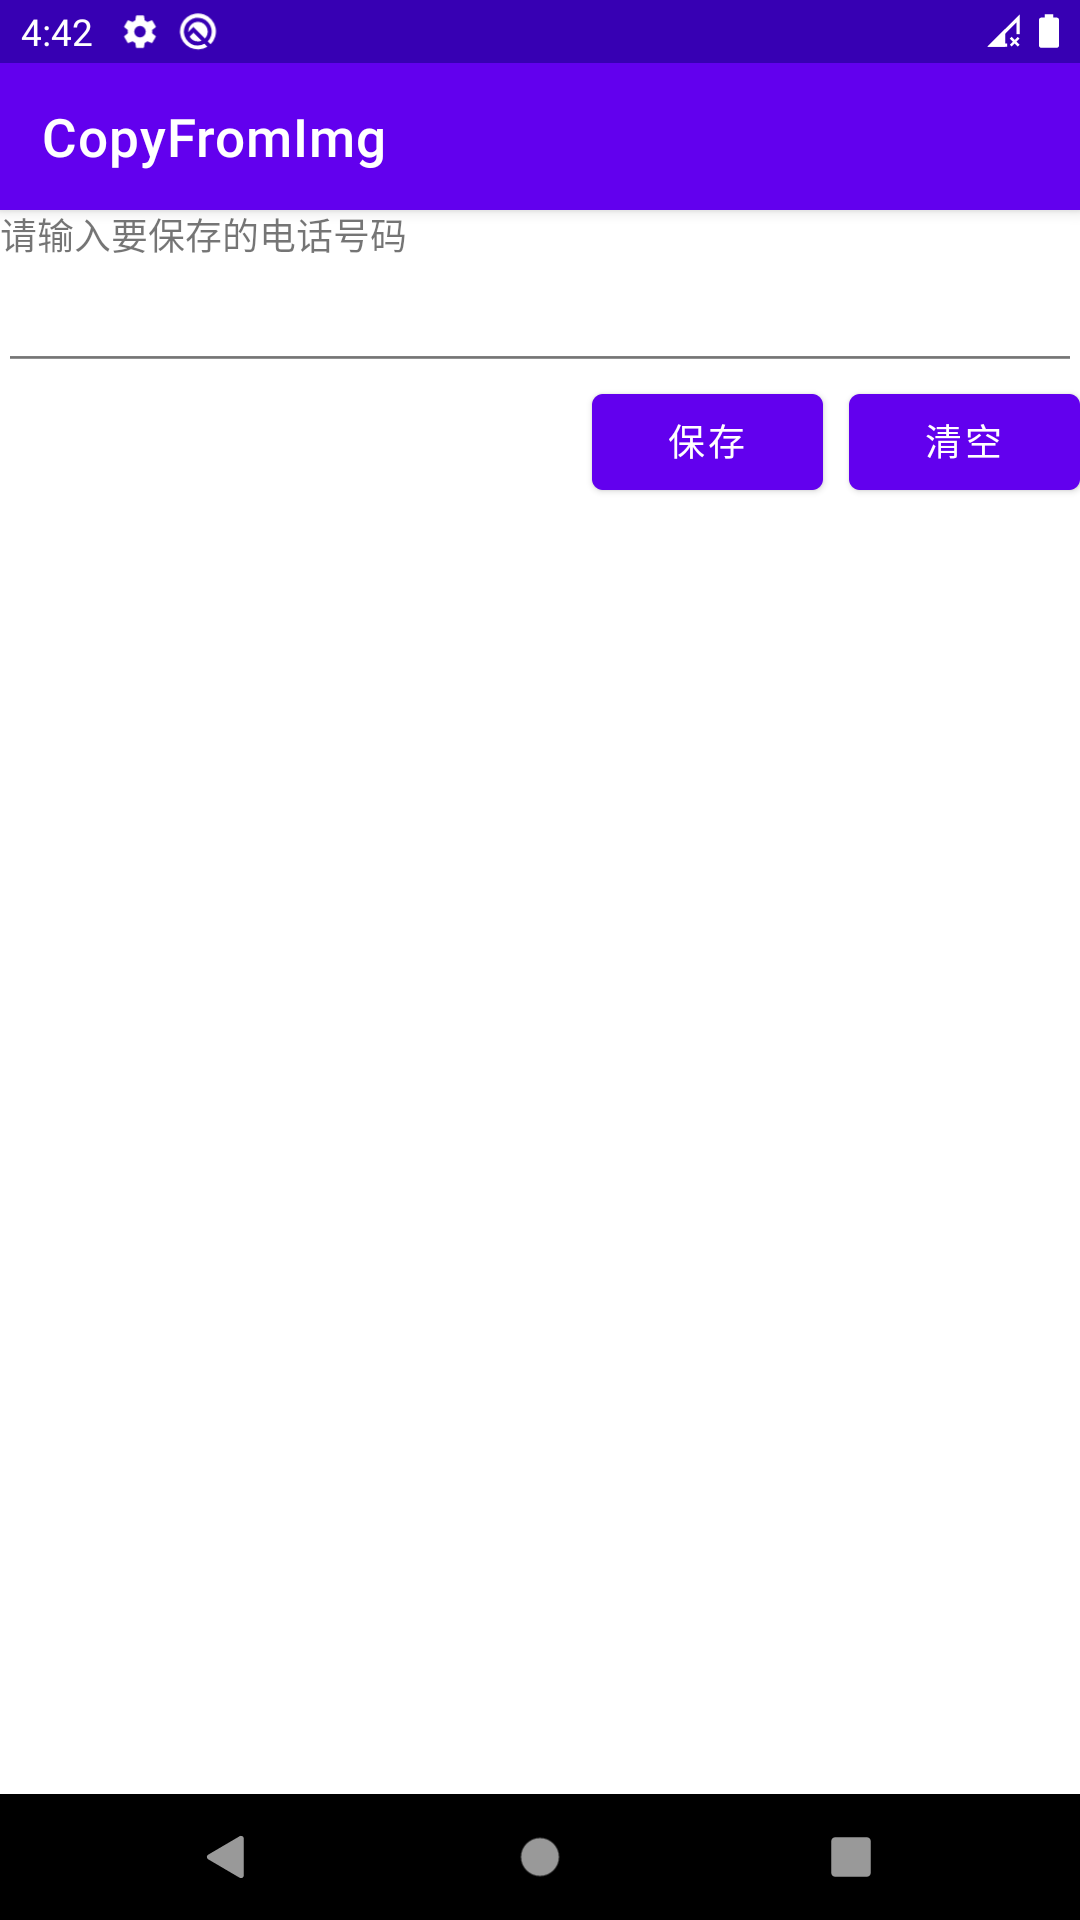
扒界面
ConstraintLayout 1 2 3 4 5 6 7 8 9 10 11 12 13 14 15 16 17 18 19 20 21 22 23 24 25 26 27 28 29 30 31 32 33 34 35 36 37 38 39 40 41 42 43 44 45 46 47 48 49 <?xml version="1.0" encoding="utf-8" ?> <androidx.constraintlayout.widget.ConstraintLayout xmlns:android ="http://schemas.android.com/apk/res/android" xmlns:app ="http://schemas.android.com/apk/res-auto" xmlns:tools ="http://schemas.android.com/tools" android:layout_width ="match_parent" android:layout_height ="match_parent" tools:context =".MainActivity" > <TextView android:id ="@+id/text_view1" android:layout_width ="wrap_content" android:layout_height ="wrap_content" android:text ="请输入要保存的电话号码" app:layout_constraintTop_toTopOf ="parent" app:layout_constraintLeft_toLeftOf ="parent" > </TextView > <EditText android:id ="@+id/edit_text1" android:layout_width ="match_parent" android:layout_height ="wrap_content" app:layout_constraintTop_toBottomOf ="@id/text_view1" app:layout_constraintLeft_toLeftOf ="parent" > </EditText > <Button android:id ="@+id/button1" android:layout_width ="wrap_content" android:layout_height ="wrap_content" app:layout_constraintTop_toBottomOf ="@id/edit_text1" app:layout_constraintRight_toRightOf ="parent" android:text ="清空" > </Button > <Button android:id ="@+id/button2" android:layout_width ="wrap_content" android:layout_height ="wrap_content" app:layout_constraintTop_toBottomOf ="@id/edit_text1" app:layout_constraintRight_toLeftOf ="@id/button1" android:layout_marginRight ="10dp" android:text ="保存" > </Button > </androidx.constraintlayout.widget.ConstraintLayout >
LinearLayout 1 2 3 4 5 6 7 8 9 10 11 12 13 14 15 16 17 18 19 20 21 22 23 24 25 26 27 28 29 30 31 32 33 34 35 36 37 38 39 40 41 42 43 44 45 46 47 48 49 50 51 52 53 <?xml version="1.0" encoding="utf-8" ?> <LinearLayout xmlns:android ="http://schemas.android.com/apk/res/android" xmlns:app ="http://schemas.android.com/apk/res-auto" xmlns:tools ="http://schemas.android.com/tools" android:layout_width ="match_parent" android:layout_height ="match_parent" tools:context =".LinearLayoutCopy" android:orientation ="vertical" > <TextView android:id ="@+id/linear_text_view_1" android:layout_width ="wrap_content" android:layout_height ="wrap_content" android:text ="请输入要保存的电话号码" > </TextView > <EditText android:id ="@+id/linear_edit_text_1" android:layout_width ="match_parent" android:layout_height ="wrap_content" > </EditText > <LinearLayout android:id ="@+id/linear_layout_1" android:layout_width ="match_parent" android:layout_height ="wrap_content" android:orientation ="horizontal" > <TextView android:layout_width ="0dp" android:layout_height ="wrap_content" android:layout_weight ="1" > </TextView > <Button android:id ="@+id/linear_button_1" android:layout_width ="wrap_content" android:layout_height ="wrap_content" android:text ="保存" android:layout_marginRight ="10dp" > </Button > <Button android:id ="@+id/linear_button_2" android:layout_width ="wrap_content" android:layout_height ="wrap_content" android:text ="清空" > </Button > </LinearLayout > </LinearLayout >
数据存储方法 SharedPreferences
SharedPreferences的写
获取SharedPreferences对象
获取SharedPreferences对象的Editor对象
使用Editor对象的putXXX()方法写入键值对
使用Editor对象的commit()方法提交
SharedPreferences的读
获取SharedPreferences对象
使用SharedPreferences对象的getString()方法读取value,并存入Map对象中
返回Map对象
使用
代码
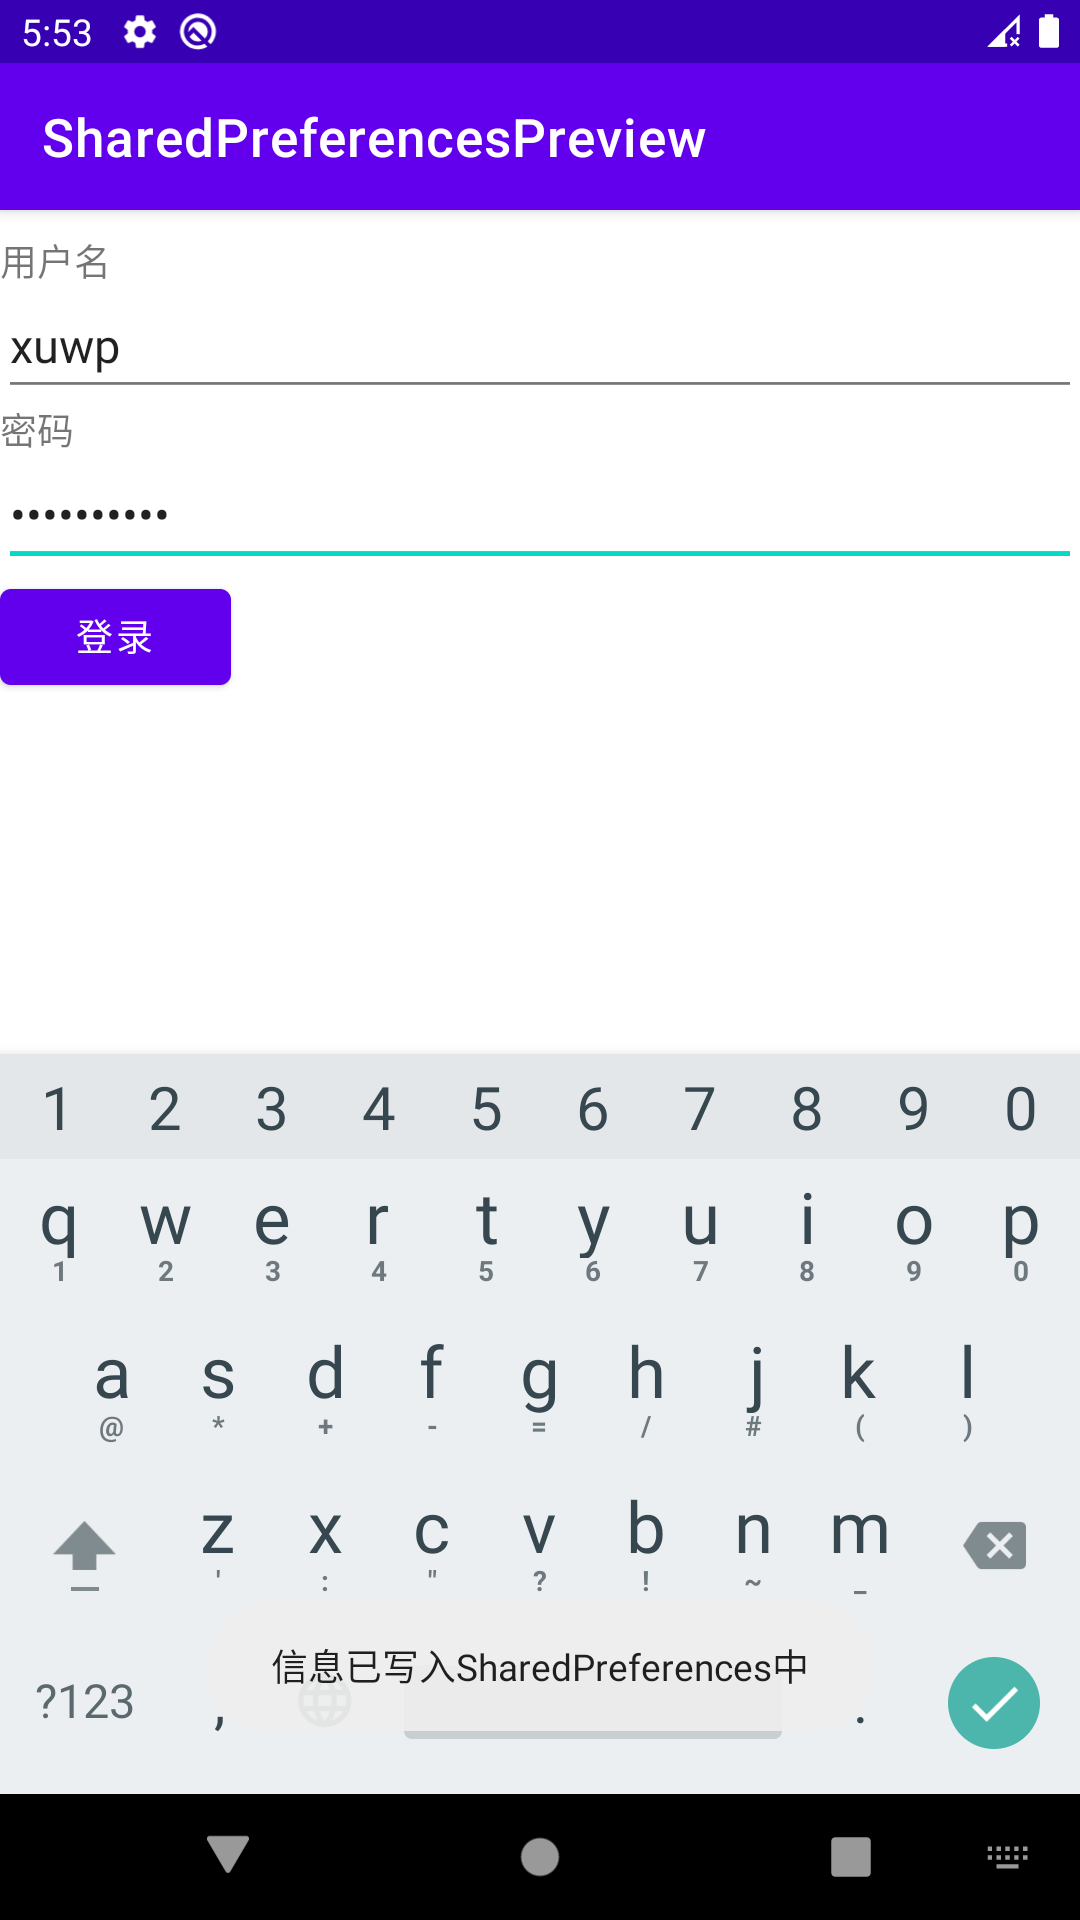
activity_main
1 2 3 4 5 6 7 8 9 10 11 12 13 14 15 16 17 18 19 20 21 22 23 24 25 26 27 28 29 30 31 32 33 34 35 36 37 38 <?xml version="1.0" encoding="utf-8" ?> <LinearLayout xmlns:android ="http://schemas.android.com/apk/res/android" xmlns:app ="http://schemas.android.com/apk/res-auto" xmlns:tools ="http://schemas.android.com/tools" android:layout_width ="match_parent" android:layout_height ="match_parent" tools:context =".MainActivity" android:orientation ="vertical" > <TextView android:layout_width ="wrap_content" android:layout_height ="wrap_content" android:layout_marginTop ="10dp" android:text ="用户名" /> <EditText android:id ="@+id/edit_text_1" android:layout_width ="match_parent" android:layout_height ="wrap_content" /> <TextView android:layout_width ="wrap_content" android:layout_height ="wrap_content" android:text ="密码" /> <EditText android:id ="@+id/edit_text_2" android:layout_width ="match_parent" android:layout_height ="wrap_content" android:inputType ="textPassword" /> <Button android:id ="@+id/button_1" android:layout_width ="wrap_content" android:layout_height ="wrap_content" android:text ="登录" /> </LinearLayout >
SharedPreferencesHelper.java
1 2 3 4 5 6 7 8 9 10 11 12 13 14 15 16 17 18 19 20 21 22 23 24 25 26 27 28 29 30 31 32 33 34 35 36 37 38 39 40 41 package com.example.sharedpreferencespreview;import android.content.Context;import android.content.SharedPreferences;import android.widget.Toast;import java.util.HashMap;import java.util.Map;public class SharedPreferencesHelper { private Context mContext; public SharedPreferencesHelper () { } public SharedPreferencesHelper (Context mContext) { this .mContext = mContext; } public void save (String username, String passwd) { SharedPreferences sharedPreferences = mContext.getSharedPreferences("mySharedPreferences" , Context.MODE_PRIVATE); SharedPreferences.Editor editor = sharedPreferences.edit(); editor.putString("username" , username); editor.putString("passwd" , passwd); editor.commit(); Toast.makeText(mContext, "信息已写入SharedPreferences中" , Toast.LENGTH_SHORT).show(); } public Map<String, String> read () { SharedPreferences sharedPreferences = mContext.getSharedPreferences("mySharedPreferences" , Context.MODE_PRIVATE); Map<String, String> data = new HashMap <String, String>(); data.put("username" , sharedPreferences.getString("username" , "" )); data.put("passwd" , sharedPreferences.getString("passwd" , "" )); return data; } }
MainActivity.java
1 2 3 4 5 6 7 8 9 10 11 12 13 14 15 16 17 18 19 20 21 22 23 24 25 26 27 28 29 30 31 32 33 34 35 36 37 38 39 40 41 42 43 44 45 46 47 48 49 50 51 52 53 package com.example.sharedpreferencespreview;import androidx.appcompat.app.AppCompatActivity;import android.content.Context;import android.os.Bundle;import android.view.View;import android.widget.Button;import android.widget.EditText;import java.util.Map;public class MainActivity extends AppCompatActivity { private EditText editName; private EditText editPasswd; private Button buttonLogin; private String username; private String password; private SharedPreferencesHelper helper; private Context mContext; @Override protected void onCreate (Bundle savedInstanceState) { super .onCreate(savedInstanceState); setContentView(R.layout.activity_main); mContext = getApplicationContext(); helper = new SharedPreferencesHelper (mContext); bindViews(); } private void bindViews () { editName = (EditText) findViewById(R.id.edit_text_1); editPasswd = (EditText) findViewById(R.id.edit_text_2); buttonLogin = (Button) findViewById(R.id.button_1); buttonLogin.setOnClickListener(new View .OnClickListener() { @Override public void onClick (View v) { username = editName.getText().toString(); password = editPasswd.getText().toString(); helper.save(username, password); } }); } @Override protected void onStart () { super .onStart(); Map<String, String> data = helper.read(); editName.setText(data.get("username" )); editPasswd.setText(data.get("passwd" )); } }
重写onStart,在重新打开应用时自动填入对应value
Content Provider 详见前面
总结一下五种存储方式应用场景和主要差异 SharedPreferences:存储用户的偏好参数。以键值对的形式将数据存储到xml文件中。适用于少量数据的存储。
文件:存储一些简单的文本数据或二进制数据。无格式化处理。适用于大量数据的存储。
SQLite数据库:存储大量结构性数据。支持SQL语言。
ContentProvider:用于进程间数据共享。通过URI操作数据。
网络:用于实时传输网络上存储的xml和json文件。完全依赖网络,要考虑资费问题。
高级组件ListView与MVVC 以一份应试用极简NewsList为例
基本思路:
首先要有数据类
然后要有一个布局
然后需要适配器从数据类得到填充好的布局
最后得到数据们,把他们放到Adapter里,再把Adapter放到ListView里
一、创建News数据类
创建几个字段:图片、标题、内容
然后创建两个构造方法:一个空的、一个全部赋值的
然后对每个字段分别实现get和set方法。
(这些如果使用kotlin只需要data关键字)
News.java
1 2 3 4 5 6 7 8 9 10 11 12 13 14 15 16 17 18 19 20 21 22 23 24 25 26 27 28 29 30 31 32 33 34 35 36 37 38 39 40 41 package com.example.mvvcpreview;public class News { private int mImage; private String mTitle; private String mContent; public News () { } public News (int image, String title, String content) { mImage = image; mTitle = title; mContent = content; } public int getmImage () { return mImage; } public String getmTitle () { return mTitle; } public String getmContent () { return mContent; } public void setmImage (int mImage) { this .mImage = mImage; } public void setmTitle (String mTitle) { this .mTitle = mTitle; } public void setmContent (String mContent) { this .mContent = mContent; } }
二、创建News的布局
news_item.xml
1 2 3 4 5 6 7 8 9 10 11 12 13 14 15 16 17 18 19 20 21 22 23 24 25 26 27 28 29 30 31 32 33 34 35 36 37 38 39 40 <?xml version="1.0" encoding="utf-8" ?> <androidx.constraintlayout.widget.ConstraintLayout xmlns:android ="http://schemas.android.com/apk/res/android" android:layout_width ="match_parent" android:layout_height ="match_parent" xmlns:app ="http://schemas.android.com/apk/res-auto" > <ImageView android:id ="@+id/news_image" android:layout_width ="75dp" android:layout_height ="75dp" app:layout_constraintLeft_toLeftOf ="parent" app:layout_constraintTop_toTopOf ="parent" app:layout_constraintBottom_toBottomOf ="parent" > </ImageView > <TextView android:id ="@+id/news_title" android:layout_width ="0dp" android:layout_height ="wrap_content" android:maxLines ="1" app:layout_constraintLeft_toRightOf ="@id/news_image" app:layout_constraintRight_toRightOf ="parent" app:layout_constraintTop_toTopOf ="@id/news_image" app:layout_constraintBottom_toTopOf ="@id/news_content" android:text ="我是这个新闻的标题" > </TextView > <TextView android:id ="@+id/news_content" android:layout_width ="0dp" android:layout_height ="0dp" app:layout_constraintLeft_toRightOf ="@id/news_image" app:layout_constraintTop_toBottomOf ="@id/news_title" app:layout_constraintBottom_toBottomOf ="@id/news_image" app:layout_constraintRight_toRightOf ="parent" android:text ="我是这个新闻的内容我是这个新闻的内容我是这个新闻的内容我是这个新闻的内容我是这个新闻的内容我是这个新闻的内容我是这个新闻的内容我是这个新闻的内容我是这个新闻的内容我是这个新闻的内容我是这个新闻的内容我是这个新闻的内容我是这个新闻的内容我是这个新闻的内容是这个新个新个新个新个新个新个新个新个新个新闻的内容" > </TextView > </androidx.constraintlayout.widget.ConstraintLayout >
三、创建适配器
NewsAdapter.java
1 2 3 4 5 6 7 8 9 10 11 12 13 14 15 16 17 18 19 20 21 22 23 24 25 26 27 28 29 30 31 32 33 34 35 36 37 38 39 40 41 42 43 44 45 46 47 48 49 50 51 52 package com.example.mvvcpreview;import android.view.LayoutInflater;import android.view.View;import android.view.ViewGroup;import android.widget.BaseAdapter;import android.widget.ImageView;import android.widget.TextView;import java.util.ArrayList;public class NewsAdapter extends BaseAdapter { private ArrayList<News> mData; private LayoutInflater mInflater; public NewsAdapter (LayoutInflater inflater, ArrayList<News> data) { mInflater = inflater; mData = data; } @Override public int getCount () { return mData.size(); } @Override public Object getItem (int i) { return null ; } @Override public long getItemId (int i) { return i; } @Override public View getView (int i, View view, ViewGroup viewGroup) { View newsView = mInflater.inflate(R.layout.news_item, null ); News news = mData.get(i); ImageView imageView = newsView.findViewById(R.id.news_image); TextView textView_title = newsView.findViewById(R.id.news_title); TextView textView_content = newsView.findViewById(R.id.news_content); imageView.setImageResource(news.getmImage()); textView_title.setText(news.getmTitle()); textView_content.setText(news.getmContent()); return newsView; } }
四、装入数据
MainActivity.java
1 2 3 4 5 6 7 8 9 10 11 12 13 14 15 16 17 18 19 20 21 22 23 24 25 26 27 28 29 30 31 32 33 34 35 36 37 38 package com.example.mvvcpreview;import androidx.appcompat.app.AppCompatActivity;import android.os.Bundle;import android.view.LayoutInflater;import android.widget.ListView;import java.util.ArrayList;import java.util.HashMap;import java.util.List;public class MainActivity extends AppCompatActivity { private ArrayList<News> mData; private ListView mListView; @Override public void onCreate (Bundle savedInstanceState) { super .onCreate(savedInstanceState); setContentView(R.layout.activity_main); mListView = findViewById(R.id.list_view); LayoutInflater inflater = getLayoutInflater(); initData(); NewsAdapter newsAdapter = new NewsAdapter (inflater, mData); mListView.setAdapter(newsAdapter); } private void initData () { mData = new ArrayList <News>(); for (int i = 0 ; i < 30 ; i ++ ) { News news = new News (R.mipmap.ic_launcher, "我是第" +i+"个新闻的标题" , "我是第" +i+"个新闻的内容" ); mData.add(news); } } }
补充 ListView
xmlns: xml namespace 注意app空间
一些ERROR解决方法 本文所提供方法仅保证能够work,不一定是最优的。
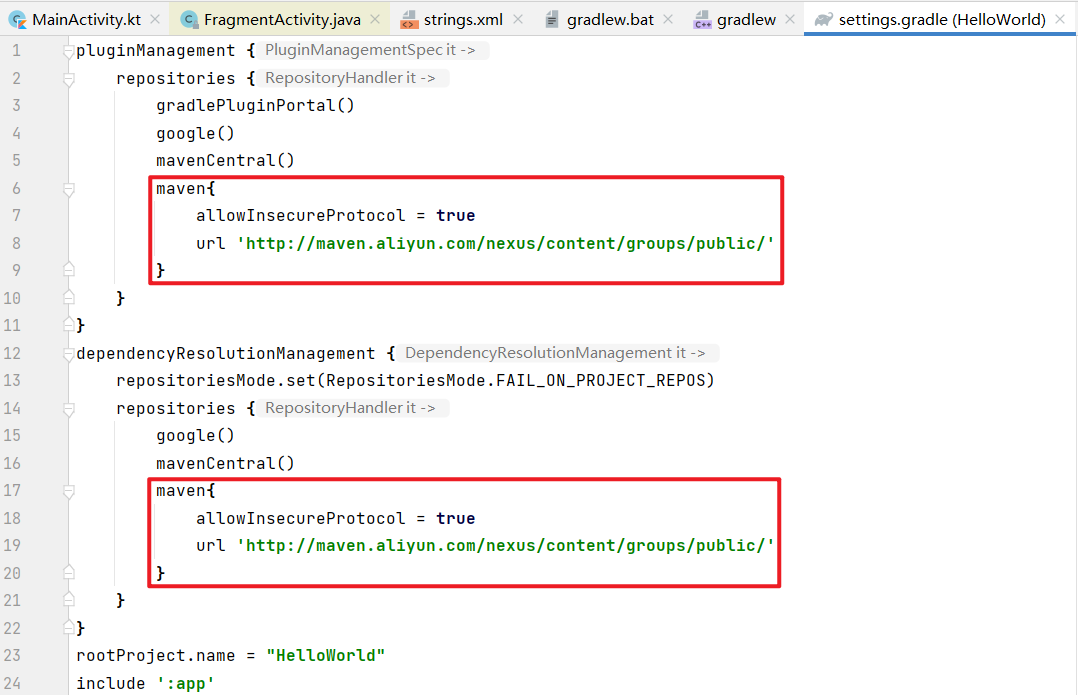
gradle下载依赖缓慢、timeout 方法一:在项目的settings.gradle中的repositories中添加国内镜像源,并允许使用不安全的仓库 。
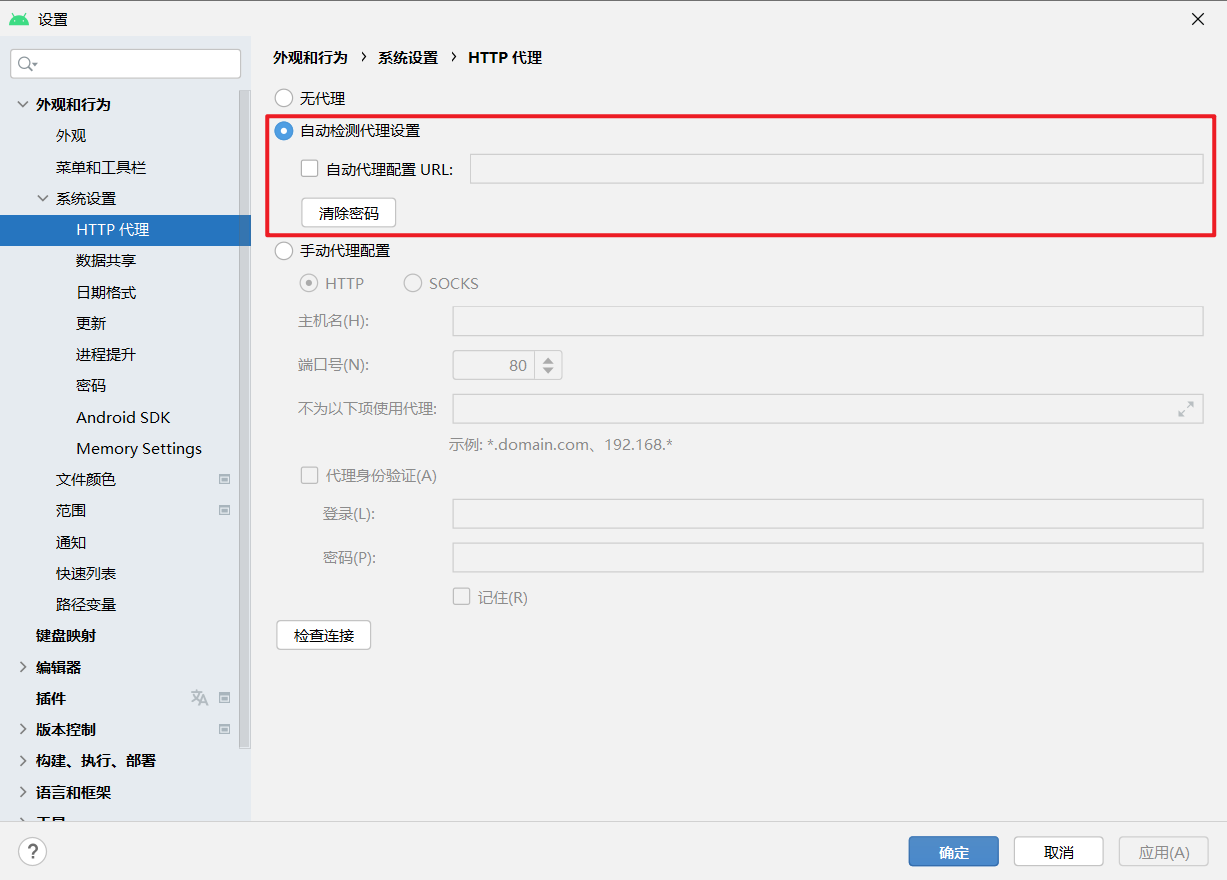
方法二:连接至世界互联网,不多说了。
一直Loading Devices 下载老版本的platform-tools,替换sdk manager自动下载的最新版本。
经测试最新的可用版本是platform-tools_r31.0.1-windows.zip
我的sdk目录:C:\Users\XuWanpeng\AppData\Local\Android\Sdk\platform-tools
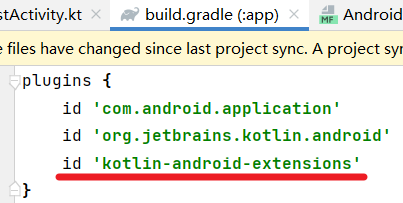
关于kotlin-android-extensions 详见《第一行代码——Android》作者郭霖的博客: kotlin-android-extensions插件也被废弃了?扶我起来
Android Studio 4.1之后,这个插件已经不会再被自动引入,已经被deprecated了。
当然,我们可以手动引入这个插件
但目前Google官方更推荐的,是使用view-binging
这里附上使用控件实例的三种方法
1 2 3 4 5 6 7 8 9 10 11 12 13 14 15 16 17 18 19 20 21 22 23 24 25 26 27 28 29 30 31 32 33 34 35 36 package com.example.activitytestimport androidx.appcompat.app.AppCompatActivityimport android.os.Bundleimport android.widget.Button import android.widget.Toastimport com.example.activitytest.databinding.FirstLayoutBinding class FirstActivity : AppCompatActivity () { private lateinit var binding: FirstLayoutBinding override fun onCreate (savedInstanceState: Bundle ?) super .onCreate(savedInstanceState) setContentView(R.layout.first_layout) binding = FirstLayoutBinding.inflate(layoutInflater) val view = binding.root setContentView(view) binding.button1.setOnClickListener { Toast.makeText(this , "You clicked Button1 by view-binding" , Toast.LENGTH_SHORT).show() } } }
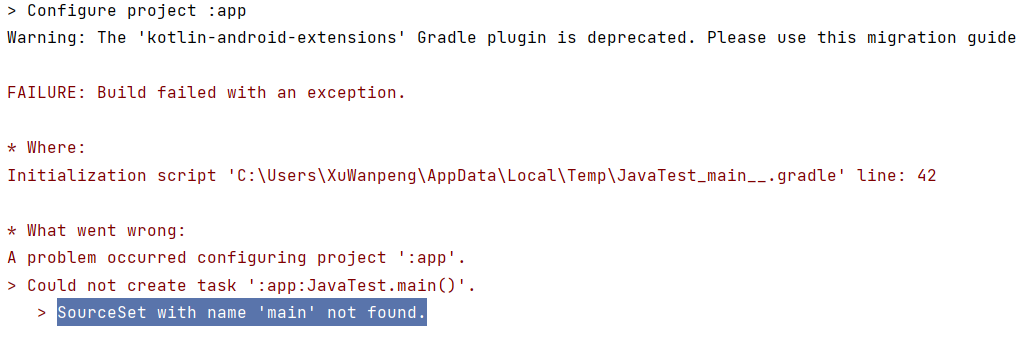
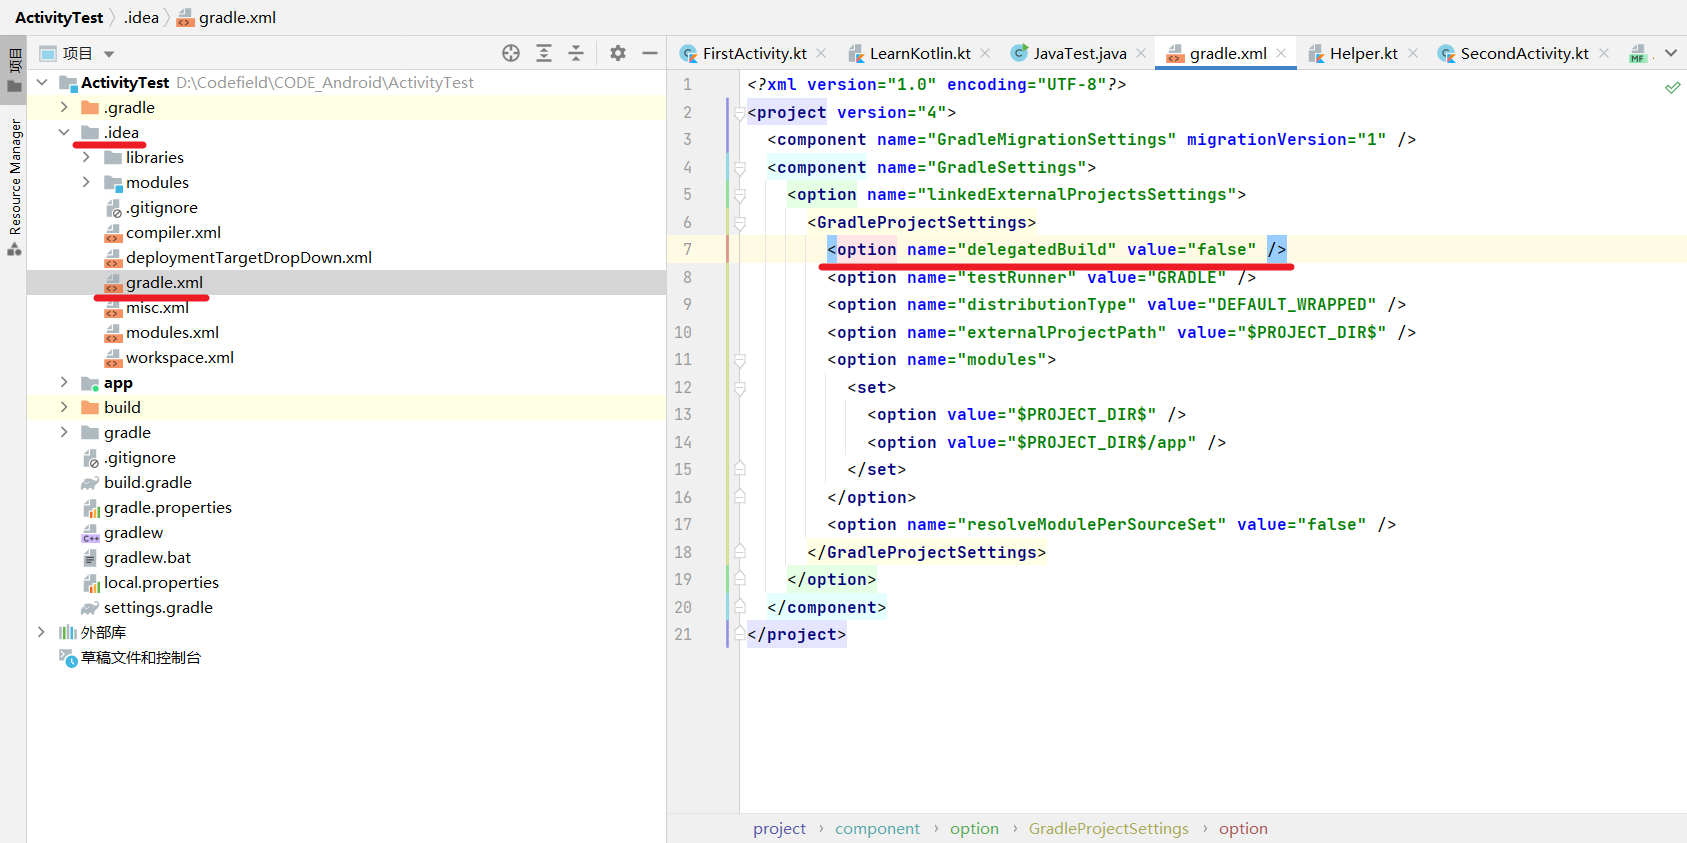
运行Java代码报错:SourceSet with name ‘main’ not found
在.idea文件夹下的gradle.xml文件中添加<option name="delegatedBuild" value="false" />,然后重新运行即可
adapterPosition返回-1 最后一行应直接返回已创建的viewHolder,不能两次调用ViewHolder()。
1 2 3 4 5 6 7 8 9 10 11 12 13 14 15 16 17 18 19 20 21 22 override fun onCreateViewHolder (parent: ViewGroup , viewType: Int ) val view = LayoutInflater.from(parent.context).inflate(R.layout.fruit_item, parent, false ) val viewHolder = ViewHolder(view) viewHolder.itemView.setOnClickListener { val position = viewHolder.absoluteAdapterPosition val fruit = fruitList[position] Toast.makeText(parent.context, "You clicked view ${fruit.name} " , Toast.LENGTH_SHORT).show() } viewHolder.fruitImage.setOnClickListener { val position = viewHolder.absoluteAdapterPosition val fruit = fruitList[position] Toast.makeText(parent.context, "You clicked image ${fruit.name} " , Toast.LENGTH_SHORT).show() } return viewHolder }
kotlin学习 基础知识 个人感觉:kotlin像一个”exJava”,将其很多难用的功能封装了起来,上手很快。
可继承类open(kotlin官方认为所有数据类型最好是final的,如果不显式强调“可继承”、“可重新赋值”,那么就是final的)
Person.kt
1 2 3 4 5 6 7 package com.example.helloworldopen class Person (var name: String, var age: Int ) { fun eat () println("$name is eating. He is $age years old." ) } }
接口、默认实现
Study.kt
1 2 3 4 5 6 7 8 package com.example.helloworldinterface Study { fun readBooks () fun doHomework () println("do homework default implementation." ) } }
继承、实现接口(同样不可以多继承)、主次构造函数(把一堆重载的构造函数分了主次,次必须调用主)
Student.kt
1 2 3 4 5 6 7 8 9 10 11 12 13 14 15 16 17 package com.example.helloworldclass Student (val sid: String, val grade: Int , name: String, age: Int ) : Person(name, age), Study { init { println("sid is: $sid , grade is: $grade , name is: $name , age is: $age " ) } constructor (name: String, age: Int ) : this ("" , 0 , name, age) constructor () : this ("" , 0 ) override fun readBooks () println("$name is reading." ) } }
数据类(不用手动实现equals()、hashCode()、toString()了)
CellPhone.kt
1 2 3 package com.example.helloworlddata class Cellphone (val brand: String, val price: Double )
单例类(不用再写if判断是否第一次调用了)
Singleton.kt
1 2 3 4 5 6 7 package com.example.helloworldobject Singleton { fun singletonTest () println("singletonTest is called" ) } }
LearnKotlin.kt
1 2 3 4 5 6 7 8 9 10 11 12 13 14 15 16 17 18 19 20 21 22 23 24 25 26 27 28 29 30 31 32 33 34 35 36 37 38 39 40 41 42 43 44 45 46 47 48 49 50 51 52 53 54 55 56 57 58 59 60 61 62 63 64 65 66 67 68 69 70 71 72 73 74 75 76 77 78 79 80 81 82 83 84 85 86 87 88 89 90 91 92 93 94 95 96 97 98 99 100 101 102 103 104 105 106 107 108 109 110 111 112 113 114 115 116 117 package com.example.helloworldfun largerNumber (num1: Int , num2: Int ) if (num1 > num2) num1 else num2fun doStudy (study : Study ?) if (study != null ) { study.readBooks() study.doHomework() } else { println("object is null" ) } } fun main () println("Hello, Kotlin!" ) val a = 37 val b = 40 val value = largerNumber(a, b) println("larger number is: $value " ) val p = Person("Jack" , 19 ) p.eat() val student1 = Student() val student2 = Student("Jack" , 19 ) val student3 = Student("a123" , 5 , "Jack" , 19 ) doStudy(student2) val cellphone1 = Cellphone("Samsung" , 1299.99 ) val cellphone2 = Cellphone("Samsung" , 1299.99 ) println(cellphone1) println("cellphone1 equals cellphone2: ${cellphone1 == cellphone2} " ) Singleton.singletonTest() val list = listOf("Apple" , "Banana" , "Orange" , "Pear" , "Grape" ) for (fruit in list) { println(fruit) } println() val mutableList = mutableListOf("Apple" , "Banana" , "Orange" , "Pear" , "Grape" ) mutableList.add("Watermelon" ) for (fruit in mutableList) { println(fruit) } println() val set = setOf("Apple" , "Banana" , "Orange" , "Pear" , "Grape" , "Apple" ) for (fruit in set ) { println(fruit) } println() val mutableSet = mutableSetOf("Apple" , "Banana" , "Orange" , "Pear" , "Grape" , "Apple" ) mutableSet.add("Watermelon" ) for (fruit in mutableSet) { println(fruit) } println() val map = mapOf("Apple" to 1 , "Banana" to 2 , "Orange" to 3 , "Pear" to 4 , "Grape" to 5 ) for ((fruit, number) in map) { println("fruit is $fruit , number is $number " ) } println() val mutableMap = mutableMapOf("Apple" to 1 , "Banana" to 2 , "Orange" to 3 , "Pear" to 4 , "Grape" to 5 ) mutableMap["Watermelon" ] = 6 for ((fruit, number) in mutableMap) println("fruit is $fruit , number is $number " ) println() val maxLengthFruit = mutableList.maxByOrNull { it.length } println("max Length fruit is $maxLengthFruit " ) println() val newList = list.filter { it.length <= 5 } .map { it.uppercase() } for (fruit in newList) { println(fruit) } println() val anyResult = list.any { it.length <= 5 } val allResult = list.all { it.length <= 5 } println("anyResult is $anyResult , allResult is $allResult " ) println() Thread { println("Thread is running" ) }.start() doStudy(null ) }
标准函数、静态方法 标准函数with、run和apply with的使用像一个静态方法,需要传入object和lambda,可能需要判空。
run的功能类似with,是一个实例方法,用object调用它,只需要传入lambda,优点是可以使用?.判空。(这一点又类似let)
apply类似run,但它的lambda语句块不将最后一行作为返回值。
1 2 3 4 5 6 7 8 9 10 11 12 13 14 15 16 17 18 19 20 21 22 23 24 25 26 27 28 29 30 31 32 33 34 35 36 37 38 39 40 41 42 43 package com.example.activitytestimport java.lang.StringBuilderfun main () val list = listOf("Apple" , "Banana" , "Orange" , "Pear" , "Grape" ) val result = with(StringBuilder()) { append("Start eating fruits.\n" ) for (fruit in list) { append(fruit).append('\n' ) } append("Ate all fruits" ) toString() } println(result) println() val list2 = listOf("Apple" , "Banana" , "Orange" , "Pear" , "Grape" ) val result2 = StringBuilder().run { append("Start eating fruits.\n" ) for (fruit in list2) { append(fruit).append('\n' ) } append("Ate all fruits" ) toString() } println(result2) println() val list3 = listOf("Apple" , "Banana" , "Orange" , "Pear" , "Grape" ) val result3 = StringBuilder().apply { append("Start eating fruits.\n" ) for (fruit in list3) { append(fruit).append('\n' ) } append("Ate all fruits" ) } println(result3.toString()) println() doSomething() }
静态方法 kotlin中极力弱化了静态方法,官方推荐使用单例类 和伴生类(companion object) 中的实例方法以尽可能地模拟静态方法。
但kotlin官方也提供了两种静态方法的实现方式:注解 (@JvmStatic)和顶层方法
顶层方法:
Helper.kt
1 2 3 4 5 package com.example.activitytestfun doSomething () println("do something" ) }
JavaTest.java
1 2 3 4 5 6 7 8 9 10 11 12 13 14 package com.example.activitytest;public class JavaTest { public void invokeStaticMethod () { HelperKt.doSomething(); } public static void main (String[] args) { HelperKt.doSomething(); JavaTest javaTest = new JavaTest (); javaTest.invokeStaticMethod(); } }
output
1 2 do something do something
注意:kotlin编译器在很多情况下都会将源文件及其后缀 编译为大驼峰命名法 的形式。
延迟初始化、密封类 延迟初始化 首先我们来看这样一段代码:
1 2 3 4 5 6 7 8 9 10 11 12 13 14 15 16 17 class MainActivity : AppCompatActivity (), View.OnClickListener{ ... private var adapter: MsgAdapter? = null ... override fun onCreate (savedInstanceState: Bundle ?) ... adapter = MsgAdapter(msgList) ... } override fun onClick (v: View ?) ... adapter?.notifyItemInserted(msgList.size - 1 ) ... } }
这里是通过对本类实现事件处理接口 来实现鼠标点击监听器的,因程序自身逻辑,在onCreate和onClick两个方法中都会用到同一个变量adapter。
那么我们首先应在类中将adapter赋值为null,同时把它的类型声明成MsgAdapter?,?代表允许为空。
但这样就带来了一个问题,既然类型是可能为空的MsgAdapter?,那么在使用这个变量的方法时也要不断地使用?.对其判空,可以想象,当工程量变大时,这个可能为空的变量会带来多少个?.和?:。
有一种办法可以解决这个问题:使用lateinit关键字,对变量进行延迟初始化
1 2 3 4 5 6 7 8 9 10 11 12 13 14 15 16 17 class MainActivity : AppCompatActivity (), View.OnClickListener{ ... private lateinit var adapter: MsgAdapter ... override fun onCreate (savedInstanceState: Bundle ?) ... adapter = MsgAdapter(msgList) ... } override fun onClick (v: View ?) ... adapter.notifyItemInserted(msgList.size - 1 ) ... } }
使用这个关键字后,就可将变量中的?去掉,代表它是一个延迟初始化的非空变量。后续调用其方法时也不再需要使用?.对其进行空检查。
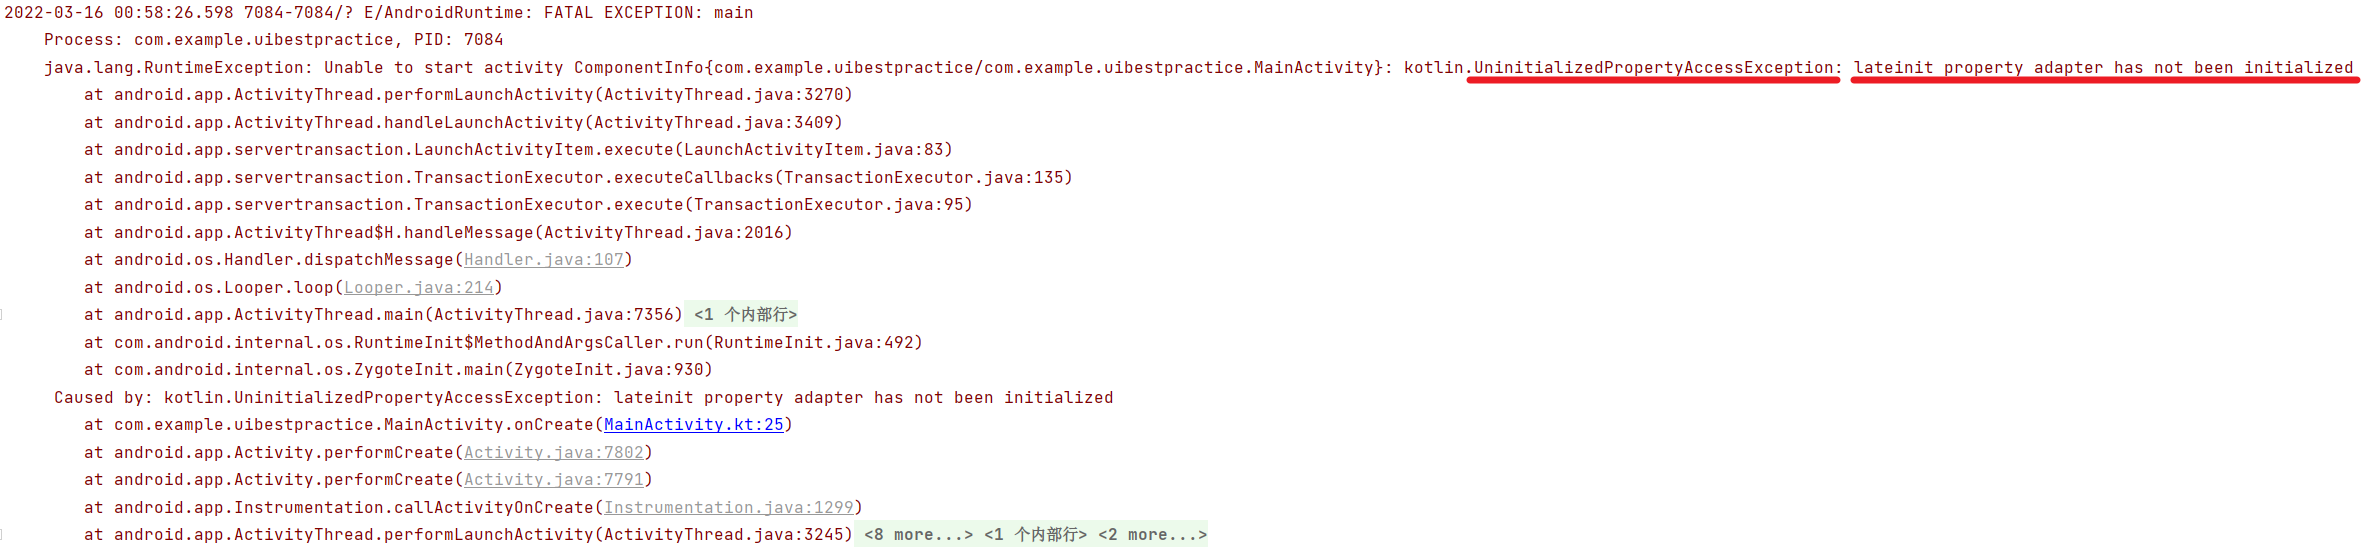
但这样是有风险的,因为kotlin编译器相信开发者会在对变量赋值后再调用它的方法,所以如果开发者没有这样做,编译器只能在编译时才能爆出UninitializedPropertyAccessException
所以若你对一个全局变量使用了lateinit关键字,请确保它在被调用之前已完成了初始化工作。
另外,我们可以检查lateinit var是否被初始化,方法是在它的属性引用 上使用.isInitialized
属性引用我觉得可以单开一小节,这里我们只需要知道
要将属性作为 Kotlin 中的一等对象访问,请使用::运算符
接着我们可以得到这样的代码:
1 2 3 4 5 6 7 8 9 10 11 12 13 14 15 16 17 18 class MainActivity : AppCompatActivity (), View.OnClickListener{ ... private lateinit var adapter: MsgAdapter ... override fun onCreate (savedInstanceState: Bundle ?) ... if (!::adapter.isInitialized) adapter = MsgAdapter(msgList) ... } override fun onClick (v: View ?) ... adapter.notifyItemInserted(msgList.size - 1 ) ... } }
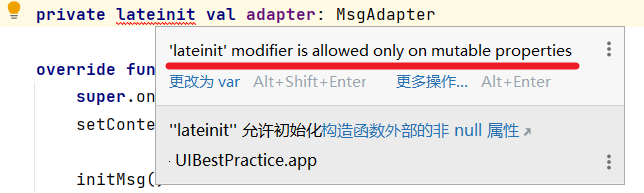
最后,即使采用这些方法后lateinit var只被初始化了一次,但我们仍不能将lateinit作用于val。
补充:?.只会对可能为空的变量生效
补充:依賴注入(Dependency Injection)
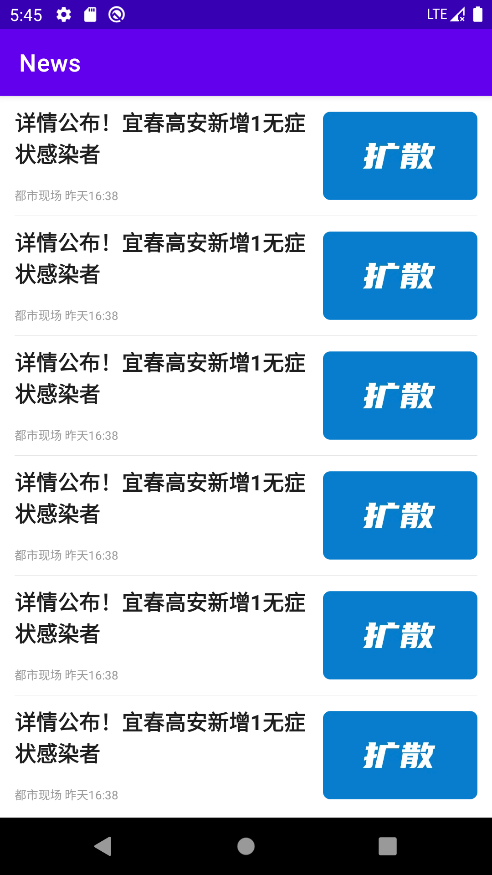
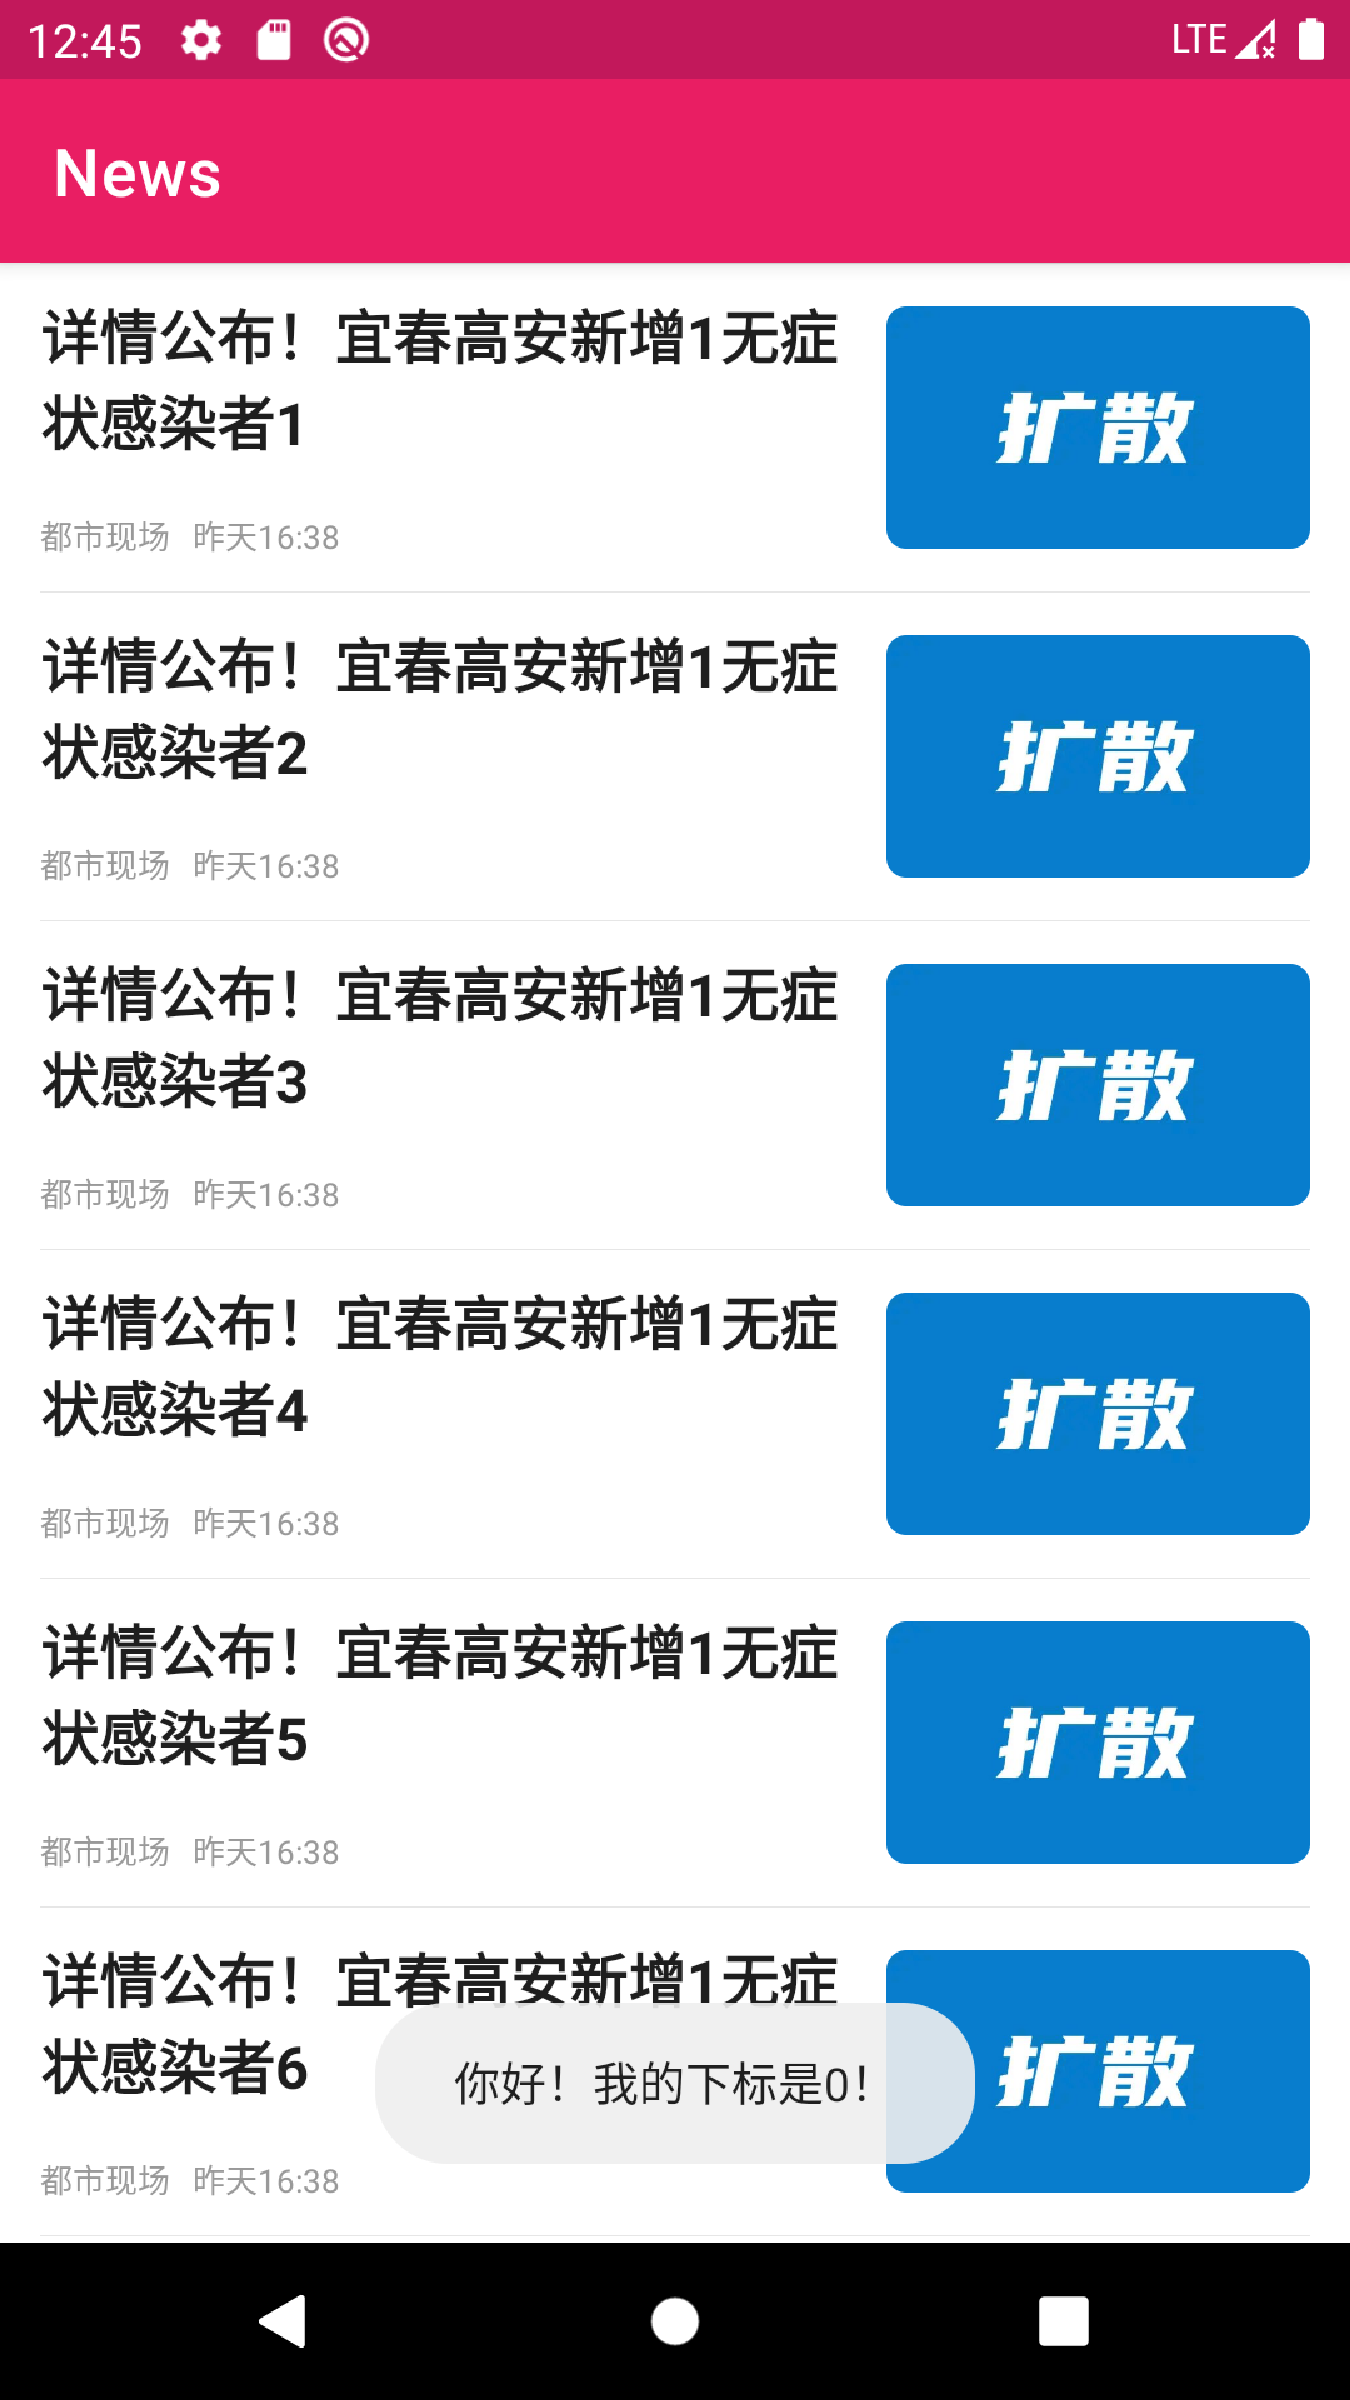
密封类 开发一个新闻项目 第一次开发 参考腾讯新闻,使用Snipaste截图软件可以估算每个item的px,2px = 1dp,同时也可以查看像素点的RGB色相(神奇,我才发现)
关于怎样安装本地APK(但是不能安装腾讯新闻,似乎因为它是x86的)
https://waylau.com/android-studio-emulator-install-app/
首先打开腾讯新闻
发现每条新闻的大概是这样的
我们先照着它扒一个item下来
1 2 3 4 5 6 7 8 9 10 11 12 13 14 15 16 17 18 19 20 21 22 23 24 25 26 27 28 29 30 31 32 33 34 35 36 37 38 39 40 41 42 43 44 45 46 47 48 49 50 51 52 53 54 55 56 57 58 59 60 61 <?xml version="1.0" encoding="utf-8" ?> <LinearLayout xmlns:android ="http://schemas.android.com/apk/res/android" xmlns:tools ="http://schemas.android.com/tools" android:layout_width ="match_parent" android:layout_height ="100dp" xmlns:app ="http://schemas.android.com/apk/res-auto" android:orientation ="vertical" android:paddingLeft ="12dp" android:paddingRight ="12dp" > <View android:layout_width ="match_parent" android:layout_height ="0.5dp" android:background ="#E6E6E6" /> <LinearLayout android:layout_width ="match_parent" android:layout_height ="match_parent" android:paddingTop ="10dp" android:paddingBottom ="10dp" > <RelativeLayout android:layout_width ="0dp" android:layout_height ="match_parent" android:layout_weight ="2" > <TextView android:layout_width ="wrap_content" android:layout_height ="wrap_content" android:layout_alignParentTop ="true" android:text ="详情公布!宜春高安新增1无症状感染者" android:textColor ="#1E1E1E" android:textSize ="18sp" android:textStyle ="bold" /> <TextView android:layout_width ="wrap_content" android:layout_height ="wrap_content" android:layout_alignParentBottom ="true" android:text ="都市现场 昨天16:38" android:textColor ="#999999" android:textSize ="10sp" tools:ignore ="SmallSp" /> </RelativeLayout > <com.makeramen.roundedimageview.RoundedImageView android:layout_width ="0dp" app:riv_corner_radius ="6dp" android:layout_height ="match_parent" android:layout_weight ="1" android:src ="@drawable/news_image" > </com.makeramen.roundedimageview.RoundedImageView > </LinearLayout > <View android:layout_width ="match_parent" android:layout_height ="0.5dp" android:background ="#E6E6E6" /> </LinearLayout >
圆角部分在github上面找了一个库RoundedImageView
效果不错,明天再做。
第二次开发 上次开发只是为了测试item的效果,使用了ScrollView-LinearLayout-layout*n这种结构
这次使用RecyclerView对主界面进行重构。
来研究一下ScrollView、ListView和RecyclerView的区别:
ScrollView:A view group that allows the view hierarchy placed within it to be scrolled.(一个视图组,允许被放置在它里面的视图滚动) 它非常适合处理需要滚动的不规则 视图的组合 。也就是说,这种View最主要的工作,就是让一个 显示不下的View可以滚动以显示完全。
ListView:Displays a vertically-scrollable collection of views, where each view is positioned immediatelybelow the previous view in the list.(显示一个可垂直滚动的视图集合,其中每个视图都位于列表中前一个视图的正下方)从这个描述中可以看出,这种View显示一个View集合,而集合中都是相同类型的元素(例如ArrayList<news>,元素是对象),所以它适用于处理需要滚动的规则 视图的集合 。也就是说,这种View最主要的工作就是让一个数据集合垂直滚动。
RecyclerView:A flexible view for providing a limited window into a large data set.(一个灵活的视图,提供有限的窗口给大型数据集)从描述上看,好像也只多了“灵活的”、“大型”这两个定语。事实上,这两个定语对于ListView来说是一种巨大的提升。相较于ListView,“灵活的”体现在RecyclerView可以水平滚动、拥有瀑布流布局等,“大型”体现在其使用了四级缓存机制,有效地提高了性能。它的编写更加规范化,这也提高了编写的成本。总而言之,这种View用于让大型 数据集拥有多样的展示方式 ,它兼容并包,胜任几乎所有工作。
注意:使用ScrollView的界面滑动时右侧会有滚动条,很好辨别。
既然RecyclerView显示数据集,那么首先我们要有数据
定义Model.kt
1 data class News (val title: String, val description: String, val imageURL: String)
要让一个类包含图片,可以把图片的URL作为类的字段。
把使用到的图片上传到我的图床以获取URL。
https://testingcf.jsdelivr.net/gh/WanpengXu/myPicGo/img/202203281026613.png
有数据类了当然也要有数据对象的集合
定义一个List,在里面构造几个对象。
1 2 3 4 5 6 7 8 9 10 11 12 13 14 15 16 17 18 private val newsList = listOf( News( "详情公布!宜春高安新增1无症状感染者1" , "都市现场 昨天16:38" , "https://testingcf.jsdelivr.net/gh/WanpengXu/myPicGo/img/202203281026613.png" ), News( "详情公布!宜春高安新增1无症状感染者2" , "都市现场 昨天16:38" , "https://testingcf.jsdelivr.net/gh/WanpengXu/myPicGo/img/202203281026613.png" ), ... News( "详情公布!宜春高安新增1无症状感染者10" , "都市现场 昨天16:38" , "https://testingcf.jsdelivr.net/gh/WanpengXu/myPicGo/img/202203281026613.png" ) )
接下来就要导入RecyclerView
在activity_main中添加它
1 2 3 4 <androidx.recyclerview.widget.RecyclerView android:id ="@+id/news_recycler_view" android:layout_width ="match_parent" android:layout_height ="match_parent" />
接着在创建Activity的同时把它初始化,在onCreate()方法中添加
1 2 3 val newsRecyclerView = findViewById<RecyclerView>(R.id.news_recycler_view) newsRecyclerView.layoutManager = LinearLayoutManager(this ) newsRecyclerView.adapter = NewsAdapter(newsList)
其中,LinearLayoutManager就要按参数类型context传入实参,它译作“上下文”,是一个抽象类,它的继承关系如下:
我们最经常填入的是Activity的子类MainActivity,对于该类型的参数,我们有三种经常使用的方式:
在MainActivity类中:直接填入this
方法接受了parent参数:可填入parent.context
在其他类中:将其作为MainActivity的内部类,填入this@MainActivity
全局Context:
新建这样一个类
1 2 3 4 5 6 7 8 9 10 11 class MyApplication : Application () { companion object { @SuppressLint("StaticFieldLeak" ) lateinit var context: Context } override fun onCreate () super .onCreate() context = baseContext } }
然后在AndroidManifest.xml中指定它为程序启动时初始化的类,加入android:name=".MyApplication"
这样就可以使用MyApplication.context获取全局Context了。
(详见《第一行代码》Chap14)
接着,我们需要创建之前用到的类NewsAdapter,如下:
1 2 3 4 5 6 7 8 9 10 11 12 13 14 15 16 17 18 19 20 21 22 23 24 25 26 27 28 29 30 31 32 33 34 35 36 37 38 39 40 41 inner class NewsAdapter (private val newsList: List<News>) : RecyclerView.Adapter<NewsAdapter.NewsViewHolder>() { inner class NewsViewHolder (itemView: View) : RecyclerView.ViewHolder(itemView) { val title: TextView = itemView.findViewById(R.id.news_title) val description: TextView = itemView.findViewById(R.id.news_description) val image: com.makeramen.roundedimageview.RoundedImageView = itemView.findViewById(R.id.news_image) } override fun onCreateViewHolder (parent: ViewGroup , viewType: Int ) val itemView = LayoutInflater.from(parent.context) .inflate(R.layout.news_item_one_image, parent, false ) return NewsViewHolder(itemView) } override fun onBindViewHolder (holder: NewsViewHolder , position: Int ) val news = newsList[position] holder.title.text = news.title holder.description.text = news.description Glide.with(this @MainActivity ).load(news.imageURL).into(holder.image) holder.itemView.setOnClickListener { "你好!我的下标是${holder.adapterPosition} !" .showToast() } } override fun getItemCount () }
ViewHolder是一个类,它用于获取一个视图、对该视图内的控件进行绑定,对其实例化后可通过方法调用符.直接对视图的属性赋值,避免了多次调用findViewById()。(大概这个意思)
创建工具方法String.showToast()可以让弹窗变得简单,在package下新建/Util/ToastUtil.kt,填入
1 2 3 4 5 6 7 fun String.showToast () Toast.makeText( MyApplication.context, this , Toast.LENGTH_SHORT ).show() }
即可。
关于更换主题色:在/res/values目录下,colors.xml中可以存储颜色,themes.xml可以使用颜色。选取颜色可以先随便输入一串RGB(如#ffffff)然后点左边的颜色进行高级取色。
感觉不错,晚上再做。
第三次开发 …(很多次开发) 成果 本应用采用kotlin语言编写,模仿了《腾讯新闻》及《哔哩哔哩》客户端。
打开app,进入MainActivity。
首先,app对状态栏和导航栏(虚拟按键)做了沉浸式优化。
自上而下看,
首先是一个AppBarLayout,内含用户头像、搜索框和两个装在toolbar中的按钮。
当点击搜索框时,会弹出SearchActivity,你可以点击这里进行新闻搜索。
接下来是一行TabLayout,当新闻种类超出屏幕范围时,它可以横向滚动查看其他种类的新闻。
接下来是一个news_fragment,包含SwipeRefreshLayout-RecyclerView 结构以实现可下拉刷新的滑动新闻列表,可以点击列表项弹出ContentActivity以查看新闻。
ContentActivity中加入了home按钮(左上角箭头)可以在递归刷新闻过深时(要按很多次返回键)直接finish该Activity。
接着是一个自定义底部导航栏bottomNav,该导航栏会在启动时直接加载至fragment_home,可通过点击其他item切换至其他fragment。
因作业主要内容是实现一个新闻列表,所以其他两个fragment还没怎么做,目前能点一点按钮。
注:因京东API每日获取新闻不超过1000条,每次启动APP会获取70条新闻,所以若一天中打开了15次及以上,我写了一个catch将其捕获后Toast。